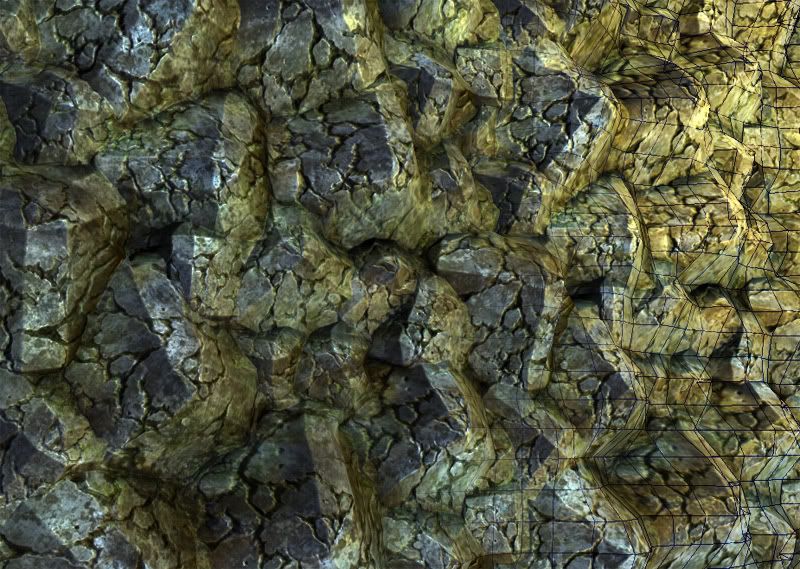
heres a tutorial showing a workflow i developed for creating perfectly tiling meshes in zbrush for things like cliffs that are baked down onto low poly meshes that follow the normal maps mesh
thanks for the tutorial!
sorry Im not to sure about some stuff, I might just be being stupid
why is it necessary to use the centre of the mesh only?
if youve exported that displacement map from zbrush cant you just make the displacement map tile in photoshop and then put it onto the plane in zbrush and be done with it?
Ged- you could but there are a few reasons i do it like this,
1- you can see the shapes your working with in 2.5d which i think is better
2- the x2 thing allows you to sculpt in to mesh after displacing without causeing any seams at all you just need to remembr to make each bruch you use warp x2 if you go over the edge
3- displacing a mesh using a height map x1 can give you tiny artefacts at the seams, which you then have to clean up = more work that way
4- you can only sculpt in z after doing a displacement and smoothing near an edge is a no-no this way gives you freedom to do anything to it
5- offsetting the mesh and making it tile in zbrush is quicker
basically this workflow may seam convoluted but gives perfect results if followed with the least amount of fixes needed, and once you get it down its not that complex
will fix the tut so i actually say ~ as peeps dont know what it is, had to look it up myself
cool man, but you don't have to apply it to plane, after its tilable, just select the normal rgb material, turn off shadows in the render tab, and turn off zadd and zsub and make sure mrgb is on, and then just paint out the normal map onto the canvas, export document and thats it.
if you went to the trouble of painting your starter rock, before you make the normal map, you can turn on flat and turn off shadows in render and export color map as well. but you have to do this first as when you apply the normal material you cant get your color information back. but make sure and turn flat pack to preview before making your normals or it will just be all white
****edit****
actually you can just undo a few time to get your color information back if you want to capture color after normals.
-you dnont get a lowpoly mesh out of it only a flat tilable normal map, which is ok but this looks ace on cliffsurfaces as the lowpoly contors match the HP and the lows normals are bent so the low polys smoothing is invisible
-the mesh can be sculpted after
-you can add parts into it
- you can take two of these meshes and blend between them to create transition peices
Maybe i need to explain what the purpose and scope of this a bit more?
ok this took me two minutes in maya, just duplicated the mesh a few times and welded together bent it round to make a tube and then bent that, apart from a little stretching which could be worked out, hope it shows what can be acheived once you have one peice, now if i made a section that tiled with the rest but had a sandy path down it....
damn dude...the path blends into the rock really nice. I'm guessing you made a second texture to achieve this, rather than blending it? works really well.....
thanks for the Tutorial and explaining why and how the steps work, Im sure it will be a help later Ive not done much low poly enviro work so its hard to understand why things work the way they do sometimes.
im glad to help, i will make a follow up tut at some point on how to sculpt joining parts, but first i have to develope a more consistent approach my current one involves alot of whoopses and buggers that aint going to works, which isnt great when trying to explain
I'm trying to figure out a consistent approach myself, I still get lots of edge artifacts if I move the mesh in too far...which I usually end up photoshopping out instead of actually fixing. not an exact science really. :P
Sheperio: Fantastic tutorial man, It was a bit hard to follow at times (I suppose a few more images of the work flow would help...it's probably because i'm more of a mudbox user).
Replies
Since you asked for it in the other thread, there's a typo on stage 1. create. (also the I maybe in caps?)
edit: Also, stage 2 "-type in a value into intensity(I used ten, seams...) should be seems.
is that it?
sorry Im not to sure about some stuff, I might just be being stupid
why is it necessary to use the centre of the mesh only?
if youve exported that displacement map from zbrush cant you just make the displacement map tile in photoshop and then put it onto the plane in zbrush and be done with it?
In my qwerty keyboard it's right below escape, so it's ctrl + `.
1- you can see the shapes your working with in 2.5d which i think is better
2- the x2 thing allows you to sculpt in to mesh after displacing without causeing any seams at all you just need to remembr to make each bruch you use warp x2 if you go over the edge
3- displacing a mesh using a height map x1 can give you tiny artefacts at the seams, which you then have to clean up = more work that way
4- you can only sculpt in z after doing a displacement and smoothing near an edge is a no-no this way gives you freedom to do anything to it
5- offsetting the mesh and making it tile in zbrush is quicker
basically this workflow may seam convoluted but gives perfect results if followed with the least amount of fixes needed, and once you get it down its not that complex
will fix the tut so i actually say ~ as peeps dont know what it is, had to look it up myself
if you went to the trouble of painting your starter rock, before you make the normal map, you can turn on flat and turn off shadows in render and export color map as well. but you have to do this first as when you apply the normal material you cant get your color information back. but make sure and turn flat pack to preview before making your normals or it will just be all white
****edit****
actually you can just undo a few time to get your color information back if you want to capture color after normals.
-you dnont get a lowpoly mesh out of it only a flat tilable normal map, which is ok but this looks ace on cliffsurfaces as the lowpoly contors match the HP and the lows normals are bent so the low polys smoothing is invisible
-the mesh can be sculpted after
-you can add parts into it
- you can take two of these meshes and blend between them to create transition peices
Maybe i need to explain what the purpose and scope of this a bit more?
2 peices
furthers that is worth the extra effort.
I'm trying to figure out a consistent approach myself, I still get lots of edge artifacts if I move the mesh in too far...which I usually end up photoshopping out instead of actually fixing. not an exact science really. :P
keep up the great work
"- you can take two of these meshes and blend between them to create transition peices"
Great work BTW!
This technique is still relevant in 2011? ; )