mopKnit v1.1 for Maya
Hey folks,
Inspired by the slideKnit Maxscript which EricChadwick linked to recently, I figured Maya deserved something similar.
Basically it breaks a polygon mesh along its UV seams and deforms it to the UV layout in world space, creating a blendShape which you can use to transform it back to the original shape.
This means you can have a complex/organic modelled shape with a very straight and neat UV layout, then to add complex geometry you can just model it in a straight line, use mopKnit to set up the UV shape, then use Maya's own Wrap deformers to attach your geometry to the layout surface, and blend back to the original shape.
Here's an example of how it might be used. Image by Greg Petchkovsky, using a similar method in 3dsmax.
Download mopKnit v1.1 here!
Usage:

As far as I can tell, there's only one real issue to be fixed so far - it doesn't weld up the edges which it splits to get the UV shape. It's not a big issue, it certainly doesn't stop the script from being useful, but it's a "neatness" thing that I'm going to look at sorting out later.
Obviously, if anyone runs into any bugs or issues, let me know and I'll try to fix them ASAP.
Enjoy!
Inspired by the slideKnit Maxscript which EricChadwick linked to recently, I figured Maya deserved something similar.
Basically it breaks a polygon mesh along its UV seams and deforms it to the UV layout in world space, creating a blendShape which you can use to transform it back to the original shape.
This means you can have a complex/organic modelled shape with a very straight and neat UV layout, then to add complex geometry you can just model it in a straight line, use mopKnit to set up the UV shape, then use Maya's own Wrap deformers to attach your geometry to the layout surface, and blend back to the original shape.
Here's an example of how it might be used. Image by Greg Petchkovsky, using a similar method in 3dsmax.
Download mopKnit v1.1 here!
Usage:
- Unzip the two .mel files into your Maya scripts folder in My Documents.
- Launch Maya.
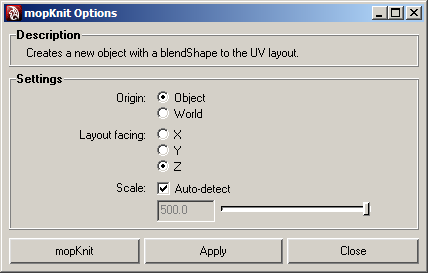
- To get the options window, type "mopKnitOptions;" into the command line to get the Options window. These settings are saved across Maya sessions.
- Type "mopKnit;" into the command line to run the script with whatever settings were chosen in the Options window.
- You can assign these commands to hotkeys or shelf buttons.
- You should see new object(s) created, if you select it and look in the Channel Box, you'll see a "mopKnit_blendShape" node.
- Adjust the "mopKnit_SourceShape" value to blend between the UV layout and the original shape.

As far as I can tell, there's only one real issue to be fixed so far - it doesn't weld up the edges which it splits to get the UV shape. It's not a big issue, it certainly doesn't stop the script from being useful, but it's a "neatness" thing that I'm going to look at sorting out later.
Obviously, if anyone runs into any bugs or issues, let me know and I'll try to fix them ASAP.
Enjoy!

Replies
Nicely done mate - it's been a good week for knitted jumpers
I've updated the script to v1.1 - added an option to place the resulting mesh relative to the object or the world (object is by default, I think it's the most useful one), also increased the slider/field value to a maximum of 500, 100 seemed a bit limiting.
and lol at knitted jumper.. nice
or would be link seams to be broken for me :-(
http://www.monkeylab.com.au/rd/Plugin_MonkeyDecorate/MonkeyDecorate_Documentation.htm
Much appreciated, this tool can be very handy
Hey, MoP, just wondering if this script is available anywhere still. The link 404s, but it looks like an awesome tool!
https://dl.dropbox.com/u/2360554/Fourms%20Stuff/polycount/mopKnit.zip
Glad so many people have the sense to save scripts like this on cloud storage.
Any chance to re-upload the script?
Thanks
If not, is there some kind of a manual way to do it, to get the UV object with blend shape deformer?
Surely there are better ways of achieving these results out there now? I can't believe that a 10-year-old script is still the best solution...
Either way, I apologise for not maintaining the links - many thanks to those who have kept the dream alive by reposting the zip file!
I've fixed the links in the original post now so the image and download are back!
@Niknesh: I haven't tested this script in about 8 years and I'm only up to Maya 2017 at the moment, so I can't guarantee compatibility with 2018, but it should work.
To be honest, I feel like I should rewrite this in Python now and aim to improve the speed of it ... might be a fun little project for an evening or weekend. If I do, I'll post it here.
Time passes so quickly
By the way, I did find a solution, more of a workaround with Transform attributes. It does the same job...and I forgot to post it here...
I''ll see if I can make some pictures in a couple of day.
In any case, your script handles things like a breeze, unlike this workaround that I have mentioned. I believe that's why people request it even today, because it's good stuff to have.
I saw this video a while ago, which about retopology with Transfer Attributes and I applied the same logic in order to mimic your mopKnit.
To summarize it, I used wrap deformer, which was applied on a mesh before transferring it to the object of choice. Same as in that video, I did that part of the UV in order to tell it where to attach the shape. It boils down to the same principle as the script.
Here's a picture better explaining it. I wonder if admins will kill me because of it's size.
Hope this helps for the people who are struggling without the script currently.
"Documents/maya/2016/scripts/mopKnit.mel line 34: This command requires at least 1 argument(s) to be specified or selected; found 0"
Anyone got any ideas how to get past this?
Thanks!
Matt