approach to techy stuff

high dynamic range
I was wondering if its best to just bevel some edges and leave the default low poly shading, then add normal map details with nvidia plugin.
Or I could mesh smooth and bake from the high poly. Any tips or advice welcome
I tried the baking method and it seemed the amount of time taken was not worth the results I got.
Trying to project a high poly round edges object on to a more angular low poly object is a bit
problematic
Results are scruffy
I don't want the polycount getting too high though so bevelling all the edges and leaving it 'low
poly' is not really an option
Replies
It's unfortunate, but true... you have to invest the time to grow your subdiv modeling skills, if you want quality normal maps.
It takes no time at all to make even a basic highpoly mesh, especially if all you're after is smoother surfaces with sharp edges, and some extra detail floating on top.
For a model like this it should be easy.
a round cylinder on to a slightly more chunky low poly cylinder is far from ideal and was a real pain to setup .
it's just not as clean as I imagined. perhaps I should leave a bevel on the edge of the low poly to absorb the shape of the round
high cylinder when baking?
http://wiki.polycount.net/Normal_Map#SolvingWavyLines
cheers Eric, will look at that
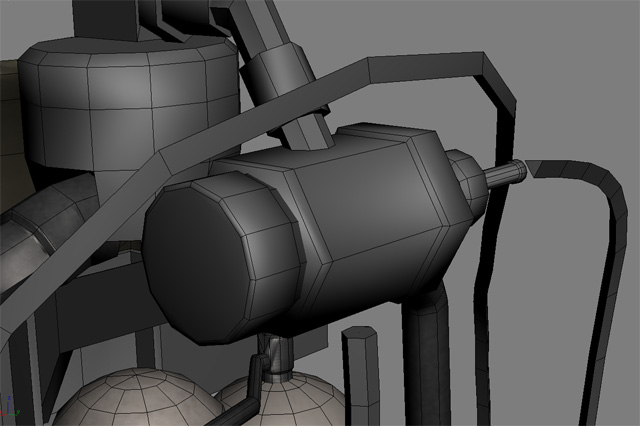
Another one I just noticed is the cylinder that feeds into (what I think is) the nozzle on the gastanks. The other cables seem to only be three-sided, but that one's much more detailed, and doesn't contribute as much to the silhouette as the three-sided ones, due to (seemingly) being enclosed by other parts of the model.
-apply smoothing groups/vertex breaks/whatever to the lowpoly,
-render the shading as an object-space normalmap (not blue)
-find the edges in photoshop (glowing edges filter)
-make a mask out of the resulting thick edges
-blur the contents of that mask.
It gives a very clean, highlights-catching look without the lowpoly cylinder projection problem. With some actual highpoly details thrown in for surface contrast sake and with a nice shader it comes out super clean, and very fast.
good luck!
Its a case of working out what gives the nicer results and what you can get away with.
Also unwrapping these suckers in a particular way can lead to unexpected results.
I suppose my main issue is with baking round edged stuff on to low poly edges, so really
adding those extra bevels seems to the best way forward.
MightyPea , the pipe thing connecting to the gas tank is a chunkier looking pipe and is not very long.
i could optimize it a bit though, but the thin pipes are very long, so I went for the 3 sided
approach to keep polycount down a bit as they bend 'smoothly' in different directions.
but they way ive found to do env stuff (lots of 90 degree angles and cylinders) is to have an 85 degree shading button (maya) which i keep hitting, first i pull out any edgeloops that i can to get rid of as many 90 degrees as i can, hit button see what is left sharpe, then go in and bevel(chamfer) those edges until i can get all edges soft.
another rule is that if you have to have hard edges then make sure the uvs are not adjoining
again looks like youve already got mst of this done, but hope some of it ay help.
This is what I'm working on:
I'm getting some wobbly stuff on various parts of this handle. I've tried the techniques listed here and they DO improve the normal map, namely adding polys and playing with the cage has helped a lot.
But what I don't seem to have is a good unwrap. I'd really like things to be horizontal rather than this sort of relaxed blob. Is there any advice for unwrapping these types of cylindrical objects? Hoping that with a better unwrap I can eliminate further wobblies and/or be easier to fix the wobblies in photoshop.
You could do this by just drag-selecting verts and using non-uniform scale to make them straight. I have a script to do this.
I'm not too up on my scripts especially for unwrapping. I've seen the link to yours in the past but I can't seem to find it on a simple search.
I think I might go with the relaxed even distribution because it'll be viewable close up. I'll just try to keep the wobbles down to a minimum. I'm gonna try both ways though. Thanks all.
Wouldn't agree that unwraping isnt good for this sort of thing, in fact its just about the ONLY way i unwrap anything, ever! Because running an unwrap on something like this, relaxing, and then clamping the edges is a LOTTTT faster than doing a cylindrical unwrap, going back and tweaking every edge so you dont have wierd stretching along the entire thing. Really there are very few times you ever need to do anything but select your edges and unwrap, i know in modo atleast. Hell in modo's UV window theres simple buttons for clamping edges to closest and farthest selected on U and V. Really helpful.
This also is a pretty general statement that isnt always best. If you're creative with how you lay out your uvs, and have a good amount of things all on the same layout, you can get stuff to line up as well or better, while having much better texal consistancy. If this was a single prop aligned to the texture with nothing else, then yeah, you'll "use" more of the texture, but in reality while it may seem less "wastefull" it doesnt nessicarily even give you better results visuaully, it may look worse with the terrible stretching that would occur.
Excessive optimization regardless of how the end result is going to look = BAD
I see your point though, a cylindrical unwrap would only work perfectly on a straight, simple cylinder without things sticking in or out, as it'll just project those straight on, which'd cause stretching.
But also, you're a noob and I'm right.
And EQ, what do you mean by clamping edges?
Unwrapping is definitely not my forte but there seems to be a lot of information here I should know or should be learning.
Watch this vid to see it in action: http://silo3d.com/users/Feed/tutorials/headunwrappingcaptioned.mov
You could also spent a little extra time and clean up those outside edges, as they tend to be just a little wider than they should, but thats getting pretty anal.
The mesh you use it on has to be a cylinder and only have nice strips of quads in it (tris and ngons and even gaps in the mesh fuck it up, annoyingly). But you select the edge loop you want and it'll pull it apart to get it to fill the 0-1 square and keep the lines (usually) straight and properly spaced.
> An old 201 Andy Brown tut on what it does.
Now to search for those scripts.
Nice to see different ways to go about it though.
Also, crazybutchers link to his uv tool scripts is also broken.
One last question though, sorry for derailing the original topic of this thread btw, how do I get a UV Island relaxed and alligned vertically (or horizontally).
In EQ's example his relax step goes from a skewed object to an object that seems to be perfectly straight up and down. And none of the scripts I seem to have downloaded are doing that little detail.
After much messing about I just about sussed it and I will be mixing and matching techniques to suit, but here is my little test.
The normal mapping for technical artists tutorial was particularly helpful, cheers for that link.
I could have bevelled the edges of the low poly instead, but this way suits the piece I am
working on better
object is hard edged/faceted:)
UV Peeler's really useful for winding pipes, though (although always choose the edge loop with the most even spacing along it because that's the reference it uses for spacing out the loops that go lengthways).
A really neat trick (and another reason I love modo so) is to use the action centres to flatten out those curved bits. Select all the edge loops you want flattened in one axis, set action centre to Local and action axis to Automatic then scale to 0% on the required axis. Et voila - all the selected loops are flattened in about half the time it takes to use the "select each loop then using the align/clamp tools" method.
Well worth recording it as a macro and adding it in as a button, I've found.
Yeah, but when you say "no smoothing" people generally assume you all your normals are averaged. So you havent found anything magical here then
Talon:
What i do for winding pipes/wires is just use the interactive relax, that way you can just select a few points, and pull it mostly straight, and then i clamp the edges. Really quick.
I keep meaning to write a script to do this, for both Max and Maya. As EQ says it's only really useful if you're unwrapping lots of things at once.
These days I find that most of the "big name" apps all have fairly comparable UV tools. Max is lagging behind in some areas (namely failing to incorporate UV editing as a true "sub-object mode" and instead keeping it as a modifier), but makes up for it in other areas (UV soft selection, some other useful little tools like having tolerances for stuff like Stitch).
Maya's Move & Sew has no tolerance so you have to make sure your UV shells are scaled correctly before you sew them or else you'll get nasty results, unless you intend to re-relax or unfold afterwards.
Mainly I think the most important part is knowing when to use which tools, and having everything set up for an optimal workflow (UI, hotkeys, right-click menus etc). You can do this in all apps, and usually whenever I see someone say "Oh but Maya can do this so much faster than Max", or "Max can do this way easier than Maya!", the truth is usually they just don't know all the proper shortcuts and workflows for each app
I can unwrap just as fast in Maya as in Max now, with very little scripting in either (mainly just one or two simple hotkey aligning scripts). Everything else is transferable between apps.
If people still aren't using Max's Relax (or Maya's Unfold or whatever, same tool with different name) then they're probably not being as fast and efficient as they could be.
I'm still quite amazed that people don't know what this tool is, it's been around in most of the major apps for several years now.
To be fair though, no smoothing groups just came to me because instead of using an auto smooth of a certain value,
just unchecking the buttons did just the same job, hence the no smoothing groups.
probably hard edged or faceted would have been a better
description
Also it's probably a better idea to use "auto smooth" and set a low angle tolerance, rather than just un-checking all the smoothing groups, since that could potentially increase the vertex count hugely if you're exporting it to a game engine (ie. a smoothing break on EVERY POLY).
If you have a box and make it all 1 smoothing group, the box's shading looks pretty awful,
when baking to a low poly like this, the poor shading gets included also
Hence the need to either add bevels or give it hard edges
Point taken over the autosmooth thing though
Yeah theres no way in hell you could get that to look correct with a single smoothing group, i'm really suprised you'de even suggest that mop. Not with tangent space atleast.
Ruz: i just for a second thought you had found a mystery solution to the age ol' problem of too sharp angles and normals.
Even the method I thought worked, if you look really closes, there are still very fine artefacts
I took all the info from this tutorial
http://www.svartberg.com/tutorials/article_normalmaps/normalmaps.html
Still though, as has been mentioned in the "triangle optimisation not always king" thread, it might in fact be more "optimal" to bevel the front corner of this wall, rather than breaking up the smoothing and UVs on every single corner. That wouldn't add as many vertices, I think.
And I certainly wouldn't use the "no smoothing groups" solution, since as I said before that will not be optimal at all when exported into a game.