Blizzard Review
polycounter lvl 18
I recently had a portfolio review from some artists at Blizzard the other day in my project planning class at school.
Wasn't really happy with the review tbqh, I didn't get much feedback at all, good or bad.
So I thought I'd post the assets I modeled for them and get additional critique from the polycount community.
Have at it!
Wasn't really happy with the review tbqh, I didn't get much feedback at all, good or bad.
So I thought I'd post the assets I modeled for them and get additional critique from the polycount community.
Have at it!
Replies
the 1st thing i would mention, is to ease up a bit on the crazybump. alot of crazy normal angles there.
Try to work on your materials, as everything is having similar feelings. especially the overall specular. Really define wat everything is made out of.
Your Uv layout could also use some revision - try and scale things to get maximum pixel density... woop woop
hope it helps a bit mate.
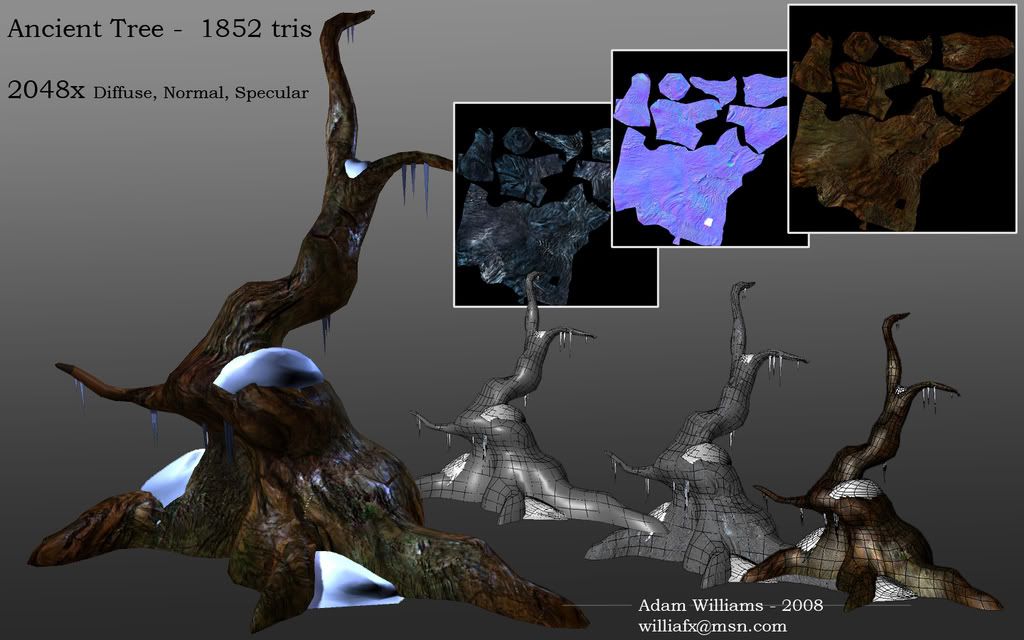
On that tree - You got of wasted pixels on the unwrap, represented by all the black space. Try pack everything in as much as possible.
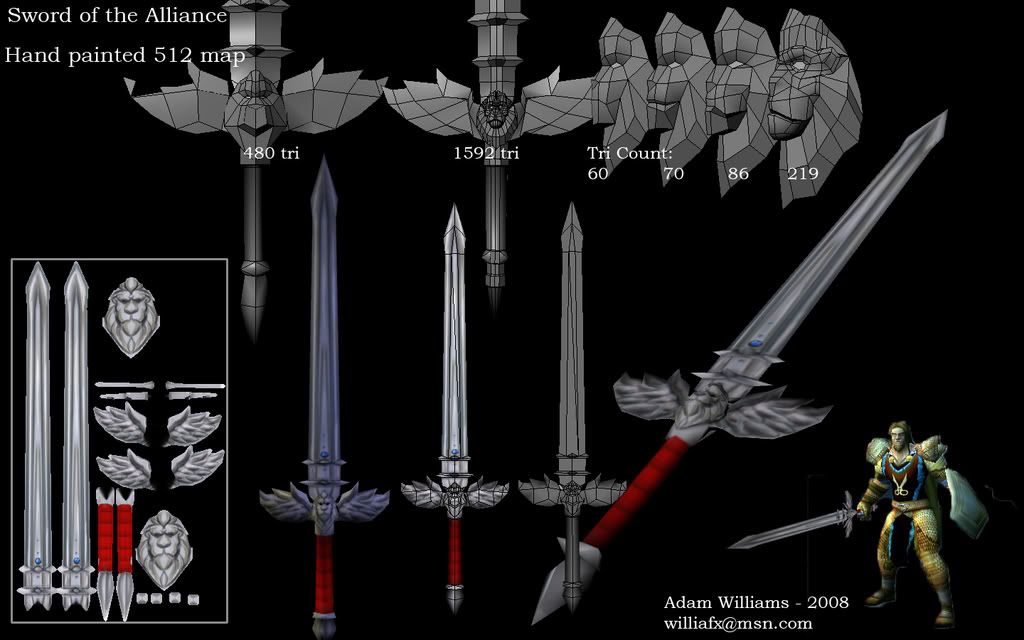
Also on the sword diffuse - you have loads of items that are exactly the same!! You should overlay the uv's on the unwrap to re-use the texture space.
The presentation of your work is cluttered, take a look around the forum and see how other people present their works, try keep it clean and readable. I'll try get back to you with some good examples :P
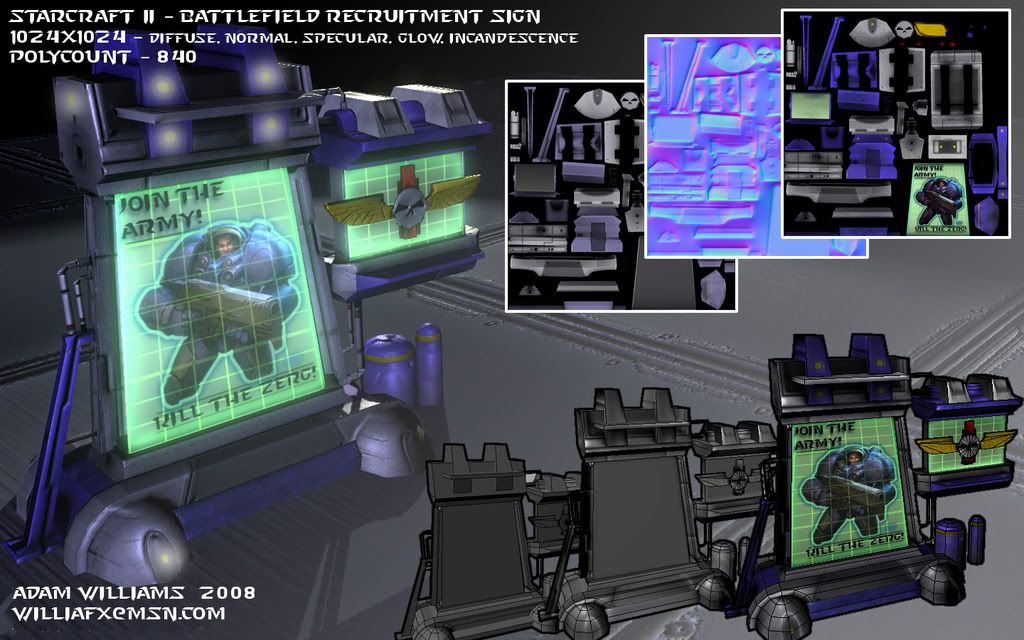
If you can point out the 1024 or 2048 spec/normal maps on anything I'm all ears. And in case you were wondering - No, they won't be using 4x2048 textures for ingame assets on SC2 either.
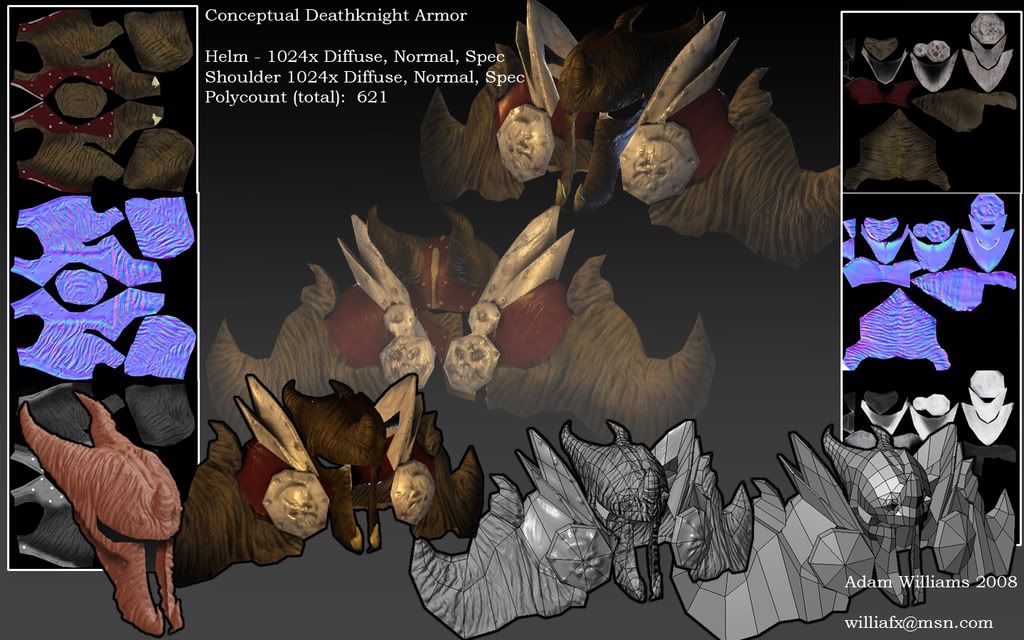
Why do you even post your maps in your presentations and then proceed to cover up 20% of 2/3 of the maps? On the Helm design you almost cover the spec map completely.
The fact that you have 5x1024 maps on an 840 (polygon?) object, and 4x2048's on something with even less shows a lack of understanding for your target platform. Is this for PC? Online? Console?
The sword has almost completely identical UVs, and yet you have nothing that is overlaying, let alone maximizing the full potential of the UV page.
Your final presentation is a mess. Get rid of the fluff and simply show the good beauty render without 90 other things to look at. The beauty render will show then whether you got it, or you don't - and too much crap onscreen draws away from the (1) thing they are actually looking at.
Personally, I like the trees at the bottom of your blog/website better than this one.
"Nothing here is within the scope of what they actually do visually or technically for World of Warcraft." - even the sword?
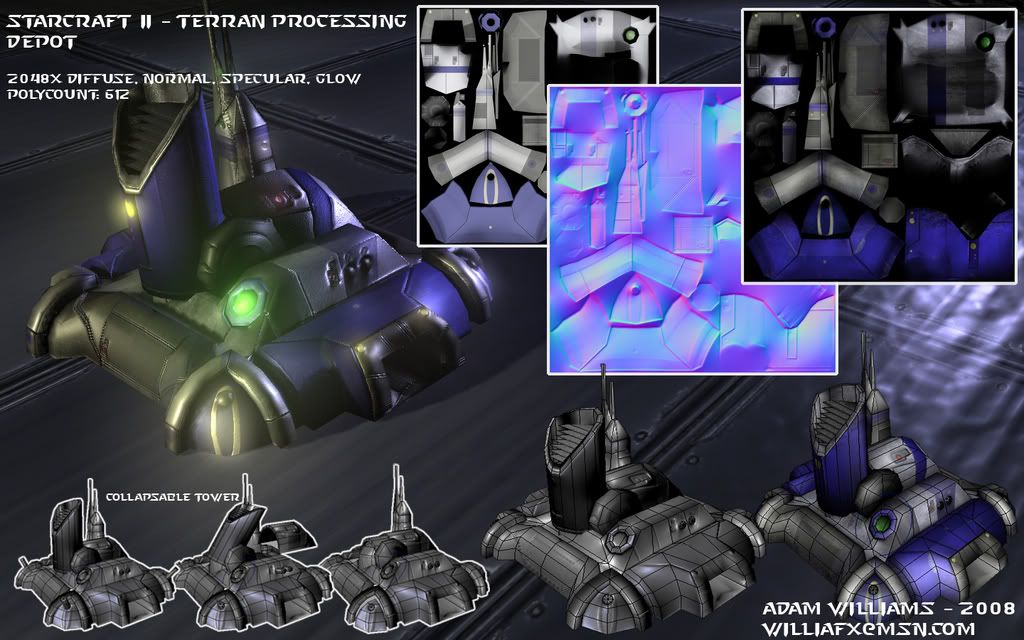
I wasn't sure what map sizes would be used in SCII. I was using a 2048 because I figured "hey, this is a large structure, so when zooming in, it shouldn't look pixellated" I dunno.
These are the first prop sheets I've ever laid out so I was just kindof winging it and trying to get everything on to one page. I was under the impression that people wanted to see my process and quality of geometry. Should I create two sheets? One with geometrical screenies and texture layouts, and another with a nice rendeered shot?
True, I have a very limited understanding of my target platforms (zero industry experience) but hey, thats why I'm posting on here.
I'll be sure to incorporate all of these crits in my future projects.
Let the beatings continue!
cheers
none of these are exactly meant to go in game (except the sword)... I was just trying to show that I could model and texture in the style of Blizzard.
True, normal maps aren't used in WoW. The armor set was just to demonstrate style. :P
Heres a good example
A sword not dissimilar to yours. I would suspect the polygon count is around 100, probably a little lower. Texture resolution is more difficult to judge, but its obviously also very low and its 256 colours. Details on the hilt are all painted on.
With that said it might have turned them off seeing normal mapped assets.
Crits:
- Some of the UV layouts have quite a bit of wasted space.
- Some of the UV pieces are identical yet have seperate UV space. I understand this could be for technical reasons, but personally I would try to add some variation in the diffuse.
Just so you know I'm also a student at Ai CA OC and I've only heard of them liking or getting excited about one piece at our school and it has some WIP shots posted in the hallway upstairs it's an environment called "Corrupted Fairytales". I think the main reason it was impressive to them is that it was an original concept and it has a lot of character and story to it. Honestly I think you should stay away from anything that looks like fan art for your portfolio the instructors probably won't let you use it for your demo reel or will strongly discourage it.
What Im seeing with your work here is that you understand 3D and game assets but you need to push the textures. None of your pieces are very interesting or exciting to me. Your sample sheets are partly to blame but your textures could be a lot more interesting. To be specific.
Sample Sheets
Take out that grey gradient thats going over your final renders it horrendously bad Specifically your sign and your death knight armor it's covering up your texture work. Show larger shots of the final renders and toss the mini break down shots their too small to see any detail. Shrink down the maps or toss them altogether, the color is nice to see but normals and spec maps arent all that interesting to look at.
Sign
Drop the SC2 theme and make it feel worn, aged and damaged from war possibly. Focus on your color map and accentuate the wear and tear on the piece with the spec.
SC2 Depot
Your maps are huge 2048 for a RTS piece is way too big. Not enough detail in your color map.
Death knight Armor
For the shoulders push the color map. In wow i think they use a 256 to 512 for them and they cram in all kinds of detail without normal maps. You could rearrange your UV's for the helm use all the space you can and cram in more detail. More battle damage and wear.
Sword
Push the detail in the color map. It doesnt look unique or special at all. It looks like a basic weapon not even like one of their epic weapons.
Ancient TreeI like this piece the best although your textures are a bit big. That tree better be huge to justify those 2048 maps. The only thing that throws me off is the lighting on the snow seems odd. I think you might be able to create a tiling texture for this piece and stretch out your UV shells a bit to use more of that resolution. Also is there anything special about this tree or is it just to fill an environment?
As for World of Warcraft, they make characters in around the 1k to 3k poly range (I think), I think, and emphasize everything (depth, detail, etc.) with textures.
For an example, the dragon has 2,914 polys
To create color variation you need to tint your color by mixing in other colors. Here is an example, a gray ball on the ground. The gray toward the ground would have some brown (whatever color the ground has), and your would tint the gray that faces the sky a bit blue and where the highlight toward the top could have some yellow in it. I was trying to give an example of reflected color with that stuff I just wrote. If you do a search on this site for Bobo's orc that's is an excellent example of proper use of color variation.
Your work is way better than when I started so keep at it.
Alex
Take for example the first image at the top. I would take one look at those uvs and say trash. You have so much wasted space and thats a HUGE no no. Just looking at that it sets the tone for the rest of the stuff and like OTT pointed out your uvs and textures are seriously needing some work. Nothing is overlayed and it's not optimized. It looks like you just hit flatten mappen and used the layout that was made for you.
That sword could easily be on a 256x512 and would look better then what you have. Everything is the same. Why not overlay it?
The sword's uv's are laid out that way because I had initially planned on taking it in to zbrush to sculpt the hilt (which I did, and used as a class assignment) but when I decided to also use it for my review that I'd hand paint it, and didn't think to remake the UV layout which I realize is probably the most noobish thing I could have done.
I'm starting to realize that all the hard work I put into these projects wasn't quite hard enough. I guess I have been thinking incorrectly about texture sizes and polycounts, and need to spend some time to reconsider how things are actually done the right way instead of just guessing.
Consider yourself very lucky that you're getting this kind of honest feedback
http://boards.polycount.net/showthread.php?t=53497
touch
rofl for sure!
I have absolutely learned more in the last day off this thread than I learned in class in the last 5 weeks.
I'll certainly be posting a lot more w.i.p's here as I keep working, that way I can fix my mistakes as I move along as opposed to a lashing after puzzling together a bunch of crap
cheers!
forums are your school. learn from your peers and always keep it comin.
But if you can take the crits, looking back on it you'll see how much better you are for it.
It always sucks to hear you need to re-do UVs because that pretty much means you have to start from scratch on most of your texture work and you end up trashing the whole thing.
However, this day and age you simply can't afford to show something with bad uvw layouts. Keep at it man, it seems like you have the right attitude for this.
I don't know how to do this in Max, but if you are on Maya, you can bake all you maps to arbitrary meshes, eliminating the need to redo a lot of texture work. Saved me a TON of time.
On the character I am currently working on, I redid the UVs 4 times while painting textures the whole time. In fact I had the textures about 90% complete and someone walked over and said, man your UV layout sucks.
To transfer map information between two arbitrary meshes:
To do this in Maya, simply place the 2 meshes on top of each other and goto Lighting/Shading >Transfer Maps. For color transfer, select the "Diffuse" tab without shading. Select the source and destination meshes. Make sure your texture is on the original mesh. For good results, adjust the search envelopes and use the highest settings. Takes about an hour per map on a good machine but it's way better than repainting.
There is one caveat to this whole process.... If you are working with tiny maps(256x256, 512x512) you won't get the best results. Because it's "Shifting" pixel information around, you may get bad artifacting. One workaround is to up rez them to at least 2048 to not lose any quality before the bake, then downrez them again.
To transfer skin "weighting" information between two arbitrary meshes:
Again, place the two meshes on top of each other. Ensure that the older skinned mesh is in it's "bind pose".
Skin the new optimized mesh to the same skeleton with the same influence settings(whatever your game engine supports, usually an influence of 4 for most engines.)
Select your old unoptimized skinned mesh>shift select the new optimized mesh and goto Edit Smooth skin>Copy skin weights. This is also a great technique if you modeled an "all quad" version for cinematics and you want to "recycle" the weights. I've done this for contract work and essentially got paid for skinning and rigging 3 characters that had the same skeleton but slightly different proportions, and only did actual work on one.
-Rodney
To reiterate what Podman pointed out : So let's say you have an object with messy UVs, let's call it objectA. Make a copy of this mesh, called objectB, and give it cool UVs. In maya you can 'rewrite' your texture using the Transfer Maps tool, baking pixels from A's layout to B's - just like you would transfer data from highpoly to lowpoly, except that in our case both objects are the same. For some reason it never took more than a couple minutes on my machines, Pod did you use PSDs maybe? I only used that on flattened textures so far.
In Max you don't even need object B. You just give object A a new set of correct UVs, and then transfer from one to the other using Render To Texture. Here again, the app will 'redraw' the texture according to a new UV layout.
You can stretch, rotate, mess with your UVs the way you want - you won't have to copy-paste small chunks in Photoshop, since the 3d apps are going to take care of recreating the textures for you.
Its a great way to work actually. You can create a texture as you go, gradually applying it to armor parts for instance. And in the end, bake the armor to a better UV set.
this is probably the coolest information I've gotten in months. Thanks for the tips!
trashing your Uv's and textures and restarting totally blows ass so this will save me many hours.
Thanks!
I've not used this in a while but I remember it was fairly easy to find out.
Render to Texture is available in Maya under the UV texture editor>Warp Texture. Essentially, the same thing(which of course, they stole from Max
Pior, the baking process may be taking a while because I am baking between two completely different meshes, topology and Uv, so it's using a "raycast" similar to normal map baking, but it's searching for color info only. Also, I'm baking to 4K maps and downrezing.
While I'm aware that Max and Maya's had this texture bake for awhile, what's new in MAYA(since 8.5) is the ability to transfer "skinweights" between arbitrary meshes. When that feature was released, I almost got on my knees and praised the gods. Now you don't need to skin envelope redundant characters with slight variation. Because Maya currently has no "envelope" weighting system, you've got to hand "paint" all your weights. This can be a bitch and a half when you've got clothed characters. Now you can "paint" a simplified version of your mesh, and copy weights to a denser mesh, or just copy the weights over to the clothing.
In fact, painting skinweights in Maya is an "acquired" skill, which is why you see more "posed" models from Max users than Maya users. It's easy to "slap on" a quick skin in Max. In Maya, unfortunately, there is no such thing as a "quick skin", default skinning sucks. lol
Again, I believe Maya got this from Max, but being a Maya user on polycount's forums, I'm certainly a minority here.
Oh, and the RENDER TO TEXTURE/WARP TEXTURE is also handy for fixing "seems" if you don't have access to a 3d painter.
-Rod
P.S.- I've learnt a ton from pior alone on these forums and I would say that you can learn way more on these boards then any classroom.
Thank you so much for bringing this to my attention, I will try this out immediately, your the man! (I am excited can you tell?)
i think u can also get the 3rd party wow model and texture viewer apps to check out their textures and models, there's pretty much not a single pixel of wasted space on those maps, everything is stretched reused and overlayed on top of each other, i think that sword on the screenshot probably doesn't even take up more than a 128x128, if that, might be even smaller.
Just keep in mind that since you might be rebaking normalmaps you will have to pay attention to their orientation otherwise you will get messy results (I assume?) Like, if you rotate a bit 90degress you will have to swap red and green channels later on, that sort of stuff. But for scaling and moving you'll be fine. Or! Maybe you could convert back and forth between world-space normals and tangent-space, I think it would work but it might degrade the sharpness of the maps a little down the road though.
And vertex numbering changing from app to app is a pain indeed...
Been messing with Maya transfer attributes some time ago, it's indeed super powerful - it transferred textures from one mesh to another one of similar shapes but different topology quite nicely. Obviously for normalmaps it would cause some sliiiight wobbly artefacts but yeah it works.
More on these weird techniques ... In Max there is a cool tool to save vertex weighting as kind of weight shell that one can manipulate just like a polygon object. It's kinda cool, because you can split a character into pieces (ala toy limbs), rig that in five minutes at 100% to bones, save the weight mesh chunks and ... merge back. Iirc the vertex being re-welded at the junctions get 50/50 weights that way, thus giving a crude first pass rig. Only did it once tho, it's a bit convoluted.
G'luck!
I looked at your work Adam. Then looked at your portfolio, and thought you were stealing work cause this stuff looks like crap from what your doing now lol. Seriously, keep it up so that we can see your work now and call that crap compared to what youll be doing in the future.
This - 100% this. For rookies like me, this place is a gold mine.