maya08+xNormal. the puzzle within the puzzle
hey all. Ive been browsing the forums around here, reading about peoples experience with normal mapping and everybody's method's for madness. fun times it seems.
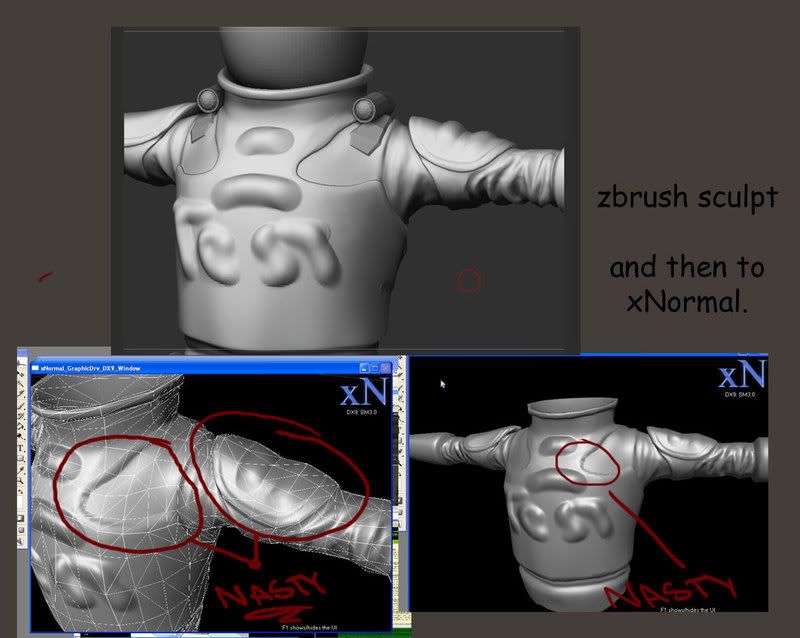
Currently I am useing xNormal to try and get some kick ass normals out of my high poly, then render it out in maya 2008. err, hopefully. The problem lays in that Iam getting weak results. As i sculpt ive been doing some tests, and highlighted the areas that really are not performing up to par. ( I would love to throw some higher res images up but haven't a clue how to post anything higher than 800xwhatever it is.)


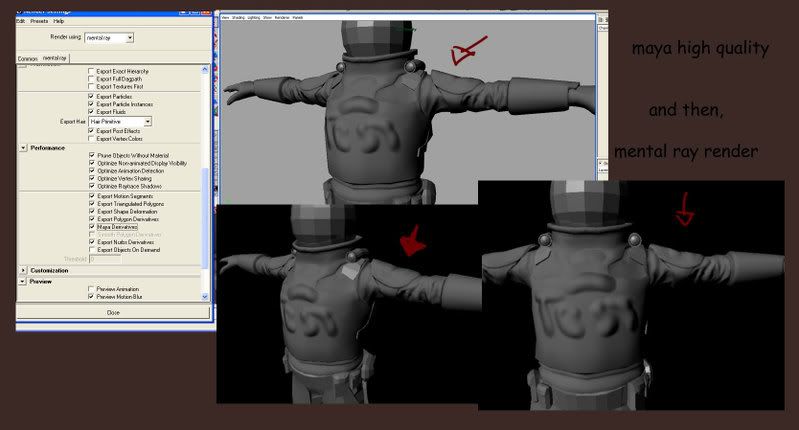
I dont think Ive gotten the hang of xNormal yet. Iam not quite sure how to work the "cage" properly. So i avoid using it. So what Ive been doing is adding my high+low poly meshs in with "exported normals" checked for smoothed normals. Under Bake Options ive set min and max samples to 16 for higher quality. And under Fine Detail, i pretty much left all the settings alone. Heck, below is a pic of my xnormal settings.

my current work flow for testing this is this.
1: lowpoly in maya
2: uvs
3:highPoly sculpt in zbrush
3: bake normals (xnormal; or zmapper or whateever?)
I understand the importance of re-topolgizing your low poly and Uvs to fit the High-poly accordingly, and I haven't done that. But still, i thought i could be getting better results than what Iam getting. Iam sure we have all seen some amazing pieces out there that do have simple lowPolys that support an amazing sculpted high-poly normal map.
Any ideas how to get a cleaner, sharper, more accurate normal of your highPoly? Ideas, suggestions, tips, ticks, haikus, anything would be so great to hear, so thanks in advance. I really want to figure this puzzle out and understand how these pros do it to it.
Currently I am useing xNormal to try and get some kick ass normals out of my high poly, then render it out in maya 2008. err, hopefully. The problem lays in that Iam getting weak results. As i sculpt ive been doing some tests, and highlighted the areas that really are not performing up to par. ( I would love to throw some higher res images up but haven't a clue how to post anything higher than 800xwhatever it is.)


I dont think Ive gotten the hang of xNormal yet. Iam not quite sure how to work the "cage" properly. So i avoid using it. So what Ive been doing is adding my high+low poly meshs in with "exported normals" checked for smoothed normals. Under Bake Options ive set min and max samples to 16 for higher quality. And under Fine Detail, i pretty much left all the settings alone. Heck, below is a pic of my xnormal settings.

my current work flow for testing this is this.
1: lowpoly in maya
2: uvs
3:highPoly sculpt in zbrush
3: bake normals (xnormal; or zmapper or whateever?)
I understand the importance of re-topolgizing your low poly and Uvs to fit the High-poly accordingly, and I haven't done that. But still, i thought i could be getting better results than what Iam getting. Iam sure we have all seen some amazing pieces out there that do have simple lowPolys that support an amazing sculpted high-poly normal map.
Any ideas how to get a cleaner, sharper, more accurate normal of your highPoly? Ideas, suggestions, tips, ticks, haikus, anything would be so great to hear, so thanks in advance. I really want to figure this puzzle out and understand how these pros do it to it.

Replies
The nasty on the bicep pad are coming from a gap in the geometry. Normal Maps don't effect the silhouette of a model and can't raise above the surface. They push in better then they push out. Which means they aren't the be all, solve all to all issues. Sometimes you just have to use geometry on your low poly to get proper defintion. Sometimes you have to overstate edges and creases on the high poly in order for them to make the translation. It might be a good idea to pinch a few edges and define the shapes better on the high. It might cause artifacts, but you could try detaching the speed bumps, but I think defining the shapes better would get you better results.
As for pushing my lowpoly mesh. I am going to try what you said Vig Make geometry that works for the mesh and not against it.
I just figured that even for the low poly mesh I currently have, it would be able to display a sharp normal map. Such as on the bicep pad area. I get that its not actually going to pop out like a displacement, but I was hoping that the normal map would show up sharper. easier on the eye to see. You said that sometimes you need to overstate the edges and creases. I will try that too as i work on my highpoly. What i dident understand was detaching Speed bumping. Whats speed bumping? Its not a term that Iam familiar with. If anybody knows that would be so cool.
What is happening probably is that the constant uniform ray distances is not suitable for your complex model.
To setup a cage just make it to cover completely the highpoly model(enter the 3d viewer and expand it). Then save it as a .SBM("save meshes"), reassign meshes(just press the yes button on confirmation dialog) and sure you check the "use cage" option on the lowpoly mesh. See the smiley example for example.
To be sure it's not a normals problem try also to use the "Smooth normals" option in the lowpoly model.
That will auto average them making in a smoother result.
Btw, the fine detail options won't be used unless you set a "Detail file"
And to use min16/max16 samples with a threshold of 0.3 is a very bad idea btw.
To make tests use 1/4=min, 1=max, 0.3-0.1 threshold. That works exactly as Mental Ray.
For final map use something like min=4, max=16, threshold 0.05(or min16/max16/threshold=0 if you don't mind to wait a lot... )
Btw, there is a Maya tutorial on the xNormal's web page, not sure if it can help you.
Hope it helps.
Although, I may be a fool,; but whenever I do try and save out my cage as a SMB, an error message occurs: "Sorry, cant find a plugin for "my directory were Iam saving the "cage.smb" file" and nadda happens. I don't know If i am doing something foolish to cause this to happen or not. So thats why I always left my cage alone.
One more thing. Under the smooth normals tab for both High and Low meshes, I use the exported normals. I know i don't want harden normals (or do I?;)). But don't really find any difference in result when switching between exported or Average. Is Average normals the equlivent of smoothing normals in the in-between?
oh yeah, thanks for the antialising settings! you rock!
Better don't put the ".smb" at the final of the name... put just "cage" ( it adds the extension automatically ).
The "use exported normals" and "smooth normals" are the options you are going to use normally. The "harden normals" is used in case your model is very simple and you don't want to bevel the hard edges to avoid artifacts in the normal map.... or also to get a more pronounced ambient occlusion effect.
That's because most of the existing exporters average the vertex normals, so you won't notice any difference.... but, for example, if you export a cube with hard edges you should notice it.
Yep, the "average normals" is equivalent to the "smooth normals" in older versions.
Just so you know. I accidentally typed the "smb" only on the forum. When I am outputting my cage meshes and exporting them, I am only typeing "cage" and thats all and getting the error. anyway it goes I cant export a caged version. Same error. Sorry to confuse you. And myself. Lol. oh wait a second.....
like, moments after typing that, and re-reading what you wrote, i decided to actually add the .sbm at the end of my "cage". Cus i was just leaving it as "cage" but "cage.sbm" works fine. I dident see this error message.
instead it work fine. hah. Thanks. I can really see a difference using the cage, and after reading up on its practical uses, I wouldn't go without it. thanks alot!!
I hopeing anybody might know what exactly the OpenGL or realtime raytraceing graphics driver" is in Xnormal.
Apparently my zbrush mesh at subdivision 6 is too big and Iam trying to find a work around to keep my detail and open up the mesh in the xNormal viewer so I can check it out results and make the cage. error message tells me my video card cant support the number of vertices, so reduce it or try the openGL or realtime driver.
Anybody know any solutions or tips?
--or is there a way to set the cage to the high poly mesh w/ out having to view it in the xNormal viewer? this way I don't have to fret over that polycount.
--or, Iam completely wrong, and I still should be taking in consideration, the polycount because if its too high, my computer wont render out the map and it will look all shitty? Perhaps?
---thanks for your time.
Just remeber this when you set it... the cages MUST cover completely the highpoly model... and if you get some ray fail errors just extrude it a bit more the cage and the mesh ( I use an "epsilon" value to avoid floating point numbers artifacts... usually 1E-5 or 0.00001f... so if the model radius is near/below 1.0f then you can have problems ).
Usually you want to use the DX9 graphics driver in Windows 2000/XP and the DX10 for Vista. The OpenGL one was a very old one kept for the people having problems with DirectX. The raytracing one is a very immature and experimental one for the people without decent graphics cards but a powerful CPU(like a quad core).... or if you need to visualize a very dense model(like Lucy from standford's set).
The graphics card under WindowsXP have a limited amount of video memory. You cannot store a mesh in the card if it's too dense. For example, for a 128Mb card you can store usually 1-2M polys inside. In Vista/DX10 the VRAM is virtualized like the system-RAM so, in theory, the limit can be raised a bit(like 10M polys)
The OpenGL graphics driver can virtualize the VRAM as is done in Vista/Dx10... but using WinXP.... so perhaps changing the default graphics driver to OpenGL can help you to visualize that heavy mesh. If not, try to use the raytracing graphics driver... but will go terribly slow if you enable reflections/shadow/radiance or you don't own a very powerful CPU.
Alternatively, try to install a graphics card with more VRAM, install Vista and use the DX10 graphics driver and get more system RAM under x64 OS.
I spent hours yesterday, trying to find a workaround to preserve the high detail I wanted and yet lower my polycount by the thousands. And then "bam"! I understand that you can change your graphics driver and that it affects what can and cannot be loaded. Sooo awesome.
Is there any draw backs to using openGL or Raytracing driver, over Direct9? Other than slowness? Like quality or map or anything else? it looks good. Just curious.
thaanks lots!
The DirectX9 one usually works faster and is very compatible with all the graphics cards(including shader model 1 ones).
If you use Vista I recommend you the DX10 one because has more effects(like SSAO, better glow effect, faked color bleeding, gamma correction) and a bit more precision in the shaders.
The OpenGL one is good on WinXP for meshes that cannot be loaded into the graphics card. For example, on my old geforce 6 with 128Mb of VRAM I can load only meshes below 1M polys... but if I select the OpenGL graphics driver then it loads ok... I think it's because OpenGL uses some kind of emulation and memory virtualization that's not possible on the DX9 driver. You can also use the OpenGL driver in case you have problems with DX9(but that's rare).
The raytracing one is good to load really dense meshes like the Standford's Lucy mesh(30M polys)... and it includes a good global illumination effect... but you need a superpowerful CPU(OCd quad-core or even better a $$$$$$$$$$ Skulltrail
Btw, you can change some options for each driver just going to the "graphics driver" tab, selecting one and then pressing over the "configure" button... usually you can control there the texture compression, shadow quality, etc...
I hope it helps.