UT3 Environment inspired by WAR
polycounter lvl 17
It just so happens that I absolutely love that Mythic has been posting the concept work from Warhammer Online. It's been a major source of ideas/inspiration and motivation for me as I learn the ropes.
Inspired by this particular area picture I decided to try to bring some of these elements into Unreal and see if I can work a full environment into the engine.
My eventual idea is to build a level around this courtyard with 3 buildings. But for now I'm going to specifically work on the courtyard.
Also, for simplicity for my own learning I've gone with an octagonal courtyard instead of a circular one. Afterall, I'm only inspired by the above picture. Not out to copy EVERYTHING from it!
This is my basic layout, I don't have a scanner so I just took a picture of my wipe board.

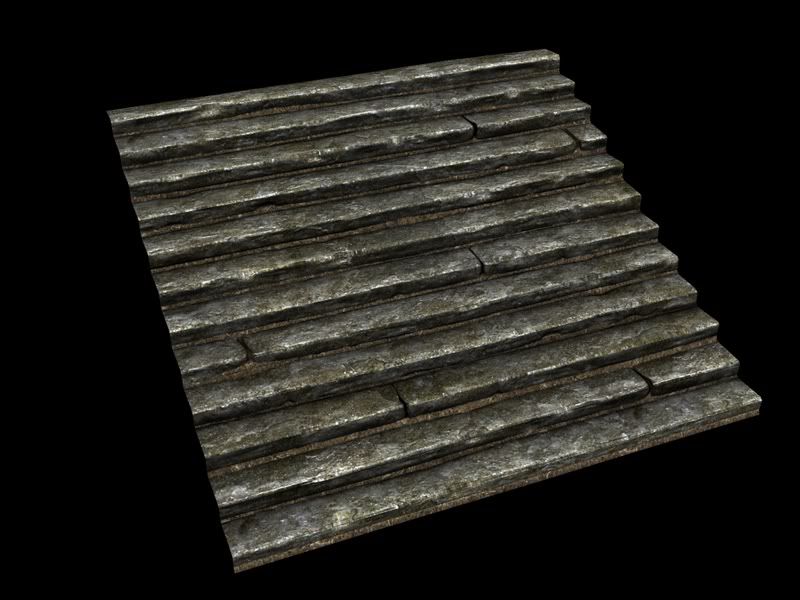
I haven't quite figured out what I'm going to do with a ground plane yet. I know I will break up some of the cobblestone brickwork with lines, but some techniques about those textures are in my next phase of learning. So I started with some of the courtyard props to build something up.
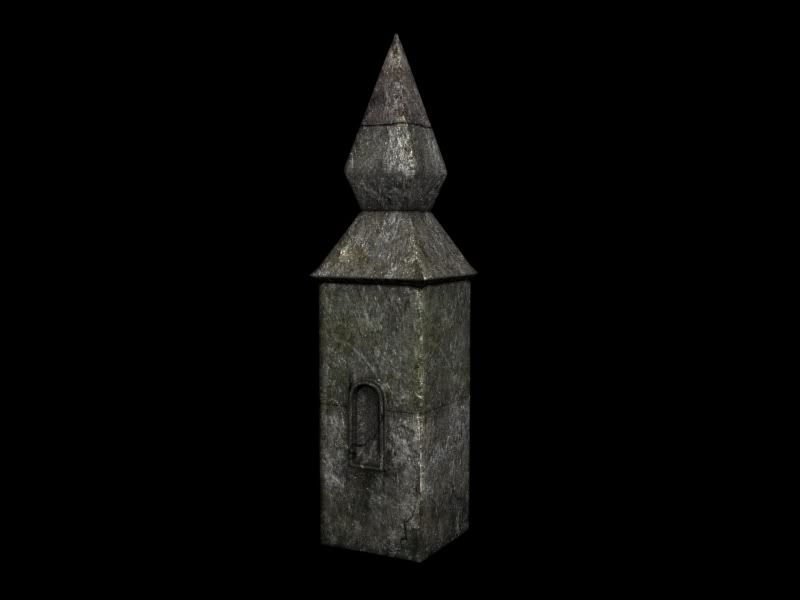
These are the low-poly versions taken with max scanline renders. I will probably derive specularity from within the engine to save texture space so the spec look might change slightly.
Comments welcome! My biggest concern is that everything is just going to end up looking like its stone! Obviously it is all stone. But I'm unsure how I will break it up and create different colours. I think I'll be adding some green foliage but thats just a start.
title changed just for you Justin!
Inspired by this particular area picture I decided to try to bring some of these elements into Unreal and see if I can work a full environment into the engine.
My eventual idea is to build a level around this courtyard with 3 buildings. But for now I'm going to specifically work on the courtyard.
Also, for simplicity for my own learning I've gone with an octagonal courtyard instead of a circular one. Afterall, I'm only inspired by the above picture. Not out to copy EVERYTHING from it!
This is my basic layout, I don't have a scanner so I just took a picture of my wipe board.
I haven't quite figured out what I'm going to do with a ground plane yet. I know I will break up some of the cobblestone brickwork with lines, but some techniques about those textures are in my next phase of learning. So I started with some of the courtyard props to build something up.
These are the low-poly versions taken with max scanline renders. I will probably derive specularity from within the engine to save texture space so the spec look might change slightly.
Comments welcome! My biggest concern is that everything is just going to end up looking like its stone! Obviously it is all stone. But I'm unsure how I will break it up and create different colours. I think I'll be adding some green foliage but thats just a start.
title changed just for you Justin!
Replies
http://mythicmktg.fileburst.com/war/us/media/images/screenshots/013008_SS14.jpg
Maybe that'll help get your juices flowing on what you could do to jazz up the colors in the area.
This screenshot is the same area, mostly.
http://mythicmktg.fileburst.com/war/us/media/images/screenshots/013008_SS14.jpg
OH NO Kurtis beat me to it.
Anyway, using that technique I showed you for bricks/stairs, there is no reason this environment shouldn't look awesome. You hear me? NO REASON!
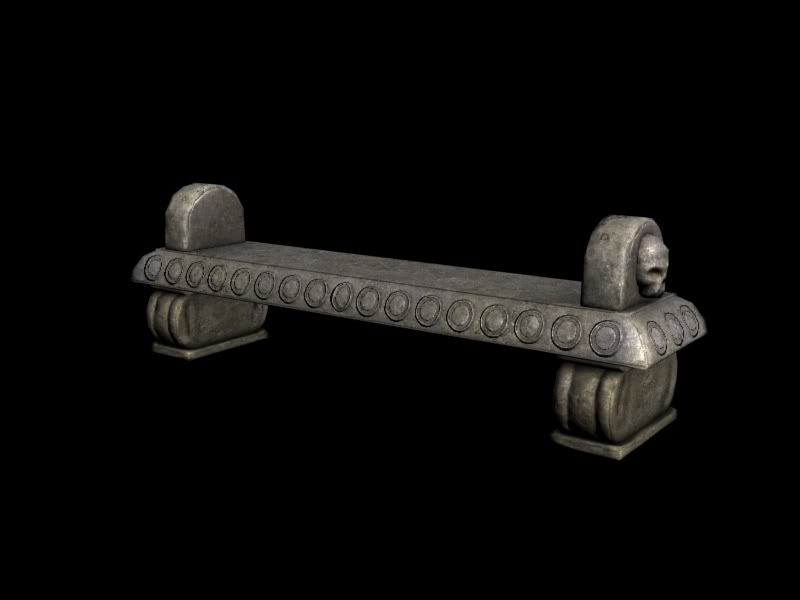
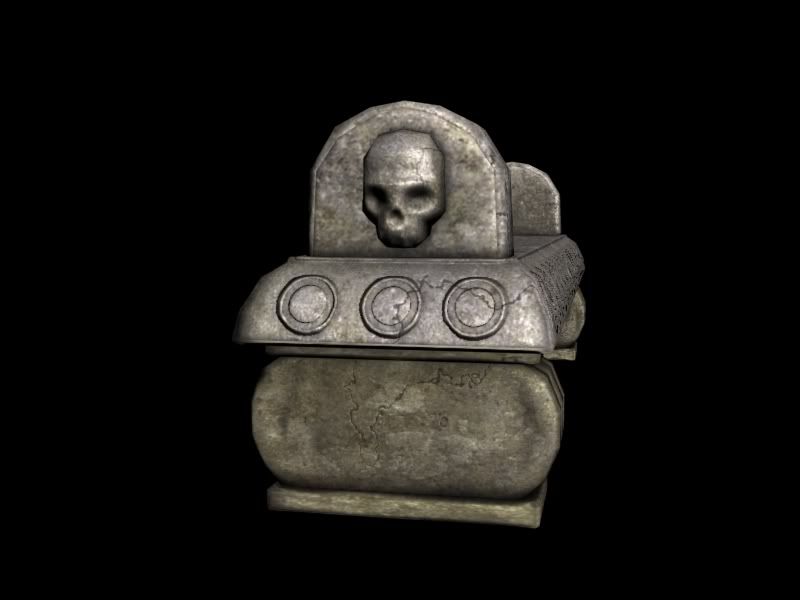
Don't care for that bench. It looks soft like a pillow and not hard/carved like stone. Get REAL serious with your skull. Never halfass a Warhammer skull.
This screenshot is the same area, mostly.
http://mythicmktg.fileburst.com/war/us/media/images/screenshots/013008_SS14.jpg
OH NO Kurtis beat me to it.
Anyway, using that technique I showed you for bricks/stairs, there is no reason this environment shouldn't look awesome. You hear me? NO REASON!
[/ QUOTE ]
Thanks for the screen link. The victorian style plaster/stone/wood combo I had thought of to bring in on the buildings that will block in the area. And I'll work a bit more on my "crack" work as my stuff doesn't seem to be beaten up as much.
And yeah, I would never halfass a Warhammer skull, I know that from painting the figures haha. My thoughts on that one was to add some extra detail to the bench. I'm still developing my sculpting skills though. As for the bench overall, I figured a slate-style bench would just end up looking too primative?
Thanks for the kick in the ass though, I'm not intending on making this look bad hah.
Watch th e 2nd video, January 31, 2007 : Video of the Month #12 RvR Battle
http://www.warhammeronline.com/english/media/video/
Just past the halfway point you'll see the area for a brief moment, but don't worry, it comes back a LOT. Also, there's a good shot showing EXACTLY those benches, close up, near the end. Regardless of how accurate you want to keep the scene, this should shed some light of a few things the concept left blank.
oh the reference keeps coming!
Watch th e 2nd video, January 31, 2007 : Video of the Month #12 RvR Battle
http://www.warhammeronline.com/english/media/video/
Just past the halfway point you'll see the area for a brief moment, but don't worry, it comes back a LOT. Also, there's a good shot showing EXACTLY those benches, close up, near the end. Regardless of how accurate you want to keep the scene, this should shed some light of a few things the concept left blank.
[/ QUOTE ]
Thanks for more hints at the reference! When I checked up on some pictures of stone benches a lot of ones were larger flat stones resting on stone legs. The best looking stone benches I found were ones that were obviously cast concrete. While those construction techniques may not necessarily be found in this particular era, I thought for artistic quality they looked the best. Thats the main reason for the circles and the "curve" of the seat itself (also for the smoother-rock type texture). Glad to know you guys also used skulls on your benches. But other than carving that entire piece out of stone (tedious at best for those people) how would those side bench parts hold up the seat itself? But thats a long justification for my bench and one of the reasons I didn't make it look like a church pew haha. As I said, I'll keep at it. I have some other ideas to dress up some of the other parts (because its UT3), I hope they go over better with you guys hehe.
I do have a question regarding the past techniques you showed me. How much of that technique do you think is used on set pieces for something like UT3? I love the technique, and sofar modeling bricks hasn't bored me yet. But I also find it a lengthy process just to reach a final goal of something like a tileable brick texture (ie for the cobblestone street and/or the retaining wall which I'm working on now).
Start with a tiling brick texture that you want to use the layout as a base, model the bricks over that until you're happy with testing outcomes being sure to model PAST the tile-point all around, then copy the bricks from one side and snap them over the tiling edge of the other side (deleting the old bricks under them). Rebake the normal for a perfectly tiling texture.
This worked great, and quickly for my cobblestone floor. It's MUCH faster than trying to make your materials tile in photoshop, additionally, if you need to bake them again you don't have to fix again.
I always export a teselated plane behind the extruded splines and ensure the bricks are at slight tilted angles.
That way in zbrush i have bricks and the grout between them being modified together for a more authentic set of normals.
When it comes time to export back out, then polycrunch down each individual brick by 60 percent I can instance some
of the bricks into the other locations and tilt and modify them a little.
This method allows you to create other iterations where you remove some bricks and leave the grout on its own in larger
areas etc.
Modelling bricks and zbrushing them is tedious so I tend to do as all out as I can once so I can then reuse them later
in different combinations.
Likewise, you can then polycrunch more dramatically each of the bricks so you can shrink them down and quadruple the
number of them to make cobbled european style patterns or
you know... whatever!
k.
But I ended up making what I think is a decent cobblestone texture? I plan on using this in the OUTER rim on a ground plane and/or terrain. It will get blended with some dirt and stuff too to break it up.
Time constraints are going to force me to simplify the design. Which won't go over well I fear hah. But I'm still going to aim to make the best scene possible out of this!
not to keen on your cobbles though, there ok but much too clean and look more tiled than they actually are, id say its probably cos there isnt enough variation in the cobbles, you probably dont need any more variation in form but you only have three different materials on them id up the number to like five or six.
also it would be cool to render out a AO map to use as a mask for some photoshop lovin, maybe some dis-colouration extra dirt or sommit.
actually looking at it again it is tiled too much. not sure about the tech that you may want to use, but a good trick is to use a 512* (or whatever) normal map tiled as you have it now, then make a 512* colour/spec map that covers twice as much space, thus you get the appearance of the same texel density while getting half the repetition. you do need an app/engine that can assign different uv tiling values to different maps
keep it up
nice to see you keepin it improvements with every new one,
not to keen on your cobbles though, there ok but much too clean and look more tiled than they actually are, id say its probably cos there isnt enough variation in the cobbles, you probably dont need any more variation in form but you only have three different materials on them id up the number to like five or six.
also it would be cool to render out a AO map to use as a mask for some photoshop lovin, maybe some dis-colouration extra dirt or sommit.
actually looking at it again it is tiled too much. not sure about the tech that you may want to use, but a good trick is to use a 512* (or whatever) normal map tiled as you have it now, then make a 512* colour/spec map that covers twice as much space, thus you get the appearance of the same texel density while getting half the repetition. you do need an app/engine that can assign different uv tiling values to different maps
keep it up
[/ QUOTE ]
Great ideas here Shep, thanks for the tips.
I'd love a bit more explanation of whats going on in that last part. So what your saying is that I map the normal map to a different channel with half the tiles that the diffuse would have? Using a 4x4 square the normal map goes over it 4 times on a (channel?) seperate UV and the diffuse then goes over it once, but encorporates the 4 "tiles". That way I can paint details onto more bricks for greater variation?
Also, does UE3 support that? I'm sure it does. Do you know specifically if there is a tutorial on playing with different channels or UV maps on objects or terrain? I should also say that I DO intend to make or use a dirt texture and probably some sort of foliage layer (weeds) on the terrain in game to further break up the ground.
This was my original reference, I didn't copy the white stones because I figured that particular detail would make it blindingly obvious its tiled. I tried to keep the main 3 colour variations (grey, blue grey and dark blue) in. I think though that if I understand what you are saying I could get some of the extra variation in the dirt/grout and bricks.
im nt sure if UT3 can use this technique so it may be redundant, but basically your using max, in the maps menu(the render mapping not nessecrily the realtime depending on the shader), there will be tiling options (a number) if you make that 2 in both U & V in the normal map, you can use a colour map that covers twice as much space as the normal map with the same amount of apparent detail.
i use the technique alot, also halo3 uses it alot, you will find their doors and panels will have a large normal map to give the form, a half tiled diffuse to give the variation, and a detailed (very tiled) spec map to give the impression of more detail (specular can be more tiled cos usually you only see it effecting small amounts of screen).
im not sure how applicable to ut3 it is, but iff you cant use this tech then just try doubling the map (in PS) and adding some more variation that way
I would suggest that u model all of ur level geometry, at least roughly and test the gameplay in UT3. Once u (and players
[/ QUOTE ]
I definitely agree for a playable level.
I'm actually going for more of an import/environment look at the moment. It is going to be a closed section of map because I don't have the months it takes to block-out/playtest and then artify a map. My goal is to make an environment scene in max/ue3. But learn UE3 import tools, lighting tools, post effects that kind of stuff in this closed environment. I don't plan on releasing this as a "map" per say. Also why I labeled it an environment and not a map.
Definitely appreciate the advice though, if I had more time I would easily be following those types of steps.
No real updates at this time. I blocked out more stuff in Max and I'm working on some tileable textures for the BSP that will enclose the courtyard.