Home 3D Art Showcase & Critiques

Desert Scene

First time posting here, was recommended by a friend who comes here alot. I am working on a full desert scene, low poly, normal mapped, and spec mapped, so that I can get used to more recent advances in tech and what not. This is my first attempt at normal mapping, and I used the photoshop plugins to make the normal. I am actually toying with the idea of making my models in mudbox, since I can make a better normal that way. Anyway, enough jibba jabba, heres what I have so far. Please critique and rip apart.

DesertScene.jpg

I have a ways to go when it comes to texturing by hand, so any help you guys can offer would be excellent.

Replies

  • StJoris
    Options
    Offline / Send Message
    The cactus looks pretty good, but the stone has severe stretching. It basicly looks like you slapped a photo on. Perhaps you should draw a concept of how you want to the rock to be, and hand paint the shading, then overlay with photos if you want photos in badly.
  • Mark Dygert
    Options
    Offline / Send Message
    I think the texture on the rock is fine, but you need to go back and work out your unwrap job.

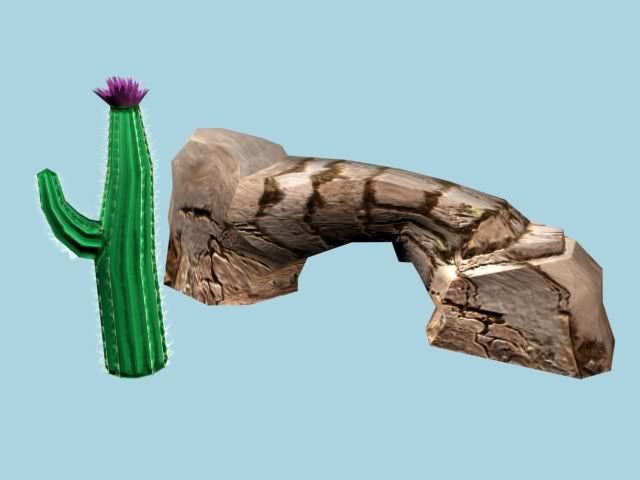
    You're off to a good start but far from a usable asset. I would suggest that you add some smaller rocks, alpha grass, maybe even a small cactus around the base of the rock and cactus to help them blend into whatever scene you put them in.

    Wires and texture sheets if you can post em would help me, help you with your unwrap job =)
  • Em.
    Options
    Offline / Send Message
    Em. polycounter lvl 17
    Hey there umbrella man, I agree with Vig, texture on the rock is fine, it's issues with the unwrap that's killing it..but you know that. Really like that cactus, it's fun. Take a second look at the unwrap and keep at it. Update! smile.gif
  • The Umbrella Man
    Yeah the unwrap is terrible on the rock. I need to totally rework it, I have just been half stepping on that because the thought of redoing that texture is a nightmare, it took me something like 6 hours texture alone to finish. I'll post the wires and texture sheets later. Thanks again guys and Gals.
  • The Umbrella Man
    Heres the uv layout, and the skin. I would like to kill the stretching without doing much to the skin if possible, but if not, screw it, I can always do it again.

    DesertWindowWire.jpg
    DesertWindowSkin.jpg
    DesertWindowWireFrame.jpg
  • Vylaroth
    Options
    Offline / Send Message
    Try to follow the form of the rock more in the UV map lay-out if you're not afraid of wasting some space. That, or try painting the outlines of rocks in some 3D paint mode if possible and then clean it up in the image manipulation program of your choice.
  • Sayanora
    Options
    Offline / Send Message
    Sayanora polycounter lvl 11
    Hey,

    I think your main problem has already been mentioned, but I just thought I'd share my method for this particular brand of rock. Conveniently enough, I'd modeled one awhile ago for project I worked on.

    I'm assuming you pelted this, correct? Your seams look like they're set up right, so my only guess is you didn't do any relaxing. If you did, I'd give it another go, with these settings. These settings aren't concrete, but they're a pretty good balance for most relax functions. Also, it's guaranteed that you'll need to manually edit your meshes to some degree. If you were already aware of this tool, hope I didn't insult your intelligence smile.gif

    Here's a picture, hope it helps!

    rockexamplewt3.th.jpg
  • The Umbrella Man
    @Sayanora: Hey thanks, that really helped. I wanted to use pelt mapping because it's quick and I want aquick art pipeline. I didn't realize that relaxing did that for you. After I tried I came up with this.

    DesertWindowWire-1.jpg
    DesertWindowSkin-1.jpg
    DesertWindow.jpg

    You guys were surprisingly helpful. Normally nobody steps up to help on other forums. Thanks a lot guys. I'll post stuff as I make it. Feel like I may be scrimping too much on the poly counts, what do you think?
  • Penzer
    Options
    Offline / Send Message
    Penzer polycounter lvl 17
    Thats better than it was before, good job on the improvement.


    example1.jpg

    In the texture on the left, you can see the smudgy areas in the encircled area. This is probably from using the clone stamp or pattern stamp brush too heavily. In the image on the right, you can see a soft edge where the two different rock patterns meet. If you want to improve that you need to match the colors and patterns up so it looks like the same rock. You could probably hide it with some cracks, or some more of the moss you have growing in the middle. Good job and good luck
  • Mark Dygert
    Options
    Offline / Send Message
    About the unwrap. Pelt mapping is good but best used in chunks on complex shapes. You'll never be able to get rid of all the stretching but you can do a few things to minimize it.

    1) You have natural seams in the rock you can exploit and hide your texture seams, make full use of them.

    2) As Penzer mentioned don't paint a blurry defuse do what you can to better blend photo and hand painted. If its all hand painted I apologize, but some areas look MSPainted while others look top notch.

    3) Just because its one object doesn't mean it needs to be one UV piece. I would break it up in 3 pieces and do 3 cylinder unwraps or pelt maps. Doing them in 3 pieces means there will be less stretching taking place on each piece. The less you have to POUND something flat the less stretching there will be.

    The unwrap you have now is stretching the sides and inner pieces to pull them out and make them flat with the top. Thats fine if your working on a top down game. The angle presented to us suggests otherwise so I suggest you unwrap it something like this...

    RockUnwrap.jpg
  • Matabus
    Options
    Offline / Send Message
    Matabus polycounter lvl 19
    Also go ahead and paint up one tileable rocky texture that you plan to use here. No point in trying to "stay within the lines" while painting your uniquely unwrapped piece. There are MANY benefits to using tileable textures when it comes to natural environment art.
  • The Umbrella Man
    I actually have two sets of unwraps. One is a pelt, one is one that I did with three separate pieces like Vig has above. It seems like I have a hell of a hard time keeping things from stretching in the one that is broken into pieces. That one also requires I redo the texture, which would probably take another whole day for me to do. Since this is just one of about 19 models I have to complete, I'll probably call this one done, and come back to it later. Thanks for the advice. I'll keep more coming as I get it.

    EDIT: Or maybe not. I guess I'll give texturing the other unwrap a try just for shits and giggles and see what floats up.
  • Thegodzero
    Options
    Offline / Send Message
    Thegodzero polycounter lvl 18
    holy fuck metabus that new icon gif you have is slick as fuck!
  • The Umbrella Man
    Heres a new one. About 3 hours, kinda stumped on the texture, there are parts I like, and parts I despise. Don't know what I should do at this point.

    RockMound.jpg
    SandStoneMoundSkin001.jpg
  • StJoris
    Options
    Offline / Send Message
    That looks pretty good, I was wrong about first one, that texture was better than I thought. You seem to have painted to match the distortion, it's a way. Personally I would have unwrapped like this: seam around the top, flat, seams around the humps (both cases there are natural seams there so it's ok. Then I'd just cylinder/pelt map the rest with a seam from top to bottom, then you'd have a pretty rectangular uv chunk for it. You could then use chuggnutts uv tool for straightening out some if you want quickly.
  • EricElwell
    Options
    Offline / Send Message
    EricElwell insane polycounter
    Umbrella man,

    It really depends on the style you are going for. This latest piece is 10x more appealing to me because it seems to hit closer to a style mark, if that makes sense. That is to say, your first texture seems to use photo source with a soft clone brush. This came out blurry, and a bit incoherent. The way the UVs are set up, the texture is placed on the mesh incoherently, and does not look like a natural rock formation. Also, the mirroring in the texture is a turnoff, as you could just mirror the UVs and save texture space. If you use unique texture space for everything, make everything unique. That said, using photo source incorrectly can be a major turnoff, and really hurt your piece.

    This last painty version has it's quirks, but it hits closer to the painty/cartoony style. It's consistent, and the UVs / Values on the texture fit the form better. The actual formation of the rocks is stylized in the mesh and this helps a lot. Though the rock formation on the texture is quite a bit off in some areas.

    Another thing you want to keep in mind is how much lighting you want to bake into the texture. If you are doing a straight diffuse, with no normals, and you do not have dense geometry, then I would suggest picking 3 base colors, light, mid, and dark. Just slap those down boldly with your global light source in mind. Then you can work from there. I might suggest doing a render to texture, or pits'n'peaks just to see where you might want your values to lay, but I would advise against shortcuts while you are learning.

    I would be more specific but it's late and I do not have my wacom on this machine to do a paint over to explain better, but i can do this later if you would like. Keep at it, the more mileage the better you will get!


    Metabus, I dig the avatar smile.gif
  • The Umbrella Man
    If you could maybe circle the parts you like, and the parts you think are off. That would be a great help towards pointing me in the right direction. As it stands, I look at this model, and I just don't know what I am doing right, or wrong.

    EDIT: My goal is to get this peice rendered to a point to where it no longer looks cartoony. I want to strive for as real as I can get it. So when I say I don't know where to go from here, I mean I don't know what the next step in texturing is to get this looking more real, and less painted.
  • IronHawk
    Options
    Offline / Send Message
    IronHawk polycounter lvl 10
    If your looking for good reference do a google image search for joshua tree CA and then start browsing. J Tree has boulder formations very similar to what your painting. Smooth rock with lots of seams.
  • The Umbrella Man
    Ok I went in and did a normal map in mudbox. I need to kill alot of the baked in shadows to make the texture work, but I wanted to get your opinions on the normal before moving on. Heres the reference.

    coyotebuttestimelesssandstone.jpg

    Heres the normal

    screen.jpg

    Now that I look at these I probably need to make the ridges a hell of a lot smaller...

    EDIT: Ahh hell don't know why I posted this, it's so obviously stupid. I need to go back and rethink this thing. Sorry for spamming.
  • The Umbrella Man
    Ok I think this is a little better, I still need to adjust specularity, and redo the texture to fit the new design. I meay unwrap again and rebake. What do you guys think?

    render.jpg
    render002.jpg
  • Mark Dygert
    Options
    Offline / Send Message
    The defuse is looking better but you're all over the style meter from the start of this thread till now. I think you are getting closer to a working asset, just nail down if you're going for cartoon or realistic.

    I would tone down the spec, and you might want to see what it looks like when you remove it? Most rocks, especially rocks in dry places are hardly ever that shinny, unless someone coats them in something?

    You're headed in the right direction keep at it, big improvements with every post! =)
  • Jesse Moody
    Options
    Offline / Send Message
    Jesse Moody polycounter lvl 17
    That last version is 10x better than the others. Shiny as all hell but you said you are fixing that so no biggy.
  • The Umbrella Man
    Alright, thanks guys for the suggestions, I hope I followed them sufficiently. Heres the version that I am calling done, but that's tentative on feedback I'm guessing.

    SandStoneRenders.jpg
  • The Umbrella Man
    My next prop is going to be a desert ruin. Heres what I have so far.

    DesertRuins.jpg

    Is there anything glaringly wrong with it so far? It's still very much a wip, and I intend on blowing more walls out, I would just like to know if I am going to sun into problems with some of my divisions later.
  • EricElwell
    Options
    Offline / Send Message
    EricElwell insane polycounter
    Hey, sorry i did not get around to doing a paint over for you. With the rocks, you made a lot of improvement, but you're missing some key things from your reference image. Instead of just arbitrary cracks and ripples, the reference clearly shows a grain in the rock pattern, with some variation in rock layers. Also the the color variation tends to follow the grain horizontally. Another thing that is hurting your piece would be the black shadows. Look at your reference image, the shadows are reddish.

    On the building, a few things stand out. First thing that caught my attention was the way the bricks have fallen out below the window, yet the window is intact, does not seem to be a natural deterioration. Second thing on the window, look at it without the broken out pieces. It seems to be a bit high to me. If the "broken out" area below it is actually a semi broken doorway, you may want to tweak the proportions to make it read more like a doorway (taller or thinner, lower to the ground or with a front step). It's a good idea to know how many stories, and where the floors/ceilings will be, even if it's an exterior only model. That will be your guide as to where the windows and doors should be. Also have scale in mind to determine how big and how many windows/doors you want. Other than that, I would just clean up the mesh flow a little bit. You can run into lighting issues with long/thin tris. There is a balance between lower poly counts, and good mesh flow / size distribution.

    Anyway, keep hacking away at it!
  • The Umbrella Man
    [ QUOTE ]
    Look at your reference image, the shadows are reddish.


    [/ QUOTE ]

    Is there a way to change the color of the shadows on a normal map? I didn't bake in any color on the texture, it's just a tiled sandstone texture, with a normal and a spec
  • The Umbrella Man
    I put alot of time into cleaning up the edges, I think total theres only about 2 triangle polys on the model, everything else is a quad. Heres a screen.

    810 Polys
    render-1.jpg

    I'm going to take this model into mudbox and start planning my texture layout. Does anyone have any examples of good uv layouts for buildings? That would be a great help in figuring out how I am going to lay out this monster. I was thinking 1024 pixels for the skin, is that a good size?
  • The Umbrella Man
    Here's a barrel. No game can be complete without a million of these strewn about.

    Does it at least look decent? I don't really know how good it looks because the flat texture is kinda lame.

    bump, normal, spec, and diffuse.
    Barrel.jpg

    I wanted it to be a lot more shiney in the blue parts but don't really know how to do that via the spec map.
  • Em.
    Options
    Offline / Send Message
    Em. polycounter lvl 17
    I like the dents, the dents in the rims around it look a little wonky. Is the stuff around the top grime? If so, I think it could use some finer noisy texture in places, and I'd remove the grime in some places. Not the best image, but this might give a better idea of what I'm talking about. Keep it up, you're definitely making progress, hit me up on MSN sometime.
    istockphoto_1513933_rusty_barrel.jpg
  • mikebart
    Options
    Offline / Send Message
    hey, When you were sculpting the rock formation in mudbox did you try using photographs of the same type of rock as stencils?
    Im havent spent much time in mudbox but I had a play around with that idea and got some realy nice results.
  • The Umbrella Man
    @Mike: Yeah I used a gray scaled rock texture actually.
    @Emily: I'll get with you on MSN.
Sign In or Register to comment.