Home 3D Art Showcase & Critiques

Keen's Progress

1
Hey guys,
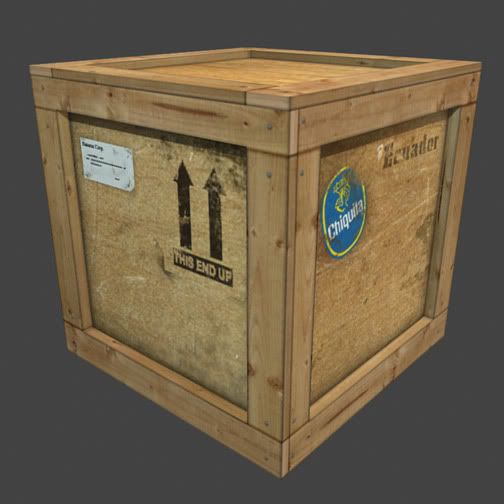
So I'm brand new to modeling and texturing and what your looking at is my first unwrap ever. I love it though! I want to get a lot better so I'm hoping to get some tips and tricks here. Anyways, critique the crap out of this thing. Thanks! grin.gif

Crate.jpg
Texture.jpg

Replies

  • rooster
    Options
    Offline / Send Message
    rooster mod
    the crate looks nice, but unless you're planning on baking lighting giving everything unique uvs is a bit wasteful. you could make a couple crate side variations and use them, but you dont need 6. you could probably use decals for the stickers too to save space.
  • Thegodzero
    Options
    Offline / Send Message
    Thegodzero polycounter lvl 18
    You only needed 4 of those sides. the ones in the bottom corner mover together then save that out and adjust the uv's to match and youl have a sexy model.
  • Mongrelman
    Options
    Offline / Send Message
    Mongrelman polycounter lvl 18
    Looking good, but as rooster said, you don't need to give each side seperate uv space, especially since it seems you are using the same texture for a few sides, just rotated.

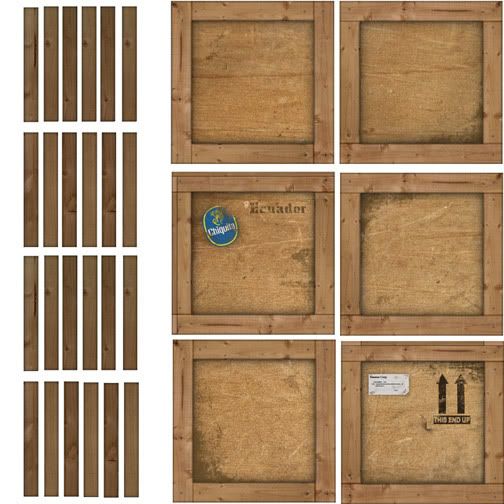
    You can just stick those sides on the same bit of texture, and rotate the uvs for particular sides to get the same effect.
  • Jesse Moody
    Options
    Offline / Send Message
    Jesse Moody polycounter lvl 17
    Very sexy box. Listen to what has already been said and you can bump up the res even more. By using decals you can easily make quite a few different variations of this thing quickly. Even changing the tint or adding some color to the boards around the edges would make this look different.
  • D4V1DC
    Options
    Offline / Send Message
    D4V1DC polycounter lvl 18
    Here:
    texturepc2.jpg

    Some nice wood texturing you got going on there, was any of this photo sourced? Just wondering, I added 1 or 2 shapen's on it seems you could get away with it in the higher resolution layout you might have laying around.
    Probably could have lost the other side but I was just showing the visual representation of what the others are trying to get you around to understanding.

    Good job, the trick to unwrapping is to find areas of the layout to use the same texture space on it. As well as all the information the others above this post have said.

    Anywho, I can't wait to see more.

    Welcome to polycount!
  • shape
    Options
    Offline / Send Message
    shape polycounter lvl 17
    cool box! other minor thingy, I wouldn't don't bother with padding around each element, just connect them up and it could be easier to remove seams too. Also I'd just sample a small section of the outer frame, for use on the inset extruded edge. That way your texture will be 100% wood smile.gif
  • The Keen
    Options
    Offline / Send Message
    Hey thanks for the feedback. I did what you guys said. Well, some of what you said. Jesse and Rooster, I honestly have no idea what you mean when you say decals. Apparently I'm not down with the 3-D lingo. Please explain. Any more critiques are welcomed. Thanks friends.

    Box.jpg
    newunwrap.jpg

    I know it's blurry, I messed up and only saved my art as a targa and not a .psd, so when I edited it I had to do some resizing. Live and learn.
  • Hollowmind
    Options
    Offline / Send Message
    Hollowmind polycounter lvl 18
    Looks like you messed up on the board ends on the top. You put the sawed off part on the wrong side at the top of the crate. I've circled what I'm talking about. Other than that very nice crate so far.

    boxfixya6.jpg
  • Spark
    Options
    Offline / Send Message
    Spark polycounter lvl 18
    Looking nice Keen, but like the guys said you can still have varient looking sides, without having to create so many sides to the box. Also, what Rooster means, is having a floating polygon that has an alpha on it, to give a different look to the side of the box, without taking up to much room in your texture space. Take the chiquata sticker, just have a polygon floating over that section and you can take out the side of the box with it on there, giving you more room for something else, or increasing your crate sides for more pixtel density. Alot of times, you are limited to a small texture size, so you have to get creative on how you use that space. Just some suggestions, again looking good.

    Spark
  • The Keen
    Options
    Offline / Send Message
    Yes...I know...I took forever to fix this dumb box. But here it is. Thanks for pointing out that mistake Hollowmind. Yeesh, you really have to pay attention when your unwrapping. I didn't get a chance to try out the decals, but that is an awesome idea and I'm going to try to use it in my future models.

    Box-1.jpg
    Diffuse: http://i65.photobucket.com/albums/h201/VeryKeen/boxunwrap.jpg

    Alright, so here is my new project. My 3D prinicples class has us making a tank and I thought it would be funny to make a "Gas Tank". It's a play on words get it? Come on guys, laugh, it's funny!...Ah well, any critiques would be wonderful, I want to make this thing right.

    Tanklol.jpg

    Tanklolwire.jpg
  • chinups
    Options
    Offline / Send Message
    chinups polycounter lvl 17
    LOL oh dude, I love your "gas tank" very well endowed.
  • Sage
    Options
    Offline / Send Message
    Sage polycounter lvl 19
    Looks really nice, I love the tank.

    Alex
  • jgarland
    Options
    Offline / Send Message
    Haha, I love it. Here's hoping you get bonus points for extra creativity. wink.gif Do you plan on texturing it?
  • warby
    Options
    Offline / Send Message
    warby polycounter lvl 18
    keen you should make those white borders the general color of the crate or mipmapping will generate white outline artifacts
  • The Keen
    Options
    Offline / Send Message
    Thanks guys! I'm glad you all like the tank. Jgarland I do plan on texturing it. I'm suprised there were no critiques so I'll move on to the texturing process.

    Warby, that's some great advice, never thought about that! I will start doing that on my new unwraps.
  • The Keen
    Options
    Offline / Send Message
    I was working on the unwrap of my tank and I ran into a problem. My Targa file looks like this.

    GasUnwrap.jpg

    The lines are incredibly hard to draw on top of. Everything is fuzzy and messed up. I don't get what I did wrong. My box unwrap was clear and perfect looking.

    boxunwrap2.jpg

    Can someone help? I'm so confused.
  • Ott
    Options
    Offline / Send Message
    Ott polycounter lvl 13
    What 3d program are you using? If max, I just render out as a .jpg or something simple and ignore the large file sizes of targas and tiffs. Just use the Select>Color Range tool in photoshop and get rid of the blackness.

    I think this is probably a Maya bug though...try rendering out your texture to a different file type and see what happens. I'm not much of a Maya guy so I won't be much help there....
  • The Keen
    Options
    Offline / Send Message
    Whoops, yeah I'm using 3Dmax. I did what you suggested but I got the same effect (even with bmp). Not a clue what I did to screw this up, but I think I'll just suck it up and get it done this way. Thanks though.
  • jgarland
    Options
    Offline / Send Message
    Hm... I've never seen something like that happen. Did you do anything differently? I'd like to try to replicate it in max to see what the problem is.
  • The Keen
    Options
    Offline / Send Message
    Hey jgarland, I put the tank on my server so you can download it:

    http://www.birdsofyore.com/tank.html

    If you can get a clean file that would be awesome, or anyone else for that matter.
  • Jesse Moody
    Options
    Offline / Send Message
    Jesse Moody polycounter lvl 17
    Hey man I dropped it into my max and it came out fine. What version of max are you using?

    I am using 8 and 9 but i used texporter to kick out the uvs.

    Anyways here you go.

    www.artbyjessemoody.com/goodies/mytanktexture.zip

    Just open it up and it's already setup for photoshop.
  • The Keen
    Options
    Offline / Send Message
    Hey thanks Jesse! Although it's still not as clean as I would have expected. I use 3Dmax 8. Nevertheless this is much better than mine so I will use it. Thanks!
  • spinal
    Options
    Offline / Send Message
    spinal polycounter lvl 17
    Awsome progress, I can see this will go far!
  • ChaoticCreature
    I think the box is perfect:) And the "gas tank" is a really cool idea:).

    thumbs up from here.
  • The Keen
    Options
    Offline / Send Message
    Making some progress on this tank. My goodness there's a lot of little things to texture. I've been staring at this tank for a long time and would love to get some fresh eyes on it. Thanks. grin.gif

    GasTank.jpg

    GasTank3.jpg


    And the Unwrap: http://i65.photobucket.com/albums/h201/VeryKeen/GasTank2.jpg

    Oh and the treads will be different. That little metal object standing out by itself will soon be cloned a bunch and be replacing my temporary treads. I'm just in the process of figuring out how to do that right now.
  • Uly
    Options
    Offline / Send Message
    Uly polycounter lvl 15
    Looking good! I'd put the seam on the hose on the bottom though. It's quite noticeable.
    Edit Looking further, it looks like it might be a rendering issue. Sorry if that's the case.

    The large 'X' on the side seems a little too large with some blur too... I'd slim it down a tad. The rest of the texture looks crisp... That's one thing that pops out at me...

    FFS Explosive Hazard symbol! : ( Think of all the people that haven't been deemed with common sense. It could add a little visual flair to the red base.
  • The Keen
    Options
    Offline / Send Message
    Thank for the comments Uly. Those weren't seams you were looking at I'm just bad at lighting. I think I got things under control though. Anyways, I did the two things you suggested. Well sort of. I couldn't figure out a good spot to put an explosive symbol so I got a "Explosive,No smoking" sign instead. Still have to do the treads and then I will consider this done.

    GasTankv.jpg

    The Unwrap: http://i65.photobucket.com/albums/h201/VeryKeen/GasTanktexture.jpg
  • The Keen
    Options
    Offline / Send Message
    Had some down time and thought I'd start on a small project, making a newspaper stand.

    newspaperstandwires.jpg

    NewspaperStand.jpg
  • The Keen
    Options
    Offline / Send Message
    Alright I think I'm done with this thing. Time to move on to other things.

    Tank.jpg
  • Wells
    Options
    Offline / Send Message
    Wells polycounter lvl 18
    Thats a pretty cool little tractor. Its missing a spec pass on the diffuse, though. Be a shame to put it out to pasture with out that last bit of love it needs to be a real stud.

    Go over it with a small hard brush and pick out where the highlights would hit on the bare metal.

    Also... look at the size of the spout on front compared to the rest of the model, then look at how much texture space you gave him. For shame! He's a focal point for the piece, pointing right at you, and you've got him with the least pixels. It tricks the eye into thinking the entire thing is very low-rez.

    Those two relatively quick fixes and you'll have a sweet little piece!
  • sama.van
    Options
    Offline / Send Message
    sama.van polycounter lvl 14
    You maybe can add some details... like this ?
    TheKeen_A_00.jpg

    Objets need to be joint togehter, and it help to know how your machine was built..
    Some aerations or holes can give more life at your machine.
  • The Keen
    Options
    Offline / Send Message
    Thanks for the critiques guys, I guess I'm not done. I've never modified an unwrap before so hopefully it will run smoothly. And I like your ideas sama.van, I'll try to incorporate some more detail in there. I'll start fixing up the tank tomorrow. In the mean time, I've been working on this.

    NewspaperStand-1.jpg

    EDIT: Sorry, wrong URL, it's fixed now.
    Unwrap: http://i65.photobucket.com/albums/h201/VeryKeen/newsstandunwrap.jpg
  • The Keen
    Options
    Offline / Send Message
    So I added more detail to the tank and also redid the unwrap to give the spout more texture space. Unfortunately I'm clueless about how to make highlights. Can anyone help me with this?

    GasTank-1.jpg

    Unwrap: http://i65.photobucket.com/albums/h201/VeryKeen/GasTankRemake.jpg
  • conte
    Options
    Offline / Send Message
    conte polycounter lvl 18
    try to make specular map from your color map
  • Wells
    Options
    Offline / Send Message
    Wells polycounter lvl 18
    Spout looks much happier now.

    sent you a PM!
  • The Keen
    Options
    Offline / Send Message
    Sorry to keep posting this tank with such minor details, but I think I'm done with it now. I added a lot more highlights to it. In the process my brother taught me a new tool in photoshop, color dodge. That made highlights SO much easier. I love learning new stuff.

    GasTankFinal.jpg

    Unwrap: http://i65.photobucket.com/albums/h201/VeryKeen/GasTankTexture512.jpg

    Oh and Askhat I don't actually know how to do specular maps yet. Just focusing on diffuse maps since they are still new to me. Soon though! smile.gif
  • The Keen
    Options
    Offline / Send Message
    Starting a new quarter at the Art Institute which means new projects! One of my projects is making a D&D character. We had a few characters to chose from and I picked the "Kuo-Toa"

    Kuo-toa02-1.jpg

    I'm currently trying to get the right proportions on paper so I can start modeling him. Unfortunately I'm not the greatest artist, so if you guys can help me out on what needs to be fixed that would be awesome. I have 10 weeks to finish this guy so I want to make sure I start with a good concept. Thanks!

    kuo-toa.jpg
  • Davision3D
    Options
    Offline / Send Message
    Davision3D polycounter
    This creatures must be the weakest of the D&D universe! laugh.gif
    Your concept is a lot more stylized and simple. I like it but try to make it bigger and make some shadeing in it.
    If you want to make it like the original, you should put this big folds in it and and make the hands and foots more flat and longer.
  • killingpeople
    Options
    Offline / Send Message
    killingpeople polycounter lvl 18
    honestly, i don't think the shading matters all the much. i'd use the original concept image you're using as reference for form information and create an ortho to help lay down the geometry and get more familiar with the creature. i would however suggest you either draw bigger, use a sharper pencil, and work cleaner and less rushed. those propotion lines aren't even straight. use a ruler if you must! it might even help measuring the form dimensions at different angles so you can properly stretch them out. hub-bubhubbubhub!

    it appears as if he has no neck at all, like you've drawn, the back of his head appears to be just a lump and his neck is all loose skinned and implies he inflates that section. other than that, everything else can be adjusted once it's been modeled.
  • The Keen
    Options
    Offline / Send Message
    Thanks for the feedback guys, I made the feet and hands longer, made the art sharper, tried making the concept closer to the reference. I know it's lacking in detail, I'm mainly just trying to get the block out. I'll be adding all the detail later when I'm creating the diffuse. Anyways, hope you guys like this better.

    EDIT: I don't plan on making him very cartoony. He's going to be a serious character. The eyes are a bit misleading in the concept.

    kuotoa.jpg

    Also I got my portfolio site up! I don't have much to show, but it's nice to have one. Won't have to worry about it later. http://www.birdsofyore.com/loren/index.html

    website.jpg
  • The Keen
    Options
    Offline / Send Message
    Hello Everyone!

    It's been a while since my last post. I've been pretty busy with all the school projects. Anyways, here's my KuoToa WIP. I'm getting ready to texture him but I wanted to get some feedback on the model before I do so. Thanks. grin.gif

    KuoToa.jpg
  • EarthQuake
    Options
    Offline / Send Message
    instead of having so many sides dedicated to the roundness of the arms, but those into defining the shape, the "roundness" will never really read nearly as much, so try 8 sides, or even 6 for the arms and put those extra polys into giving the silouhet a cool shape
  • The Keen
    Options
    Offline / Send Message
    Thanks for the feedback Earthquake. I tried making a cooler silhouette but have artist block. Here's my attempt:

    Frogbah.jpg

    I honestly don't know how to make the silhouette look better so any suggestions would be awesome.

    By the way I did take out a ton of edges out of the frogs arm and it didn't change the look of it at all, so thanks for that.
  • The Keen
    Options
    Offline / Send Message
    Well I decided to stick with my "Before" character and ditched the "After". Here's my character so far:

    frog2.jpg

    frog.jpg

    The Unwrap: http://i65.photobucket.com/albums/h201/VeryKeen/kuotoaunwrap-1.jpg

    I would love to get some feedback from you guys on the texturing. I plan on adding a belt and arm straps, a knife etc. soon.
  • The Keen
    Options
    Offline / Send Message
    Yeesh, I can't seem to get anyone excited about my Kuo-Toa. Oh well, I have finished him. I'm pretty happy with how it turned out. Now, on to the rest of my school finals!

    FrogTurnaround2.jpg
  • ghost-d
    Options
    Offline / Send Message
    ghost-d polycounter lvl 17
    Don´t worry, your Kuo-Toa looks great. I love the texture on his hands. Very nice work.
    Keep posting more stuff like this.
  • Wells
    Options
    Offline / Send Message
    Wells polycounter lvl 18
    After posture was better... well, didn't look he was going to fall over, anwyays.

    I'm not sure whats going on with the eyes... at first I thought the pupil was transparent, but upon closer inspection that doesn't seem to be the case. Is the yellow part photo-refed?

    I don't think you're nearly ready to call this one done [unless you're just sick of working on it]. The texture looks like a simple two-tone color swatch with a texture overlay applied full-bore to the entire thing. Tut tut, this won't do. Look at all the great detail in your source material - all those wrinkles and folds. What fun to paint! Also missing is all the great, subtle colors. pink around the mouth/lips, the very soft change from the pale green to sickly yellow color on the stomach, arms, etc. As it stands, your color scheme sort of bludgeons the viewer. Try and make it look more natural.

    I'd lose the elephant skin overlay and start painting all the details that couldn't be modelled with your budget.
  • The Keen
    Options
    Offline / Send Message
    Thanks for the feedback guys. Sectaurs, I am amazed you knew I used elephant skin! man nothing gets by you guys. I positioned the render in a way where it looks like his eye is transparent (accidentally), it's not though. And I took note of everything else you said and I will make the changes as soon as I get all my other finals done. Although, I'm really not sure how I could hand paint convincing skin textures onto my unwrap, any advice?
  • The Keen
    Options
    Offline / Send Message
    Well, I lied when I said I was going to make changes on my Kuo-Toa. I'm not actually focusing on character design, I want to do environments and props. Like these!

    Victorian Telescope (my design)
    Telescope1.jpg

    Telescope2.jpg

    Unwrap: http://i65.photobucket.com/albums/h201/VeryKeen/telescope.jpg
    Spec: http://i65.photobucket.com/albums/h201/VeryKeen/telescopespec.jpg
    Normal: http://i65.photobucket.com/albums/h201/VeryKeen/telescopeNormal.jpg

    And another project I'm working on:
    gaspumpv1.jpg

    I'm brand new to normal mapping and spec. So any critiques on these would be very appreciated. I want to make them portfolio pieces.
  • The Keen
    Options
    Offline / Send Message
    Finished! Also added a lamp to give the gas pump some company. I shaved some more polys off the gas pump so it's now 715 tris. Messed around with the normal map filter in photoshop and tried doing a color spec. I would love it if you guys can take a look at my maps and tell me what I need to work on. Thanks.

    Diffuse, Normal, and Spec: http://i65.photobucket.com/albums/h201/VeryKeen/gasmaps.jpg

    finished.jpg
1
Sign In or Register to comment.