Hi Poly Attempt-Jaggir (And a Request for Advice).

polycounter lvl 20
The company is moving into "Next Generation" technology and I am now having to learn High Poly" techniques. For the "PracticeModel, I wanted soemthing I kew well, so I have gone back and picked this piece of mine as the "Concept for the creature.
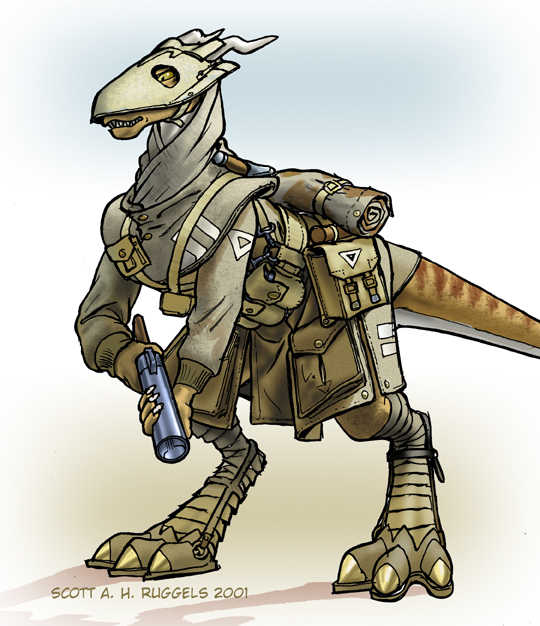
This guy finished out in the usual "Next Generation" full dress might look good in my portfolio, but to do it, well, that's the rub.
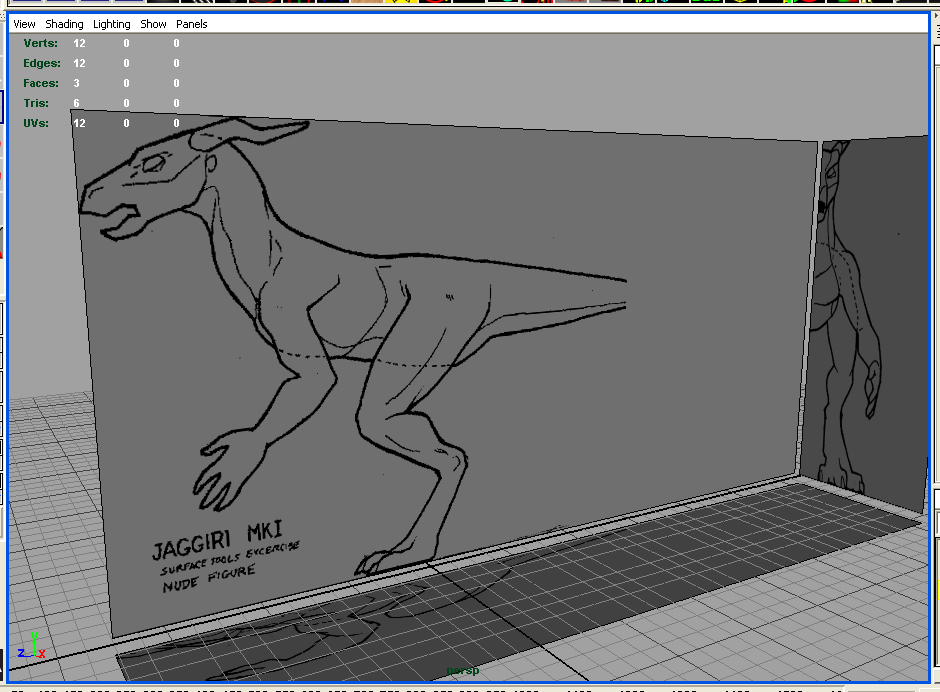
I set up the file, the way I usually do, with an inverted cube as a bas, and the plan views mapped to their corresponding faces:
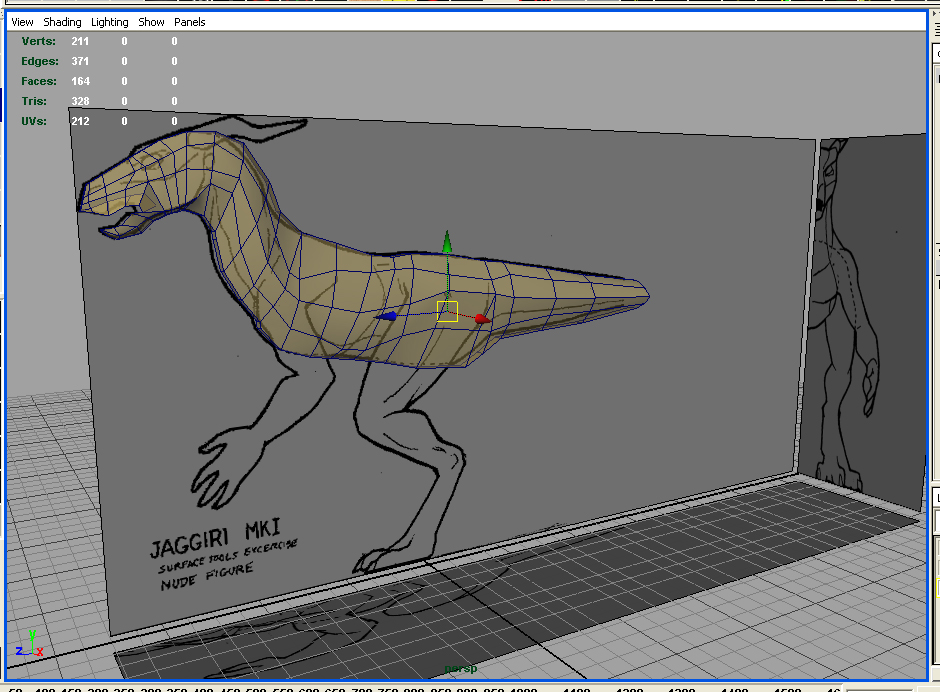
However, from where to proceed? If I follow the method described here:http://www.thehobbitguy.com/tutorials/polymodeling/. I get something like this:
And I am finding the mesh density actually becoming a pain to adjst and deal with.
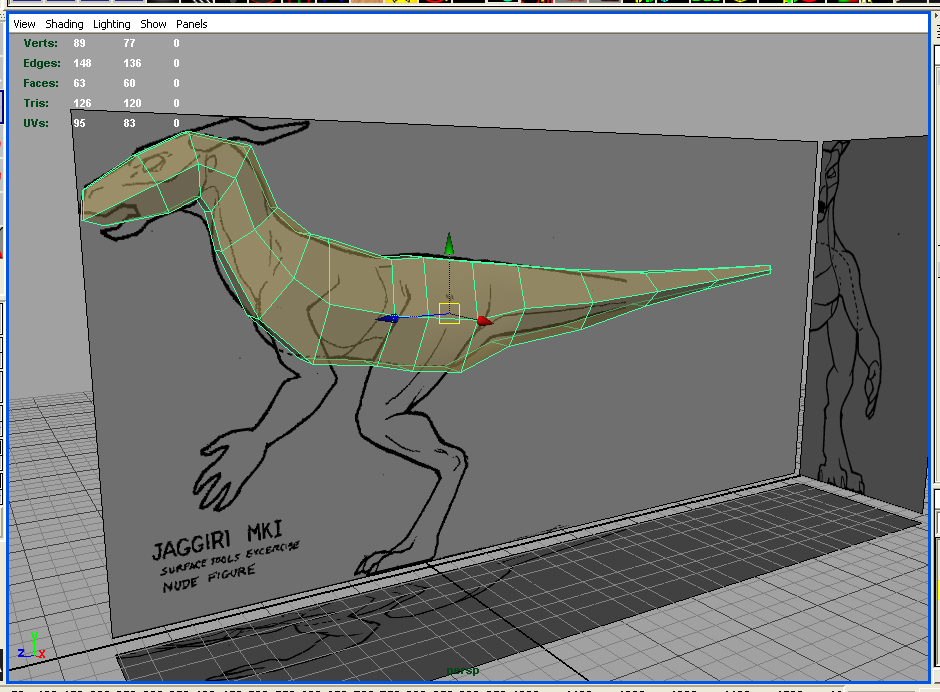
On the other hand, if I start with the "Box Method", as advocated by folks at the massive Black show, I get results that begin more like this:
I've done a lot of recent modelling using a varioation of the Polygon shell method, especially for production and it works for getting a useable monster quickly. But the Box method here, my instincts are telling me, that the fact I got a "good silhouette" in a shorter amount of time, and that I started with boxes, may give me a "cleaner" mesh. So how should I proceed in making this High Poly? (I want to get a base nude figure done, before I worry about Uniform, and acoutrements).
Thoughts?
Scott
This guy finished out in the usual "Next Generation" full dress might look good in my portfolio, but to do it, well, that's the rub.
I set up the file, the way I usually do, with an inverted cube as a bas, and the plan views mapped to their corresponding faces:
However, from where to proceed? If I follow the method described here:http://www.thehobbitguy.com/tutorials/polymodeling/. I get something like this:
And I am finding the mesh density actually becoming a pain to adjst and deal with.
On the other hand, if I start with the "Box Method", as advocated by folks at the massive Black show, I get results that begin more like this:
I've done a lot of recent modelling using a varioation of the Polygon shell method, especially for production and it works for getting a useable monster quickly. But the Box method here, my instincts are telling me, that the fact I got a "good silhouette" in a shorter amount of time, and that I started with boxes, may give me a "cleaner" mesh. So how should I proceed in making this High Poly? (I want to get a base nude figure done, before I worry about Uniform, and acoutrements).
Thoughts?
Scott
Replies
Scott
Scott: Both of those meshes look like good starts. Either could become a good base for a high-poly model.
You'll want to use (some advanced Maya user can probably correct me on this!) Smooth Proxy on that mesh? Then you can work on the low-poly model and it'll smooth it out like subdivision surfaces.
I'd say just work on a high-poly thing for the time being, don't worry about how it looks in the low-poly version, as long as the smoothed mesh looks right, then once the high-poly model is done, then make a new low-poly mesh from scratch around it, and render the normal-map from that.
I'm sure someone like Daz will be happy to tell you the correct workflow for stuff like this in Maya, I'm afraid I only use Max for highpoly work at the moment, so I'm not sure what a sensible way of doing that in Maya would be...
I like the concept, look forward to see what the final model turns out like!
MoP
I'll give it a go, then MOP< take a look at Smooth Proxy. (Then Z brush acfter that for Extra Detail).
Scott
http://www.thedentedhelmet.com/davin/replica_weapons.htm
Hopefully this will help, Now Back to the Question... Smooth proxy?
Scott
Best advice I can give concerning hi poly in general is to seperate out everything you possible can into seperate pieces and detail them out.
It is good to rough out your proportions first like you are doing, but then create new seperate pieces for stuff like the strap, the buckle at end of strap, the caps on buckle, the bolts and pins on straps, the latch on end of strap that connects to waist belt and so on and on and on and on.
A character generally takes us a solid month to model here and we still add a ton more detail in the normal map through photosho filters later so its good to settle down and get comfortable with the notion that you are looking at over a months work here, possibly 2 months to fully articulate your model.
I think that getting comfortable with how long this stuff takes and approaching each part as an individual form as part of the whole are 2 incredibly important things to learn right away.
Later on, when you understand the process, thats when you can spot where and when it is appropriate to cheat.
So you ended up plumping for the tech afterall eh?
You effects guy mailed me about it a wee while back.
r.
As to making it all in separate pieces, that is what i was figuring, building out a base nude model as a clotheshorse, and then sculpting the great and pieces over it. I know the character, and I know how Military Equipment looks and is put together, Idont see making a lot of little pieces as being a bad thing, just a buit tedious, the gear is loosely based on British Pattern 37 Web and construction techniques so I can use common straps and fasteners and snaps all over.
I'm just trying to figure out how to approach the body. "Smooth Proxy"?
Scott
There isn't that much difference between the two of them, especially time-wise.(I remember dimly though that there is no shift-cloning edges in maya, so it could be different there.)
You could have built the very same light mesh that you got with the box-modeling method by using the one of the hobbit-guy. All you have to keep in mind is to build from "big" to "small" and start detailing only if the rough forms are defined, so you don't have to move around too many vertices/edges/faces later in order to apply more global changes that could have been accomplished by just moving two or three vertices at an earlier time. As for permanently subdividing your model in order to quickly get a higher detailed mesh -as I understood it (I'm no maya user)- I personally wouldn't do it unless the basemesh was very rough and literary build out of extruded boxes. But opinions may differ on that
Okay
Scott
Hit polygons>smooth on either of them right now and you'll see that your result is just an undefined blob in the vague shape of a dinosaur. And now undo it.
The key is definitely to not feel overwhelmed with verts and edges to shift around. So keep the cage light, and only start detailing out when you're happy with basic forms. Just get stuck in with the split poly tool. Keep everything as quad as possible, and use edges close together to define a harder edge.
If you are just starting out I would highly recommend using the CPS toolkist as opposed to Mayas crappy out of the box smooth proxy. It has way more functionality.
However, nowadays personally I simply use 'smooth and undo'. It's crude but it works. Heres the thing: the purpose of any kind of smooth proxy setup is to be able to easily work with your control cage and see the driven smoothed result at the same time. But the more high res modeling you do, the less you will need to see both your cage and result simultaneously. Because you basically learn to predict how the smooth algorithm affects the geo and how it will look. You sort of gain this sixth sense for it. Its hard to explain but its very satisfying. I hope that doesn't come across as arrogant.
Grab cps, ( http://www.highend3d.com/maya/mel/?group...;sort=file_name ) and just start trying to flesh out the shape of the thing and you will start to get a feel for how your topology on your cage looks once smoothed.
That design you have there has an awful lot of bags and straps and stuff which can be real tricky. As Ror says, aint nuthin' like jumping in at the deep end
Even though it will be in Max and not Maya, I am going to be doing a high poly video tutorial in the near future, so if you wanted to look for that, hopefully it will be in time to help you. I'm also going to make some quick reference cards (jpegs) for people to print out with common techniques and meshflow resolutions.
I personally prefer the box method, and I just slowly cut away the details till it's refined.
Also I'd say a month is far too long for that concept. It might take that long as a side project and as your first model, but a seasoned high poly guy should be able to crank that out in a week, the high poly anyway. I know Mr Rockstar has been doing some models of that complexity in 4 or 5 days. Arshlevon and myself have been reproducing similar feats as well. Don't let the time factor dishearten you, some people take longer, and you will definately increase speed with time.
Poop, the time factor isn't a worry, really. It is a side project, but being done at work to practice Hi Poly techniques, as well as "looking productive" while I do this and Learn Z-brsh and some other new "Next Generation Tools". Still I'd like to take a little time on this, but I am not seeing where my 200 Polygons and hour estimate for low to medium low polygon work will translate to High Poly work. I'll just have to dive in and see what I get. Thanks for the Advice, though.
Scott
I'd say that for the concept you chose the Zbrush part is quite a while away, and you can do most of it in the 3d pacakge( I have practically zero Maya knowledge, so I'll ignore the specifics).
the great thing about HP as already mentioned is that you can seperate it into multiple objects. Each object can de detailed as much as you want, and you can intersent and boolean as much as you need to (though this can screw up smoothing, but you already know about the perils of booleans).
So you can build your accessories separately, cut holes for the belt holes, boolean or intersect your belt loops and buckles and buttons. All thos patches you have that we used to just paint? Build them as seperate objects and simple place them into the mesh.
You low poly version is also easier to build (your low poly cage will still probably be higher than what you are used to) - as well as having your old 2d sketches, you will have a fully formed 3d concept model to check it against, and probably verts to snap your low poly cage to.
If you havent already seen it, I really cannot stress how good Martin Krols Demon.avi is. it'll take a little bit of searching as there are a few dead links out there. If you can find it I can upload it for you, its a fair size.
He builds a nice quad mesh then details it, but what you might like to see is the way he builds the accessories.
If something is made out of two panels butted together, then heck, make it that way
[/ QUOTE ]
Can't agree more. Always hurts to see meshsmoothed lowpoly models with some random details carved into them, while to have something look like it was built, you should model it the same way.
A good thing to do if you're experimenting with new stuff is to not start wih the most visible and important part of the model.
I'd start with one of the bags, probably the big one on the side. Seems like a good playground to try out the different ways to approach hipoly modeling.
That should warm you up and give you a bsic workflow to follow.
But I always wanted an action figure like that. :-)
Progress to be posted AFTER i Return from San Diego onthe 20th.
Scott
when i started high poly modeling, I didn't really find that it was any different than low poly modeling, even tho before i started, i had no concept on how to do it, which is very strange..
just keep everything quads, nice and clean, and methodicaly add detail. i prefer the box method a little more.. if you have that base mesh that you posted above, you can just start by grabbing some polies at the base of the rear leg and extruding them down, rotating, etc etc, untill it forms a proxy leg, which just makes out the basic shape of the leg. from then, it's a matter of adding lines, and adjusting here and there untill you get a shape you're happy with. there's a few tricks that might be useful, like adding edge loops around the leg on the body, to help with deformation, although that might not be nessisary. high poly to me is just keeping my mesh clean, and bringing edges together to make creases when you want them. you can make the dino's body like that, faily simply. as far as the equipment goes, like ror suggested, just make them separately. a proper rig would hold them all together, and quite frankly, if you want something to look right, you've got to build it the way it acctualy is in real life.
and make sure you take your time, although i'm sure i dont need to tell you that.
i hope that helped, and wasn't just incohearant banter. if it was, make sure and tell me so
oh, btw, Scott, once again, your knowlage of all things ww2 is absolutely staggering.
http://prymevalgraphics.com/martin_krol_vids.htm
As it turns out I had seen them before, but long since lost the files, so it was good to grab them again.
Thanks for the tip!
I will update as I make major changes. Now I just need to figure out how to put in the mouth...
Scott
As you have already said, it results in really bad level0 meshes, and as soon as you get to a certian level of detail it will not be a practical modeling aproach (1. because of performance issues while modeling, and 2. because you don't have as much controll over the mesh as you have with a clean level0 mesh).
It basicly only works well, for round, cartoon like meshes.
Scott
That's usually what control cages look like at this stage... I think you're on the right track, Scott. For the mouth you can just cut some new edges in for the approximate shape, then extrude those inwards, that should work.
MoP
But he explained it in a way that made me think that he is actually working in a smoothed mode, while manipulating the control mesh. Which basicly means that is is just looking at the smoothed result, and not actually trying to get a good level0 mesh.
Working like this results for example into really sharp spikes (and sometimes overlaps) in the level0 mesh which will look ok in smoothed mode but really limit your control over the final result, and are also bad for unwrapping and animating the mesh.
But it is probably also my aproach to basicly model 100% detail directly into the mesh, and only blocking it out very roughly before that (which works pretty well
I hope this made sense (if not I blame it all on the Irish beer
Yeah, it's usually a good idea to switch off between the control mesh and smoothed version (if you're not doing that already, Scott - are you?) just so you make sure the low-poly cage is staying fairly sensible and workable.
JKMakowka: Also though, if this is purely for a normal-mapping exercise (which it seems to be), it doesn't really matter what the control mesh looks like as long as the smoothed result is ok, since it's just the smoothed version that will be baked down to a different low-poly mesh later on.
Picture1
Picture2
(!Warning nudity!)
This is actually really well done, but as you can see, the smoothed result looks great, while the level0 mesh looks well 'urrggh'. I guess this mesh is done the way described above (not entirly sure though, might be also to save rendering time or something like that). And it is not only bad looking, but a mesh build like that is not really well suited to add further detail (without drastically changing it) and UV-mapping and descent weighting for animation will be also quite difficult to do I guess.
Scott
I am not really talking about normalmaps and such, just about doing highpoly models the proper way (tm). I guess I am just a bit old fashioned, and too influenced by the digital sculpturers over at Spiraloid
But just because you can get away with a lot of things when using mormalmaps, doesn't mean a proper highpoly mesh doesn't look better
Zbrush, btw, is a nice tool, but it is way overrated at the moment. Actually I think it is a really nice tool to do surface detail a lot better than it was done before by bumpmaps and stuff like that, but it doesn't really replace a well crafted base mesh. But than again call me old fashioned
Overall after several months with it now, I'm definitely generally somewhat
While I have not used it enough to say so with complete confidence, I have been watching and learning from Kevin Lanning's use of it on the characters on the Gears of War.
I think its an incredibly useful tool that lives up to expectations with the correct workflow.
While I need to agree that it is a laborious process in terms of how many pieces you are required to break your model up into so you can export/zbrush/polycrunch and return to max, you can't argue with the results.
In the end , it is all about results I think.
Quality has always taken time and now that the bar has risen again, as it always has before, quality is still the deciding factor and we are simply required to become more capable with the time required for that quality which has always been accomplished by spending more time practising in the past.
I don't see a reason yet to assume the same will not be true whilst sure, I still appreciate that it all takes longer still now
r.
MOP I'm all I am doing is using face estrudes, and being very vcareful to keep thing 4 sided. to keep themesh logical, if not perfectly smooth. Adding detail only as necessary at the moment. I may need more general detail, to tighten up a few places but it seems to work.
Scott
Scott
well after about 4 days of not very hard work on it, The basic shape and elements are all there. It's odd seeing a creature developed before my education in 3D appears as a full volume form. it's evident, that I cheatd a lot with the form, and in making the model Ihad to decide between the discrepencies between the front and side view.
So from now it will be some twiddling and tweaking of vertson the control cage and adding a little more here and ther for some muscle definition, but that's basically the shape, for now, When I am done, next will be to drag it into "Z-Brush" and learn how to use that properly, so that this can be the dry and dustry creature I've always imagined it to be.
Scott
I know you mentioned tweaking and a little adding for muscles, but...
I'd say, personally, that you need to make your low-poly control cage quite a bit denser before moving onto zbrush.
Really, it works best if your cage is closer to the final result than you've got it here.
Anyway, Im sure you'll turn out fine though!
Keep up the good work!
Outside of managability, there isnt much reason to practice polygon economy with this portion of the character.
Probably not a lot more in the head, though thats about as far as I think it needs (though I could be wrong). But once I have the base body, I can use it for several projects,and directions, like this:
Scott
I've found it helpful to look at other people's high poly meshes while I work on my own to see how they manage their loops and everything. My favorite forum for that is spiraloid. Might wanna check it out.
Scott
a puppy
http://img188.exs.cx/img188/8343/GM_Wire_WIP_04.jpg
http://img188.exs.cx/img188/6238/GM_Body_WIP_13.jpg
a head
http://img169.echo.cx/img169/476/newerdude97tr.jpg
high poly head tutorial
http://67.15.36.49/team/tutorials/criven/criven01.asp
3dtotal also had a good tutorial on modeling sebula i think...
It looks like youre worried about the polycount in your model. You dont need to weld anything together to make tris, instead you could just continue the loop all the way around the model. If you need more detail, make another loop. Anyways, my advice is mainly to just look around at other people's meshes...
So let me know what I should be doing now and where I can imrpve things. I hope to start with Z-Brush on this guy as soon.
Thanks.
Scott
Hope that makes sense.