Hi all, 
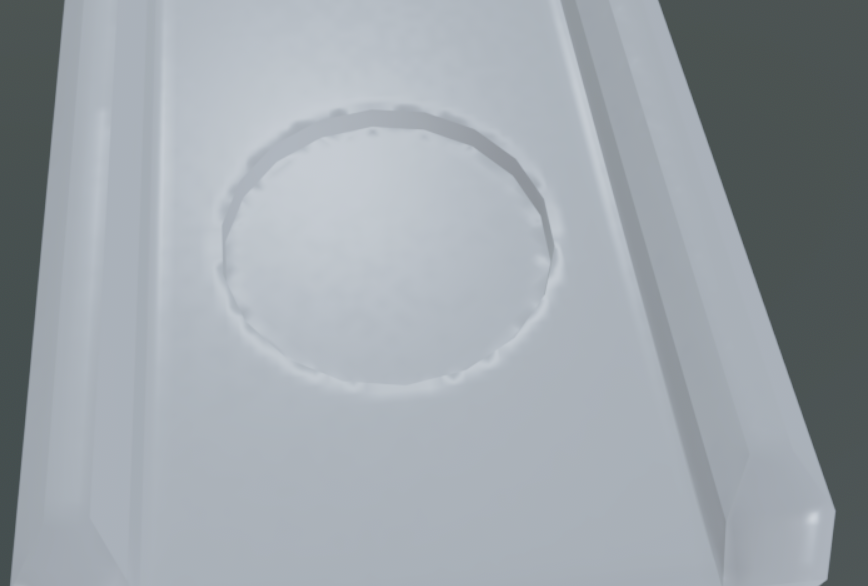
I'm having some issues with baking, the first image shows how the mesh looks in marmoset without any baking done yet and the last image is after baking the normal map.
I tried increasing the size of the low poly so it covers the high poly but that didn't fix the issue.
What does the low poly wireframe look like (shaded wire is best)?
Are you using hard edges anywhere?
Are you splitting the UVs where there are hard edges?
Are you adding space between UV splits, and using edge padding?
Low poly and High poly shaded wireframe
UVs in Rizom
I think not all the UV seams are marked as hard edges. After exporting the mesh to rizom for UVs then importing back into blender i can't see where I placed the hard edges.
Hi! Ideally share meshes (low, high) so others can reproduce the issue on their end. You can either zip and attach to a post or share a link to an upload.
Not all UV seams must be hard edges, but all hard edges should be split in the UV layout (when baking a normal map).
Also, you need more empty space between uvs. This prevents shading errors, because it stops it from pulling in the wrong colors from neighboring polygons.
In Rizom you have your Padding set to 3, and a 2048 resolution. 3 is not enough space.
Hi! Ideally share meshes (low, high) so others can reproduce the issue on their end. You can either zip and attach to a post or share a link to an upload.
Not all UV seams must be hard edges, but all hard edges should be split in the UV layout (when baking a normal map).
Hi! Here are my first thoughts on checking the files:
Throwing the meshes into Toolbag and baking, I saw streaks on parts of the model, checking in Blender looks like there are some bad UVs. Aside from that, many UV strips are not straightened, this means more visible aliasing artifacts along seams/ edges, especially at low resolutions ( Aliasing on seams - Painter docu).
There's hard edges which have no UV splits. (Here also an UV strip which could being straightened). You would either need to split UVs or remove the hard edge. Generally, I would look at the mesh shading in solid mode and deliberately set hard edges (+ UV splits) where it meaningfully improves the mesh shading (removes strong gradients from the mesh). Not every edge at an angle needs to be shaded hard. The more UV islands you have, the more space you need for padding between them.
Seems like the lowpoly has 4 different material IDs while UVs are packed together. Is there a reason for this? If not, I would use one material. If using multiple material IDs I would pack UVs per ID.
Checking the Blend file, I see 'smooth by angle' modifiers are being used. If you do this, be aware it might make edges sharp you then miss during unwrapping and don't split the UVs for. Sure, you could select angles by angle set in the modifier.
Keep in mind that if you simply pack for consistent texel density, it will give areas which are not visible (backside, top, bottom, interiors) same amount of resolution than areas that are visible. That's resolution that could go towards prominent or complex areas. On such an asset, I would manually control UV size based on visibility and complexity. I do the same for lightmap UVs, give low priority areas less space, increase space used by high priority areas. For assets using tiling textures or can bee seen from all angles consistent texel density makes sense.
Ok, so my game plan is to,
1 - Check the low and high meshes and make sure they match up correctly 2 - Set sharp edges on the low manually without using any modifiers 3 - Delete all the Material IDs since they're not needed, and i was just using them to make sure the high and low intersect with each other correctly 4 - Export to Rizom and place seams where the sharp edges are 5 - Straighten UVs when possible 6 - scale parts of the mesh depending on how visible they are and how much texture resolution they will need
Is this good??
Also, some questions if you don't mind,
1 - Is there a general rule on where I should and shouldn't place sharp edges? 2 - So, wherever I place a sharp edge, I need to place a seam there in Rizom? 3 - How do I know which parts of the mesh can be straightened and which should be left as is? Does it depend on the amount of distortion? 4 - The higher the texture resolution, the higher the padding amount, right? 5 - Should my low poly be slightly bigger than the high poly so the HP fits inside the LP?
Hi! By now you probably put your plan into action. When you're generally happy with the shading achieved by the modifier, you could apply it as a starting point. Personally, I define sharp edges while checking the mesh shading, placing UV seams at the same time (unwrapping in Blender).
I had another look at the model, so here are some further thoughts/ opinions:
- some parts of the lowpoly are perhaps more complex than neccessary. Of course, I don't know what the plan is, whether the vending machine is suppose to be a fully interactable hero asset or filler. If you simplify, for example make the body a detailed box instead of multiple, layered parts, that means you have less complexity, less parts to unwrap. I think stepping back for a planning and break-down step can cut down the time required for a model a lot, while improving visual quality. - Some parts of the lowpoly are quite dense while not contributing meaningfully to mesh shading and shape (for example that row and buttons offset to the left). - With the current model, you would need to use bake groups to prevent nearby geometry projecting onto each other. - Would start with perhaps 3 materials on the lowpoly: body, details, glass. - Possibly could rely on mesh shading for larger body part, only adding surface detail in texture. I would consider use of tiling maps for larger areas, should texture resolution prove to low.
I did a pass on the asset, addressing some of my points above, if you want something to look at. Attached you find zip 'VendingMachinefbx' containing the modified high and low poly. I did a test bake with that one in Toolbag using 'Quickloader'. Changed naming so it works with 'Bake Groups'. For the lowpoly, made the body one mesh. Used two material IDs, 'body' and 'details', left glass out for now. Triangulated meshes using triangulate modifier (to ensure consistent mesh shading between applications). UVs are split at hard edges and straightened were it makes sense (unless I missed some :P ). Islands of areas with less priority are scaled down, while islands of parts with curved detail are scaled up. In some cases I added some edges to improve projection/ skewing, I suppose you could Toolbags option to correct via a map but I like when it just works. Tweaked cage offsets.
Attached file 'VendingMachine_low' contains just lowpoly with zipped textures (normal, ao). Surely it's not perfect, but hopefully enough to illustrate some points. I hope it's okay to attach files of that size, I can remove them after some time.
1) Is there a general rule on where I should and shouldn't place sharp edges?
Whether to use a hard edge is depends on the asset/ situation and to some degree preference. Naturally, you'd want to have them at steep angle, so you don't have strong mesh gradients which the normal map might not be able to fully compensate for, due to its limited resolution and/ or color depth. Faint gradients shouldn't be an issue. When using LODs and the mesh shading is somewhat consistent between LODs, you can reuse the normal map, hard edges help to achieve this. If the mesh shading between two LODs becomes too different, you would need a normal map per LOD. I suppose less relevant if you're not creating manual LODs.
2) So, wherever I place a sharp edge, I need to place a seam there in Rizom? Yes split UVs for hard edges. Possibly you find more and better written information on the wiki. Since it's a common topic, there should be plenty threads as well. A way to test this would be to simply try different approaches on a model, the simplest shape being a cube (all smooth, beveled, hard edges + with UV splits, hard edges + without UV splits).
3) How do I know which parts of the mesh can be straightened and which should be left as is? Does it depend on the amount of distortion? I think with shapes that can be thought of as tubes with caps, this can be applied to. Aside from minimizing aliasing artifacts at seams, check out this thread by Neox UV Straightening and its perks on LOD generation. This wiki page might contain further bits on UVs you might find helpful. I do initial UVs by assumption, when I spot visible stretching or notable low texel density, I iterate on the UVs. When world projecting textures, stretched UVs are less of an issue.
4) The higher the texture resolution, the higher the padding amount, right? That sounds right, as you half the resolution so does the padding. As soon there is none, expect bleeding. Wiki has some suggestions. I would preview in engine.
5) Should my low poly be slightly bigger than the high poly so the HP fits inside the LP? I don't do anything like that personally. When doing low to high, I just match the lowpoly shape to the highpoly as nicely as possible within the given triangle budget. I do test bakes throughout, check in engine and iterate based on that. Some areas will need a higher mesh density than others to match highpoly, for example curved elements. Higher density might be also worth for parts that are silhouetting, so they don't give a facetted/ 'lowpoly' impression. Sometimes I add some tiling/generic parts to texture atlases to allow for some flexibility (straps, cords, wires, ...).
Oh gee, this turned out to be a wall of text. Well, written to the best of my ability and knowledge. Best read up and do your own tests :-B
Replies
Are you splitting the UVs where there are hard edges?
Are you adding space between UV splits, and using edge padding?
UVs in Rizom
I think not all the UV seams are marked as hard edges. After exporting the mesh to rizom for UVs then importing back into blender i can't see where I placed the hard edges.
Not all UV seams must be hard edges, but all hard edges should be split in the UV layout (when baking a normal map).
Aside from that, many UV strips are not straightened, this means more visible aliasing artifacts along seams/ edges, especially at low resolutions ( Aliasing on seams - Painter docu).
1 - Check the low and high meshes and make sure they match up correctly
2 - Set sharp edges on the low manually without using any modifiers
3 - Delete all the Material IDs since they're not needed, and i was just using them to make sure the high and low intersect with each other correctly
4 - Export to Rizom and place seams where the sharp edges are
5 - Straighten UVs when possible
6 - scale parts of the mesh depending on how visible they are and how much texture resolution they will need
Is this good??
Also, some questions if you don't mind,
1 - Is there a general rule on where I should and shouldn't place sharp edges?
2 - So, wherever I place a sharp edge, I need to place a seam there in Rizom?
3 - How do I know which parts of the mesh can be straightened and which should be left as is? Does it depend on the amount of distortion?
4 - The higher the texture resolution, the higher the padding amount, right?
5 - Should my low poly be slightly bigger than the high poly so the HP fits inside the LP?
I had another look at the model, so here are some further thoughts/ opinions:
- Some parts of the lowpoly are quite dense while not contributing meaningfully to mesh shading and shape (for example that row and buttons offset to the left).
- With the current model, you would need to use bake groups to prevent nearby geometry projecting onto each other.
- Would start with perhaps 3 materials on the lowpoly: body, details, glass.
- Possibly could rely on mesh shading for larger body part, only adding surface detail in texture. I would consider use of tiling maps for larger areas, should texture resolution prove to low.
I did a pass on the asset, addressing some of my points above, if you want something to look at. Attached you find zip 'VendingMachinefbx' containing the modified high and low poly. I did a test bake with that one in Toolbag using 'Quickloader'. Changed naming so it works with 'Bake Groups'. For the lowpoly, made the body one mesh. Used two material IDs, 'body' and 'details', left glass out for now. Triangulated meshes using triangulate modifier (to ensure consistent mesh shading between applications). UVs are split at hard edges and straightened were it makes sense (unless I missed some :P ). Islands of areas with less priority are scaled down, while islands of parts with curved detail are scaled up. In some cases I added some edges to improve projection/ skewing, I suppose you could Toolbags option to correct via a map but I like when it just works. Tweaked cage offsets.
Attached file 'VendingMachine_low' contains just lowpoly with zipped textures (normal, ao). Surely it's not perfect, but hopefully enough to illustrate some points. I hope it's okay to attach files of that size, I can remove them after some time.
2) So, wherever I place a sharp edge, I need to place a seam there in Rizom?
Yes split UVs for hard edges. Possibly you find more and better written information on the wiki. Since it's a common topic, there should be plenty threads as well. A way to test this would be to simply try different approaches on a model, the simplest shape being a cube (all smooth, beveled, hard edges + with UV splits, hard edges + without UV splits).
3) How do I know which parts of the mesh can be straightened and which should be left as is? Does it depend on the amount of distortion?
I think with shapes that can be thought of as tubes with caps, this can be applied to. Aside from minimizing aliasing artifacts at seams, check out this thread by Neox UV Straightening and its perks on LOD generation. This wiki page might contain further bits on UVs you might find helpful. I do initial UVs by assumption, when I spot visible stretching or notable low texel density, I iterate on the UVs. When world projecting textures, stretched UVs are less of an issue.
4) The higher the texture resolution, the higher the padding amount, right?
That sounds right, as you half the resolution so does the padding. As soon there is none, expect bleeding. Wiki has some suggestions. I would preview in engine.
I don't do anything like that personally. When doing low to high, I just match the lowpoly shape to the highpoly as nicely as possible within the given triangle budget. I do test bakes throughout, check in engine and iterate based on that. Some areas will need a higher mesh density than others to match highpoly, for example curved elements. Higher density might be also worth for parts that are silhouetting, so they don't give a facetted/ 'lowpoly' impression. Sometimes I add some tiling/generic parts to texture atlases to allow for some flexibility (straps, cords, wires, ...).
Oh gee, this turned out to be a wall of text. Well, written to the best of my ability and knowledge. Best read up and do your own tests :-B