Home Digital Sketchbooks

Sketchbook: RobZero

Offline / Send Message
Pinned
Let’s start from the begining, if you check my Artstation profile I’ve worked several years creating an illustration portfolio with some 3D pieces, on October 2019, before pandemic, my wife and me attended to IluxCon 2019 at Reading, Pensylvania.
  
I had the honor to meet an amazing couple of sculptors, Colin and Kristine Poole, they were exhibiting some pieces of their collection. One night I had a small chat with Colin and he adviced me to try sculpture, he said: “Listen to the muse’s calling”; it took me 3 or 4 years to listen.

My first digital character sculpt was the “Crimson Ronin”, a videogame character which has it’s own blog entries if you want to check it out.
My favorite part was sculpting so I have the crazy idea of creating a portfolio to break into the collectible and miniatures industry.

This piece started as an anatomy study, it wasn’t meant to be a finished character so my main goal was to follow a tutorial by Marc Brunet titled “Nude figure Scultping Guide”.
I wanted to challenge myself by sculpting a complete female figure for the first time, not stylized or cartoony but semirealistic.
My mindest shifted direction as my wife suggested me to change from a generic female  figure to a finished character. I thought it was a good idea because not only I could identify which were my strongest and weaker points, but at the end of the process I would have my first finished fanart ready to be 3d printed.


Photographic reference from Marc’s tutorial.

ZSpheres figurine

As I mentioned before, this was meant to be only an anatomy study of a posed figure,  so I started (like Marc in the tutorial) using zspheres and basic rotations to find the pose and proportions.


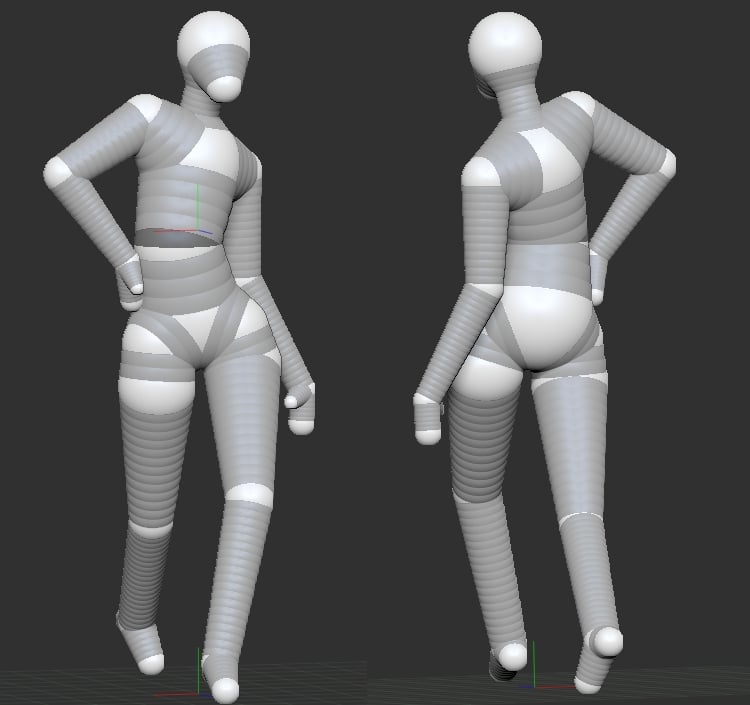
After that I applied the unified skin to get a very basic base mesh as a starting point.


DISCLAIMER: there will be gaps in the process, unfortunately I don’t have some files anymore, I’m used to save lots of incremental stages and to free some disk space I had to erase some of them.

Anatomy and body tone

I mentioned before I worked on  my illustration portfolio and for this I have studied a lot of anatomy and figure drawing, as a matter of fact I have worked as figure drawing teacher and fantasy illustrator, therefore the foundation I have is very strong, not perfect, but good enough to translate from 2D to a 3D human figure piece.


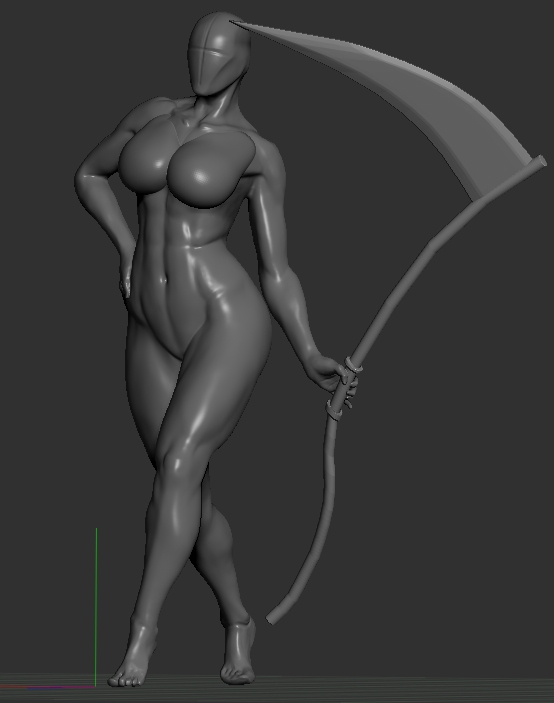
Lots of hours later I got to this point. I was satisfied with some anatomical forms but I felt the legs were bigger than the upper body. 


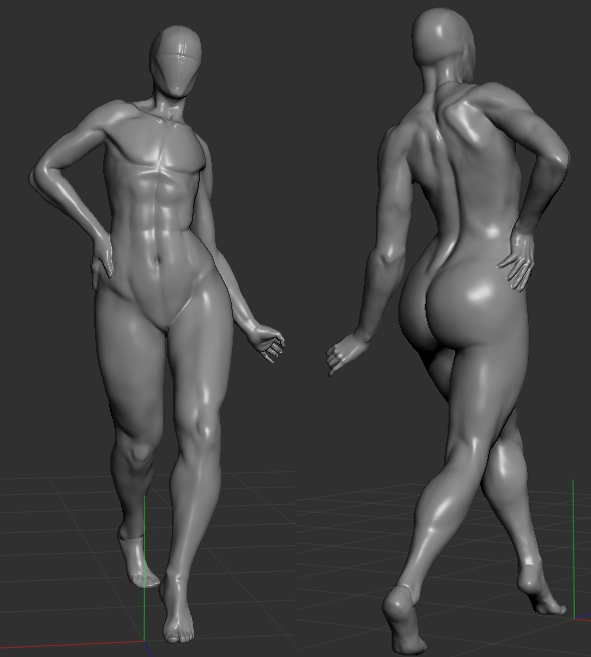
At this stage I decided  to create a comic character using the pose from the reference.
I considered to sculpt Poison Ivy or Catwoman but I wanted to explore a female character not from the mainstream, so I remembered one of the most sexy and strongest anti-heroines in the comic industry:  Brian Pulido’s Lady Death, ¡Damn she’s hot!


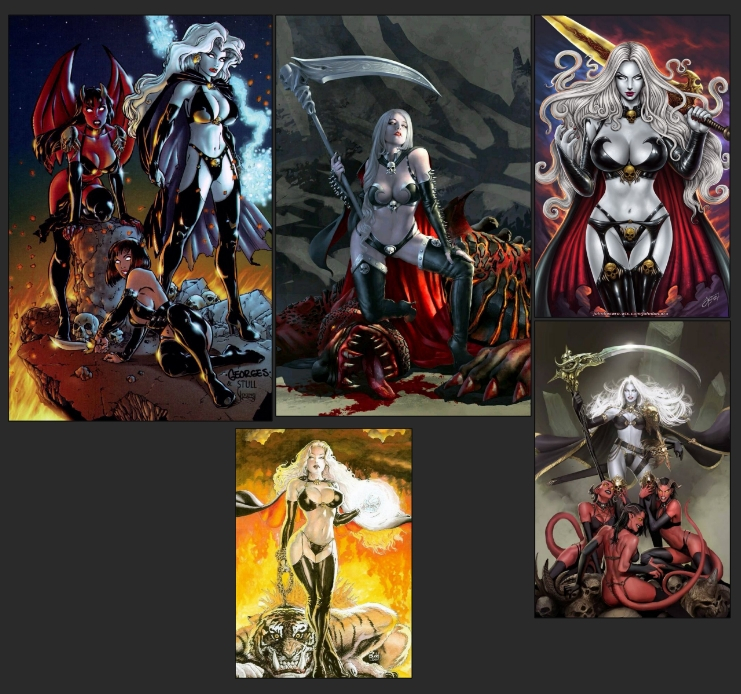
With Lady Death in my mind I started to visualize a strong woman, with a body tone belonging to a female warrior, I didn’t want to give her a bodybuilding structure so I tried to show some muscle groups but not super exaggerated.
I resized the upper body to have better proportions, added big breasts ;)  and modeled a very basic scythe to give her more personality. My main goal was to start stablishing the general look of the character. 
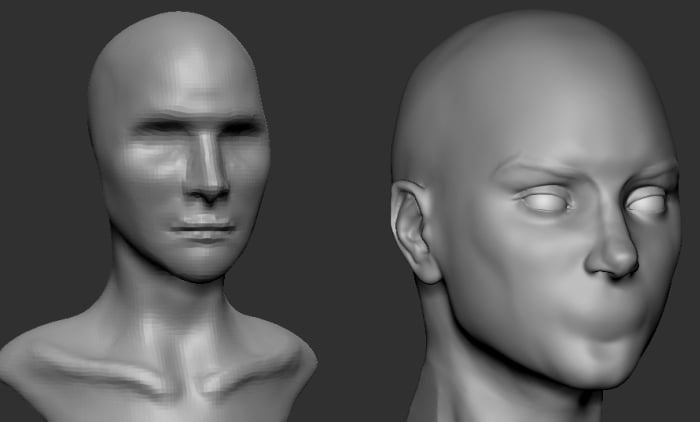


Head

This was the most challenging part of figure regarding to anatomy, I had never sculpted a female face before so I struggled a bit.
As a figure drawing teacher I know the proportions and main forms of the human head, the difficult thing with female faces, in my opinion, is that everything needs to be subtle but defined enough to have a solid structure. If you define a lot some forms you start to have a masculine face so it’s a game of adding and refining clay.
My first intention was to give this character a similar facial look to the actress Bryce Dallas Howard, so I gathered references.
By the way, I never intended to do a portrait of her, so I wasn’t very conecerned of getting the exact likeness of her face.
I knew that the head needed lots of polishing but I wasn’t very sure about the direction it was taking, so I forgot about beautiful Bryce and decided to mix facial features from different actresses and models.


This process wil continue in my next entry.
Thank you very much for getting this far, I will be posting how this piece has evolved. Please send me your comments, critiques and questions. 
May zbrush be with you.


Replies

  • RobZero
    Options
    Offline / Send Message

    Lady Death Fanart Collectible:
    Part 2 Hair and body adjustments


    Hi there! It’s me, Rob Zepeda.
    In this second post I’ll be sharing more steps in the process of creating a Fanart collectible statue with Lady Death as protagonist. 

    Hair

    With the head merged to the body I started to sculpt some general shapes to see the flow of the hair. Before doing that, I took a screen capture from the front view of the character and threw some lines to explore the composition. I  know it would be better to have other views of the figure but at that point I mostly wanted to explore the hair and other elements like cape and schyte.


    I’m totally new at sculpting a whole figure, therefore I didn’t have the slightest idea of how to sculpt hair. To learn a bit of this subject I had to watch two or three YouTube tutorials for hair sculpting. Sorry for not remembering the names of the videos; both of them show the sculpting process for stylized hair, the first author is Dan Eder and the other is Danny Mac, even though my character is not stylized (cartoony) this videos gave me a very solid starting point.
    I divided the hair in 5 areas in order to have better control, as I learnt with the tutorials, it’s super important to first have the main masses of hair and check if the flow and general forms are visualy pleasing.


    After purchasing some hair curve brushes and lots of hours applying hair strands I got a hair style I found good enough and reflected the dynamism and flow I was looking for. More hours and hours of polishing waited me but I will talk about that later.


    Anatomy rework

    At this stage I wanted to rework some areas of the body that needed more polishing or adjustments.
    The first thing I changed was the neck angle, in my first figure the neck and head were pushed forward, therefore it looked like she was humping. For this reason I tilted upwards the head, giving her a prouder and more imposing appearance. Also the chest looked very wide in comparison to the head.


    Hands

    Time to give some love to the hands. I wanted to detail and polish the anatomy of both hands and fingers but I faced a problem with the left hand (our left), as this element is in direct  contact to the hip area I wasnt’ able to carve the roundness of the fingers and the palm.
    I decided that the better approach would be to separate (cut) the hands and arms in order to have more control and freedom to work on them.
    Another reason for making the separation was that; at the end of the day both arms are going to be printed separately, this character uses very long gloves that reach the middle of the biceps, so I took advantage and made both cuts.


    After cutting the arms I started to refine both hands, again this was a bit challenging for this is my first time sculpting a female, fortunately I took my old notes on hand anatomy and did my best effort.


    I think that one of the most difficult things of sculpting femenine hands is, as I mentioned before, to find the middle ground between enough information to give them a semirealistic look but not too much information that it starts looking masculine or rough.

    I didn’t want to use wrinkles or skin alphas to detail them for two reasons: 1- I wanted to face the challenge of doing this by hand with a couple of brushes, and 2-I’m not shure it will be trully benefitial to have the most tiny little wrinkles and pores, my plan is to print this character in a 1/6 th scale, therefore it’s very likely that such subtle details aren’t going to be noticeable on the printed surface.
    My 3d printer is a brand new Phrozen Mini 8ks, maybe I’ll print a test of this hands with more skin details and look how does it look.

    Sculpting, painting and other artistic adventures aren’t lineal paths, it’s necessary to go back and forth in order to refine and adjust parts of the piece.
    The first thing I wanted to modify were the breasts, I know that Lady Death has big ones but it’s not my intention to give her an exagerated look with titanic boob implants, my goal is to give her a  sexy but natural appearance. By the way, I had a hell of a struggle defining the separation of both breasts, the contact area looked welded and carving the middle line with the damStandard brush gave a fake appearance. 

    Important Disclaimer: The position of both breast doesn’t have a natural fall acording to the weight, the reason for this is that I’m considering a bra that is pushing them a bit up and to the center.


    Another modification was done on the face, I compressed a bit the side planes of the face, the result is a sharper (triangular) jaw line. To be honest, at this point I’m not super happy with this new look, writing this blog entries and revisiting my process allowed me to value more the previous version of the face. I think I’ll return to this head, it looks stronger and more imposing.

    Some tweaks were made to the butts, I gave more definition and extended a bit the butt crack. 
    I don’t know why but it was a bit complicated for me to get the right look to this area, I explained before how also I struggled a bit with the breasts; I felt that I was only carving a straight line in the middle of the butt instead of having two semispherical shapes having contact right in the center.  
    I definitely need to sculpt more  boobs and butts, a sacrifice my wife will have to understand  ;)


    Finally I smoothed a bit all muscles and reshaped the torso. Looking at the full body I felt the body tone belonged more to a female bodybuilder, it was too strong and muscular.


    Hair Polish

    At this point I was ready to polish the hair so basicaly I did three types of operations:  Move and reshape hair strands, subdividing to have a smoother look and detailing some lines in minor areas. 

    Tip: A great brush for hair detailing is Orb Crack from the package Orb stylized effects, sorry for not remembering the author’s name. These are meant for enviromental detailing but they can be super useful for organic forms also, best thing is they are free to download.

    To be honest I’m not sure that my methodology was the right for this figure, I mean, maybe it would be faster to give more resolution and detail the main shapes I started with, instead of adding brush strokes with a curve brush for each of the hair strands. 
    I’m not sure how difficult this piece will be to print (the hair), maybe I’ll cry tears of blood, but the only way to learn  is to challenge ourselves. 


    Thanks again if you got this far reading this post.

    In our next chapter I’ll be showing and explaining the development for the clothes.
    May zbrush be with you.

  • RobZero
    Options
    Offline / Send Message

    Lady Death Fanart Collectible:
    Part 3 Clothes section 1


    Hi there! it’s me, Rob Zepeda.
    It’s been a while since my last entry, my wife and me moved to a diferent home and there were lots of things to arrange, store in boxes, and rearrange etc. 
    In this third post I’ll be sharing more of the process for creating Lady Death, a fanart collectible statue 
    First of all I want to mention that I have great respect for the original design created by Brian Pulido, nevertheless with this fanart I want to give a different look to the character, I think of her more as a warrior and huntress than just as a femme fatal that wears a tiny bikini with long boots and gloves. 
    In my mind I imagine that she had to gather some leather, by killing animals and hellish creatures, and the metal ornaments could have been forged by Cremator, a master blacksmith that was vanished from Lucifer’s kingdom. 


    Disclaimer:  To be honest I haven’t read a single Lady Death`s comic, my main approach to the lore was the 2004 animated film directed by Andy Orjuela. It may have some differences with the comic story,  but it was the easiest way for me to have a better understanding of Lady Death’s universe.

    Bra

    For the black leather piece I used the classic approach of masking parts of the breasts and extracting with a thin thickness. Some Zremeshing, fixing polygons and polish by features were simple enough to get this piece.

    The straps that conect the chest and neck were created with a single curve brush created by myself; at this point I didn’t think it would be useful to buy a pack with strap IMM curve brushes, also I wanted to understand how curve brushes are created.


    From the beginning I wanted to avoid metal flourish ornaments, I want to give a bit of aggressive look to the clothes. I took inspiration from some Goth accesories and garments, I’ve tried to give a more organic look to the pieces and using some bone elements, not only looks cool,but it reinforces the supernatural nature of this character.

    The little skull and bony hands are part of a skeleton Imm brush that I bought years ago. By the way, if you feel a little envy for those skeleton hands, trust me, you’re not the first.

    Bikini

    Again masking and extracting allowed me to create the cloth piece for the bikini, my trusty strap Imm curve brush helped me to add a sexy touch and also will connect the bikini with the boots.


    Not wanting to leave just like that the bikini, I decided to create some ornaments to add a bit of salt to this piece.

    As you probably know, for my first blog entry, this figure was posed from the beginning so I don’t have the possibility to sculpt with simmetry. I thought that it would be very useful to use a DAZ 3d model in T or A pose that allowed me to work with simmetry and later I would have only to adapt those pieces to the posed figure.

    I opened DAZ studio brought a Genesis 8 female model and reshape her in order to have a similar body type of that in my zbrush posed sculpture. I rendered a front and a back view that allowed me to make some paintover to stablish the design of this ornamental pieces. 

    In this point I want to mention that I think is very important not to forget that as 2d or 3d artists we need to give a cohesive look to the piece, designing and experimenting is more time consuming that just directly painting or sculpting, but at the end of the day the time you invest in preliminary sketches will help you to reinforce the general message and look of the whole piece.


    After completing a very simple sketch of the ornaments I returned to Zbrush to sculpt them. For the organic stuff like the skull in the center and the lateral bony fingerish pieces, the good old Move, ClayBuildup and Trim brushes were my best friends at this task.

    For the hard surface pieces I decided to sculpt them only as sketches in zbrush, later I would import them as OBJ in Blender for modeling with better edges and topology. Hardsurface sculpting/modeling in Zbrush is something I don’t understand very much, to be honest I haven’t immersed myself in Zmodeler or other tools that other artists use to stay in Zbrush, which is super useful. I will definitely study more about the hard surface workflow in order to have a more efficient sculpting methodology.


    I  decided to eliminate the diamond lateral pieces since I didn’t like how they looked. Instead I used again a spike Imm brush, it looks cool and it gives consistency to the shape language along the different garments.

    By the way, adapting the symmetrical pieces I modeled in Blender to the posed figure, was a bit more complicated than I expected in Zbrush.

    Gloves

    Masking, extracting, zremeshing and tweaking geometry helped me to get the gloves pieces. 
    I searched for some references at Pinterest to have a better understanding of folds and wrinkles, for the bra and bikini I didn’t worry about that but for the gloves I had to trust on the images I found and my observational skills.

    Sculpting or drawing clothes is on of the most complex tasks because you have to understand the physics and how some materials behave when the body takes a specific pose.
    If you are having difficulties with folds, wrinkles and how clothes behave, I really advice you to look for tutorials, Marc Brunet and Glenn Vilpu have amazing information regarding to the clothed figure.

    The metal ring at the top of the gloves was done in Blender because I wanted to have sharp edges and I couldn’t get those inside Zbrush. 
    I have understood that my lack of knowledge with hardsurface modeling with Zmodeler and other tools is interrupting my workflow, I will definitely study and practice this subject.
    Again I decided to create an Imm curve brush in order to add the metal diamonds around the ring, for the little skulls I used an Imm brush with lots of skeleton pieces.


    Some details were added to the gloves, like a seam at the inner part of the arms with some stitches, once again I bought an Imm curve brush with stitches to save some time.
    In order to add some flavor I attached some organic spikes that protude from the gloves, the idea is that those cloth pieces are made from the skin of a creature like a small dragon or some kind of an abyssal reptile, that explains the iguanas pictures in my mood board.


    Thanks for reading and joining me in the adventure of sculpting my first collectible figure.
    In my next entry I will continue to show you some of the process for the boots, the cape and texturing all the garments.
    May Zbrush be with you.


Sign In or Register to comment.