[UE4] Black Shuck

polycounter lvl 12
Since finishing this project, I have considered making the proper breakdown this artwork deserves. That was a great experience in achieving the cinematic look and how I can work on strict time limits.
*final artwork*

.day1.
on this day, I tried to keep everything structured in Miro by creating a mind map of stuff necessary to have and present on the artwork.

I have much of the stuff from Megascans that I tried to somehow combine with more or less the same style or look: decals, nature elements, and different props for set dressing. I also gather references from projects that represent the same type of problem as mine - for example, brick structures or lighting scenarios.
After that, that was time to start bocking the scene. Nothing special - modeling was made in blender based on the main reference.
This part was crucial because I needed to be sure that composition in 3d works as it works in 2d. It takes a lot of tinkering and moving stuff around. fun stuff

.day2.
When trying to come up with some pipeline of how I wanted to make this map, I was thinking of using a landscape from Unreal as a base, but it was tough to handle, and it never gave me a unique look that I tried to recreate. So, I changed the landscape to a unique mesh and sculpted it in a blender with sculpting tools and stencils. This is what I come up with. After that, I create a simpler version and bake it in marmoset.


.day3-6.
With my "finished" landscape mesh, I decided to start pooling everything in the engine to be able to see the proper picture. Made a fast master material with tesselation and camera-based fading effect for efficiency and 4 different material blends with vertex through height map. It's a bunch of materials as functions with a couple of parameters. The Megascan materials never work for me out of the box, so I need this ability to change textures on the fly as I paint on the terrain. Also, mesh patches helped a lot with adding thickness and randomness to the terrain.


I put some trees here and there and added a bunch of props to elevate the look of the terrain cause, for now, it looks boring. The next will be placing more trash and start working on architectural pieces. I used HDRi images with overcast lighting for the light source and placed a height fog for the atmosphere. Everything is super simple and fast at this stage.

Then Foliage/trash and whistles were added ... I wanna have almost finished terrain before fully concentrating on architecture, and I turned on ray tracing. Rest in piece my trusty 1070 now 3080 will continue your duty.

.day7-12.
This time was all about content. A lot of sculpting and texturing. I got a sculpt and finale textures for the lower part of the building. Decided to change materials from white bricks (like on the concept) to cobblestone. Also, I added platforms. Happy with the result!
Starting with base meshes that I made in the blender, then sculpting details in Zbrush. After that, I created Low poly meshes and baked everything in Marmoset. Texturing was done in substance painter. Nothing unusual in the pipeline.
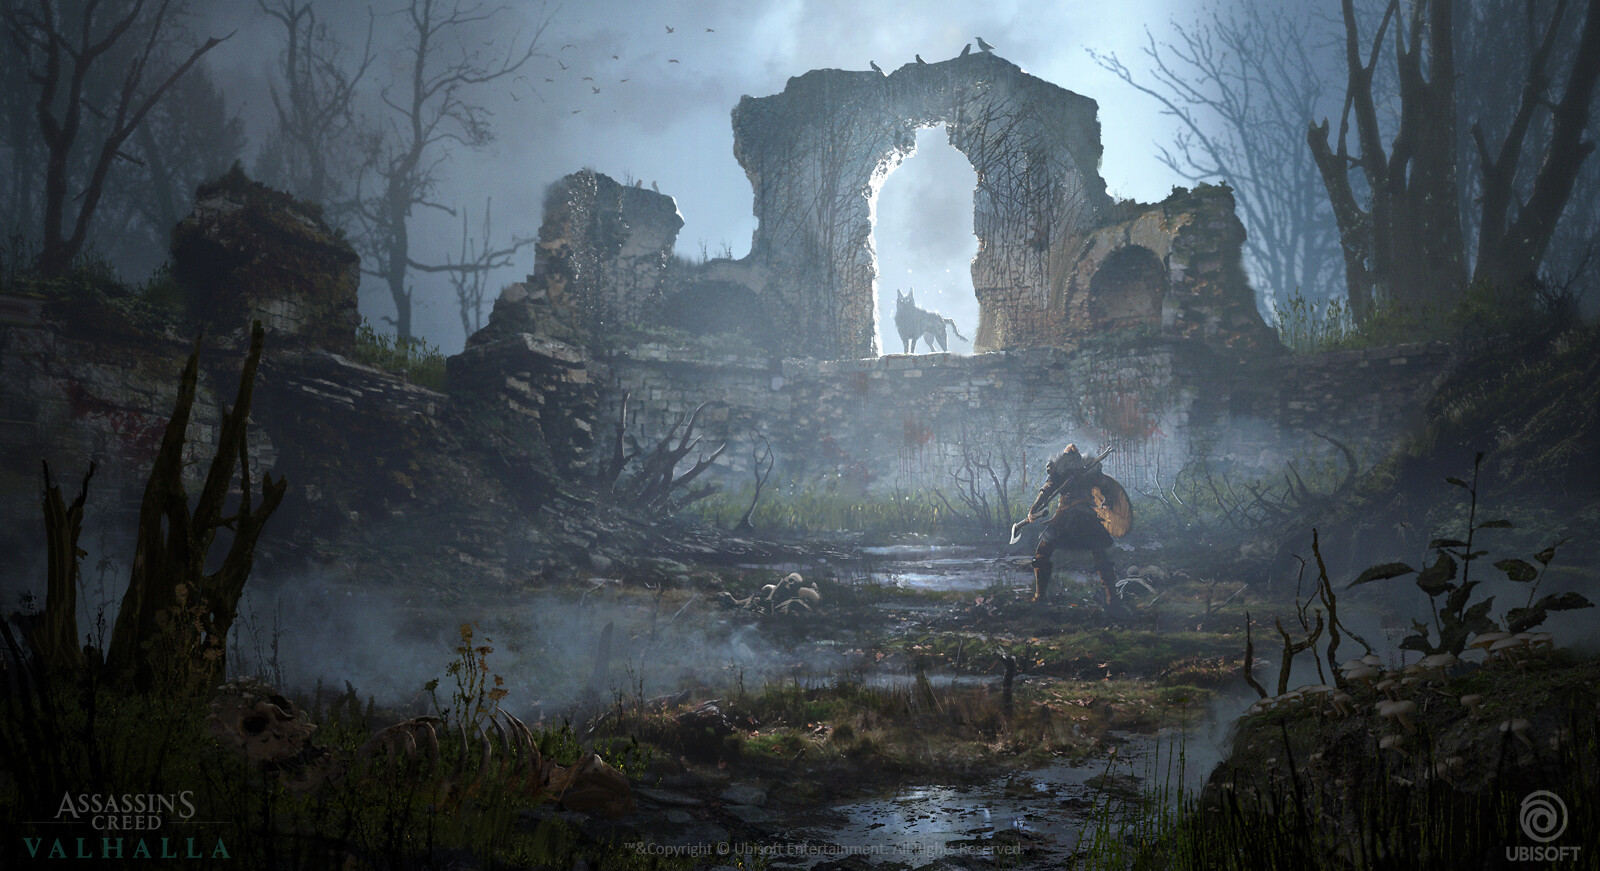
Final rush! It was all about assembling, lighting, and polishing. For the lighting, I decided to go full cinematic look and try to make it as good as possible. Ray tracing helped to give money look and streamline the whole process. With a combination of Warm and Cool light + Fog Cards, I create a localized light area in the middle of the scene. Using a couple of bright lights in the center of the main gate and right behind to fake rim light. All of that is for creating a light shaft and focusing on the main focal point of the whole scene. Also, many decals for the final touch and a VFX, of course, such as particle dust, scattering fog, and to add some movement - wind.


Basically, on this point, it is done! This is the final look of this beautiful environment.


Thank you for reading. I hope it was informative and somehow can help you with your environment!
More screenshots and a full video breakdown you can find on my artstation
*final artwork*
Let's start!
First of all, huge thanks to Gabriel Tan for giving me the green light to do this project
you are a rockstar, beautiful artwork
you are a rockstar, beautiful artwork
It started as a small-level art practice with just one idea to make something cool with Quixel Megascans library, but it eventually became more than that when I started to dive into the production. I gave myself around a couple of weeks. And more or less manage to stick with it. That is what I am proud of ^^*.
For this project, I mainly used: Blender, Zbrush, Marmoset Toolbag, UE4, Substance Painter, and Quixel Megascan.on this day, I tried to keep everything structured in Miro by creating a mind map of stuff necessary to have and present on the artwork.

I have much of the stuff from Megascans that I tried to somehow combine with more or less the same style or look: decals, nature elements, and different props for set dressing. I also gather references from projects that represent the same type of problem as mine - for example, brick structures or lighting scenarios.
After that, that was time to start bocking the scene. Nothing special - modeling was made in blender based on the main reference.
This part was crucial because I needed to be sure that composition in 3d works as it works in 2d. It takes a lot of tinkering and moving stuff around. fun stuff
.day2.
When trying to come up with some pipeline of how I wanted to make this map, I was thinking of using a landscape from Unreal as a base, but it was tough to handle, and it never gave me a unique look that I tried to recreate. So, I changed the landscape to a unique mesh and sculpted it in a blender with sculpting tools and stencils. This is what I come up with. After that, I create a simpler version and bake it in marmoset.
.day3-6.
With my "finished" landscape mesh, I decided to start pooling everything in the engine to be able to see the proper picture. Made a fast master material with tesselation and camera-based fading effect for efficiency and 4 different material blends with vertex through height map. It's a bunch of materials as functions with a couple of parameters. The Megascan materials never work for me out of the box, so I need this ability to change textures on the fly as I paint on the terrain. Also, mesh patches helped a lot with adding thickness and randomness to the terrain.
I put some trees here and there and added a bunch of props to elevate the look of the terrain cause, for now, it looks boring. The next will be placing more trash and start working on architectural pieces. I used HDRi images with overcast lighting for the light source and placed a height fog for the atmosphere. Everything is super simple and fast at this stage.
Then Foliage/trash and whistles were added ... I wanna have almost finished terrain before fully concentrating on architecture, and I turned on ray tracing. Rest in piece my trusty 1070 now 3080 will continue your duty.
.day7-12.
This time was all about content. A lot of sculpting and texturing. I got a sculpt and finale textures for the lower part of the building. Decided to change materials from white bricks (like on the concept) to cobblestone. Also, I added platforms. Happy with the result!
Starting with base meshes that I made in the blender, then sculpting details in Zbrush. After that, I created Low poly meshes and baked everything in Marmoset. Texturing was done in substance painter. Nothing unusual in the pipeline.
- Starting with concrete slabs


- Stones walls
for them, I created a bunch of boulders and arranged them in the desired shape


- The next one is bricks and brick structures.
Same approach as for boulders.


- Main gate


Final rush! It was all about assembling, lighting, and polishing. For the lighting, I decided to go full cinematic look and try to make it as good as possible. Ray tracing helped to give money look and streamline the whole process. With a combination of Warm and Cool light + Fog Cards, I create a localized light area in the middle of the scene. Using a couple of bright lights in the center of the main gate and right behind to fake rim light. All of that is for creating a light shaft and focusing on the main focal point of the whole scene. Also, many decals for the final touch and a VFX, of course, such as particle dust, scattering fog, and to add some movement - wind.
Basically, on this point, it is done! This is the final look of this beautiful environment.
Thank you for reading. I hope it was informative and somehow can help you with your environment!
More screenshots and a full video breakdown you can find on my artstation