A specific UV manipulation issue

polycounter lvl 7
Hi!
I'm working on a video game project by myself at this time, and one thing among many that I've been doing recently is creating a cartoony eyelid material in order to control a character's eyelids through a material rather than the usual polygonal eyelid. This is to make things easier to work with for this kind of eye that isn't spherical and doesn't wrap around an eye so easily - or at least to my knowledge. If there is a way for one mesh to automatically wrap around the surface of another (the eye) without wonkily animating an eyelid with an ungodly amount of controllers, DO let me know, because that sounds very interesting, but for now, the only possible feature in Unreal Engine for this, to my knowledge, is the so-called "FMeshToMeshVertData", which is supposed to work the same way as a wrap deformer in Maya. However, it's nowhere to be found in the engine itself last time I checked, only in the bare minimum of documentation online, so it's a no-go.
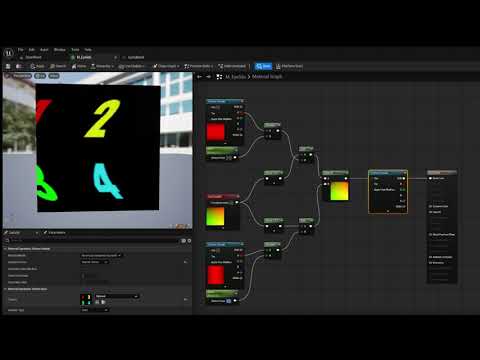
Here's what the material looks like. I made a gradient in After Effects that would bend the texture in a nice and smooth arc based on a multiplication input value from 0, and then I added the usual transform features to move the eyelid around after the fact.


I've pretty much finished it, but there's one particular thing that doesn't work: Manipulation of the horizontal axis in the UV doesn't seem to work in this case. I think the reason for this is that the eyelid texture has almost no details that change along the X axis. But I'm trying to change the UVs in the X axis AFTER changing the Y axis, so why doesn't this work? Why is it detecting the changes I have already made to the material?

Here's a video from earlier in the process of making this material, where I had a pull modifier as well, in order to pull the eyelid slightly to the sides if needed, but it never worked because the original image, before changing the UVs, only had a horizontal line:
 https://www.youtube.com/watch?v=EHU4W0zdpaE
So, is there any solution or workaround for this? I find it very strange that this doesn't work straight away.
If anyone wants to see the final result, here's a little animation I rendered out. He' not rigged yet, so there's only eyelids right now:

I'm working on a video game project by myself at this time, and one thing among many that I've been doing recently is creating a cartoony eyelid material in order to control a character's eyelids through a material rather than the usual polygonal eyelid. This is to make things easier to work with for this kind of eye that isn't spherical and doesn't wrap around an eye so easily - or at least to my knowledge. If there is a way for one mesh to automatically wrap around the surface of another (the eye) without wonkily animating an eyelid with an ungodly amount of controllers, DO let me know, because that sounds very interesting, but for now, the only possible feature in Unreal Engine for this, to my knowledge, is the so-called "FMeshToMeshVertData", which is supposed to work the same way as a wrap deformer in Maya. However, it's nowhere to be found in the engine itself last time I checked, only in the bare minimum of documentation online, so it's a no-go.
Here's what the material looks like. I made a gradient in After Effects that would bend the texture in a nice and smooth arc based on a multiplication input value from 0, and then I added the usual transform features to move the eyelid around after the fact.

I've pretty much finished it, but there's one particular thing that doesn't work: Manipulation of the horizontal axis in the UV doesn't seem to work in this case. I think the reason for this is that the eyelid texture has almost no details that change along the X axis. But I'm trying to change the UVs in the X axis AFTER changing the Y axis, so why doesn't this work? Why is it detecting the changes I have already made to the material?
Here's a video from earlier in the process of making this material, where I had a pull modifier as well, in order to pull the eyelid slightly to the sides if needed, but it never worked because the original image, before changing the UVs, only had a horizontal line:
https://www.youtube.com/watch?v=EHU4W0zdpaESo, is there any solution or workaround for this? I find it very strange that this doesn't work straight away.
If anyone wants to see the final result, here's a little animation I rendered out. He' not rigged yet, so there's only eyelids right now:
Replies
It looks like Unreal Engine allows customized UV channels separate from the the UV manipulation that you do before the texture sample node. So I guess that's one way to edit UVs after the texture sample node. I haven't set up the whole material yet with this in mind, but it looks like exactly what I need. I will have to make changes in the Y axis before the texture sample, and X axis after it using this method.
I can only hope this works the way I expect in the final material instance used for the eyelids, but I noticed something strange about this approach as well - it looks like mask doesn't work properly, and warps the opposite side slightly in a way that doesn't make sense to me:
I tried to stretch it too far just to show it. I find it interesting how the lower half is weirdly half-way affected by the UV map of the upper part.
Anyway, I realized I will probably never have the need to pull the upper and lower eyelid separately, so it's fine.
I will post final results here if it ends up working.
Edit: I could still have some use for separate X offset parameters of upper and lower eyelids, though.
you don't need 2 lerps and an add at the end - just lerp between the two UV sets using your mask instead
it's good practice to saturate the alpha input to the lerp because an outside 0:1 range value in the alpha could give unexpected results. it doesn't look like that's happening due to your logic but might be worth seeing if it makes a difference.
Still can't offset the eyelids in X axis individually at this time, though.
For those occasions where the eyelid disappears, but I might be overthinking.
Thanks for the advice! I get a bit confused about lerp nodes every time I open up Unreal after a long time.
It's just a slightly different way of handling alphas from every other program I use.
About saturating alpha inputs, do you think that might have something to do with the weird UV distortion I'm getting in the post above?I also noticed that I get some black pixels in the eyelid alpha. Hardly noticeable, but undesirable. I will try these things out when I have the time.
I'm honestly not sure why you're getting the crossed over influence. the reason I thought it might be connected to the lerp alpha is that if a negative number goes in the output gets kind of inverted (look at the maths for a lerp and you'll see it).
and because I like waffling..
When I do anything dramatic with UV manipulation I try to do 2 things:
1 : center them (uv * 2) -1 : this gives me a very clear reference point for any sort of translation
2 : generate simple gradients mathematically rather than using textures - eg. your cylindrical gradient can be generated from the u component of your UVs (center them, abs(), pow()). this gives you better precision than a compressed texture and eliminates the possibility of texture related artefacts
none of that means you're doing anything wrong - I do this sort of thing a lot and have found those to be effective techniques to prevent myself from getting confused
I might return to this thread when I have significant updates about the eyelids specifically. I got sidetracked by other things, such as not creating enough eye mesh to be able to "inflate" the eye for certain expressions without distorting the UVs too much. As far as the X axis mask not working properly, it remains an open question, and hopefully someone might have an answer - or maybe it's a bug, who knows.
For now, I'm running into a couple of other issues that I should create separate threads for.