creating tubular weaving?
polycounter lvl 17
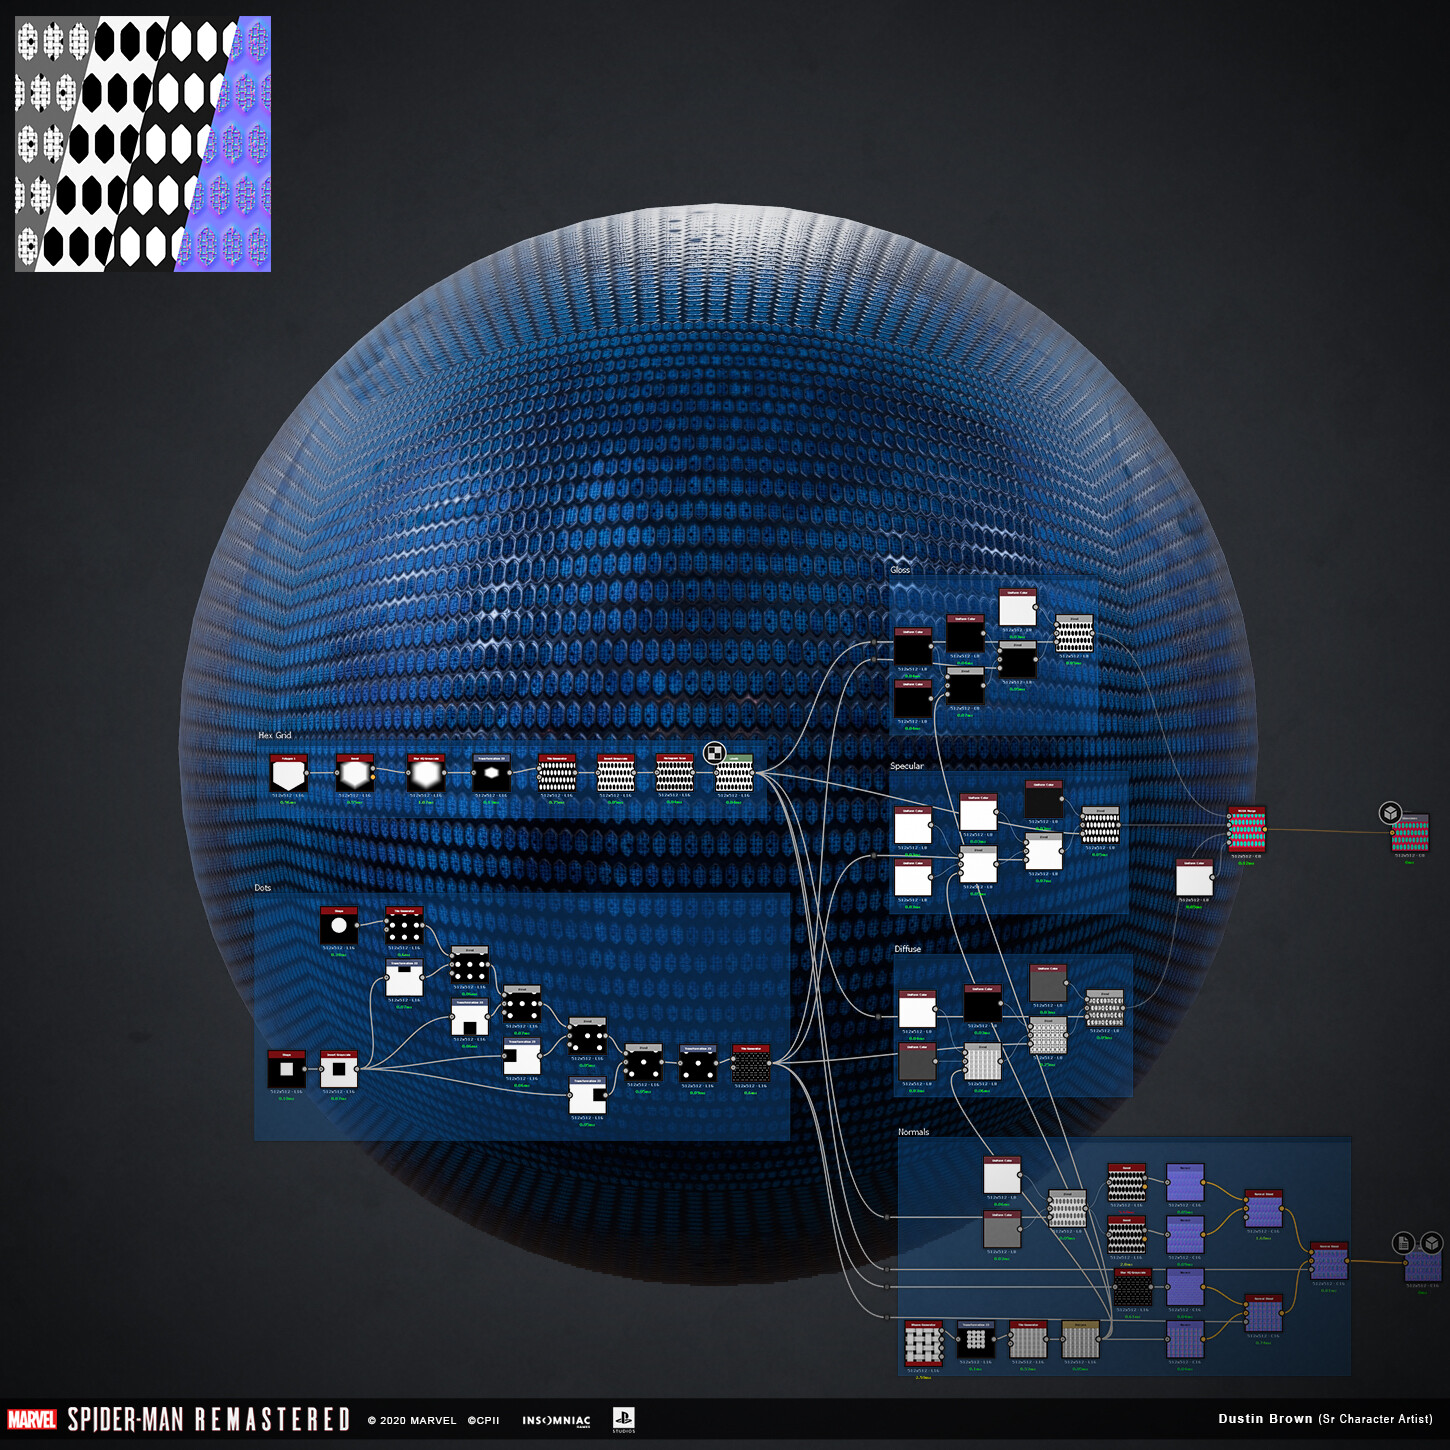
Hello. So I just started learning Substance Designer and 'm trying to recreate the pattern made for the Amazing Spider-Man suit by Dustin Brown for the ps5/ps4 game.
https://cdnb.artstation.com/p/assets/images/images/032/415/081/large/dustin-brown-dustinbrown-spiderman-tasm-textile-blue.jpg?1606362346
I'm trying to see how it was put together and what nodes were used, but I really can't see what it says. It's too blurry. Also the version I'm using seems to differ. He seems to be using a transformation 2D node to mask out the weave pattern. However I could not find any way to adjust my node for that effect, so I found and used a crop node instead which makes it look the same. As far as I can tell anyway.

Right now Im looking to make the weave pattern, tubular. I was wondering if there's any tips you have to make it using the weave generator. I found a tutorial where each thread is consturcted one by one to make a weaved basket, but judging from my reference, he didn't use this so I'm wondering how it could be done. Thanks in advance. Also attaching my file if anyone wants to have a look.
https://cdnb.artstation.com/p/assets/images/images/032/415/081/large/dustin-brown-dustinbrown-spiderman-tasm-textile-blue.jpg?1606362346
I'm trying to see how it was put together and what nodes were used, but I really can't see what it says. It's too blurry. Also the version I'm using seems to differ. He seems to be using a transformation 2D node to mask out the weave pattern. However I could not find any way to adjust my node for that effect, so I found and used a crop node instead which makes it look the same. As far as I can tell anyway.
Right now Im looking to make the weave pattern, tubular. I was wondering if there's any tips you have to make it using the weave generator. I found a tutorial where each thread is consturcted one by one to make a weaved basket, but judging from my reference, he didn't use this so I'm wondering how it could be done. Thanks in advance. Also attaching my file if anyone wants to have a look.
Replies
At the base the weave pattern, which you can actually see if you zoom in to top left corner of the original artwork where the breakdown shot is.
Second pattern is dot pattern which is basically five on dice. You can make it with tile generator where tiling is 3x3, pattern is bell and checker mask is on. So this pattern is subtracted from the base pattern. Again, you can see if you zoom in to top left corner of the original artwork where the breakdown shot is.
Lastly hexagon pattern where there is a single node for it at designer (alveolus).
Output of fist two nodes(foreground) blended(copy) with hexagon borders(background), with hexagon itself is opacity mask on that blend.
Hope this helps!
Best,
Deniz
Yes, I've recreated the other parts following the original artwork and although my graph is not as sophisticated, it's good enough for me. The weave pattern is the one I need help with. It's just a flat pattern and I'd hoped I could make it look rounder as per my edit. :-)
Otherwise I will need to create the threads one by one, but that's not how the original creator did it so I'm thinking it can be done using the weave pattern as a starting point.
But in case you dont wanna add more tiling I did a little work to make it more roundy. Hope it helps.
Also whenever I wanna learn more about any node, I 'open reference' where you can see how the node is actually made. (right click, open reference or ctrl+E)
Before
After
Now I just want to fix my normal map. I'm just taking my hexagon pattern and adding a bevel, adjusting it so I get a nice smooth edge, but this leads to that the thin edge becomes dark which is not what I want. I want that thin line to be white instead of dark which makes it go down instead of up. Just can't seem to work it out. Any tips there?