Retro 3D Art FAQ - Everything you need to know to create PS1/N64/Dreamcast/etc. 3D art!
polycount lvl 666
Welcome to the 'Retro 3D FAQ', a thread dedicated to sharing information about the creation of 3D art for game consoles made before the age of programmable pixel shaders. If you enjoy the look of 3D games from the 90's and early 2000's, and would like to learn how to make such art yourself, this is the thread for you! ")
Resources:
Nintendo DS (NDS):
Playstation Portable (PSP):
Textures:
Blender: In shader editor, set the texture nodes 'Texture Interpolation' to Closest. Example.
Pixel snap UV's:
(Note: When working with very small textures snapping the UVs to the pixel corners can help avoid unnecessary texture bleeding, and may also help reduce memory usage since their positions can be stored as integers values instead of floats)
Blender: Go to "Texture Paint" tab, and in viewports top left corner drop down menu switch from "Texture Paint" to "Vertex Paint".
3DS Max:
Reflections via mirrored duplicate geometry: For flat surfaces it's possible to get reflections without cubemaps or any fancy shaders. To do this just set the flat surface to a transparent value and duplicate + mirror the visible parts of the scene you want reflected (these copies can be a lower LOD if needed). For smaller reflections like puddles you can copy just the lower parts of a mesh (like the characters legs) and use alpha or stipple to fade them away before reaching the upper parts. This effect can be seen in Grand Theft Auto Vice City (example) and God of War (example). An interactive example of this trick can also be seen on here. You can also render the mirrored geometry to a separate lower resolution framebuffer, or with lower resolution mip-maps, to get a more glossy reflection. Another method, especially if you can't afford to duplicate the scenes geometry, is to simply create an empty 'room' on the other side of the reflective surface and apply gradients and lights to its walls (example1, example2).
Reflections via frame buffer as texture: On PS1 one of the methods used to fake reflection was to use the screen itself as a texture via 'double buffering' ; Basically two rendered frames worth of memory is set aside, with one being a completed frame and the other being reserved for the next frame, then each time a frame is output to the screen their role gets swapped. Some PS1 developers realized that if they moved a models UV's to the completed frame (based on their vertex normal directions in screen space) when the next frame started being rendered it could create a semi-believable reflective surface effect. Sometimes triangles would be rendered twice (since PS1 didn't support multi-texturing) to show the underlying texture, with the first pass being at the original UV coordinates and the second pass being at the completed frames coordinates and blended at 50% opacity. Examples of this effect can be found in the PS1 releases of 'Tomb Raider' and its sequels. See here for a more detailed explanation.
Skyboxes using only vertex colors: On consoles where texture resolutions are limited a texture based skybox would look very pixelated or blurry, and likely waste a lot of precious memory. So instead games like Spyro (examples), Looney Tunes Racing (examples), and Homeworld (examples) used vertex color based skyboxes. You can easily do this these days by using a tool to convert a texture to a vertex colored mesh, like this one.
Lights/Shadows cut into geometry: If lighting doesn't need to be dynamic an artist can cut the light/shadow rim into the geometry directly. After cutting the shape into the floor or wall they would then darken the faces within the shadow via their vertex colors. This was done for some games on PS1 and N64 such as Tomb Raider (example) and Banjo & Kazooie (example). If you want a soft falloff simply cut a second rim inside/outside the cutout geometry and blend the vertex colors between the two.
Cell Shading outline: To create a solid outline for your mesh, you can simply duplicate the mesh, push/inflate the duplicate outwards along its normals (such as with the 'push' modifier in 3DS Max), invert the normals, and turn on backface culling. After this you can apply a solid color to it if you want a cartoony outline (example). Note that this may create outlines in areas you don't want there to be any, but simply decreasing the push amount in those areas should solve it (Blender Tutorial). This is generally called the "inverted hull" method, and is often still used today due to its simplicity and quality of the results.
Rim Lighting: Can be achieved using a frame buffer trick; Render the mesh to its own frame buffer, then add one or more brightened copy/copies to the main buffer slightly offset in the lighting direction(s), and a non-brightened copy over top of that. Alternatively apply the tint and offset at the same time the pixels are added to the main buffer, and re-render the mesh on top of it. The first method uses more memory, while the second uses more processing power to generate the final frame. This trick was used in the game Vagrant Story for PS1 (example1, example2, example3) during certain story events. It is often confused with the "inverted hull" technique, but they produce subtly different results.
Avoiding pixel grid aliasing: When creating very low resolution textures that have alpha and are in a grid-like pattern, such as a chainlink fence, you can get perfectly clean edges by simply painting the texture as a regular grid (as opposed to painting them diagonally) and rotate the UV's until the pixels on the mesh are at the desired angle. One example of this would be the cloth strips on Tidus clothes in the PS2 game Final Fantasy X (pic).
Sphere billboards: Because a true 3D sphere would require many triangles to appear perfectly circular, even when rendered at a low resolution, many games would instead use a sphere texture on a billboard (quad that is always facing the camera). Coupled with tinting the texture based on viewing angle to fake lighting/shadow changes, it provided a very convincing effect with hardly any performance cost. (example - credit to SimonT for this one)
Hexagon texture tiling: One unusual trick to getting a variety of patterns out of a very low resolution textures is to tile it in hexagonal patterns, as opposed to square grids. This method was used for the sand parts of the ground in Animal Crossing on the Nintendo 64 / Gamecube (example).
Cylinder optimization via alpha plane: To create cylindrical shapes such as tables, barrels, etc. without using too many triangles, you can sometimes get away with creating a lower poly 'body' of the cylinder and create the top/end piece by cutting out a circular shape on a plane using a 1-bit alpha. Depth can also be added by creating a darkened duplicate of the plane underneath/behind the main one (example). Interestingly this optimization trick is still sometimes used today (examples - credit to SimonT for this one).
Texture animation via palette cycling: When using a very limited set of colors (such as with 2, 4, and 8-bit textures) without any color-modifying compression, you can animate parts of the texture by simply shifting the palette values over one space at a time (so the 3rd color become the 4th, the 6th becomes the 7th, etc.). When applied to just a limited range within the palette effects like blinking lights, technicolor shifts (example), or moving water (2D example), can all be achieved with basically no performance or memory cost. The creator of the technique did a GDC talk about it a few years ago which you can view here.
Anti-Aliasing via camera-shake: If a game is running at a very stable 60fps (or whatever the screens maximum refresh rate is), by simply rendering every-other frame with a 1 pixel offset you can create a convincing form of anti-aliasing while in motion. This trick works due to the natural ghosting (partial retention of colors between frames) present in all LCD screens. The PSP game 'Gran Turismo' used this trick (example pics here).
--- Links ---
Resources:
ShaderGlass
Useful plugins:
Sprytile (for Blender)
Pixel8r2 (for Substance Painter)
Tutorials:
Pixel textures - Blender tutorial (video)
Pixel textures - Maya tutorial (video 1) (video 2)
Vertex coloring - Blender tutorial (video)
Dithered renders (written tutorial for 3DS Max)
Photoshop filter based texturing (Misc weapon texturing tutorials)
Retro 3D art communities:
https://www.reddit.com/r/ps1graphics/
https://discord.com/invite/2AYj5VP
Misc:
Jaspers channel (Scrolling Textures) (vertex lighting video1 and video2)
Information about 3D Modeling software used with the Nintendo 64
--- Per-console limitations for artists ---
To make art that looks like it came from a specific console, you need to know the technical limitations of that console.
Below are details regarding the capabilities of various retro consoles, specifically those that relate to creating art for them.
The information here was painstakingly collected and researched over the course of many months, but if there are any mistakes please let me know!
Nintendo DS (NDS):
Textures:
Resolution: 128x128 (typical maximum). Supported up to 1024x1024 but wasn't practical for memory reasons.
Bit Depth (standard): 2-bit (4 colors), 4-bit (16 colors), 8-bit (256 colors).
Bit Depth (w/alpha): 5-bit w/3-bit alpha (32/8 colors), 3-bit w/5-bit alpha (8/32 colors), 15-bit w/1-bit alpha.
Alpha sorting: Normally 1-bit only. For semi-transparent pixels the sort order must be pre-calculated.
Mip-maps: Not supported.
3D Assets:
Screen: 2048 backface culled triangles per frame (hard limit, any more can cause visual anomalies).
Characters: 200-400 triangles on average.
Note: 2D billboards often used instead of 3D models to work around triangle count limit.
Display resolution/quality:
Rendered/Output: 256x192 for each screen.
Framerate: 60fps if triangles rendered on only one screen, 30fps if triangles rendered on both screens.
Nintendo 64 (N64):
Textures:
Resolution: 64x64 (4-bit), 64x32 (4 or 8-bit), 32x32 (4 to 16-bit), and lower resolutions up to 32-bit color.
Memory: Texture + mip-maps must fit in 4kB cache. 2kB for the texture ((64*64*4)/8192 = 2kB) + 2kB for mip-maps.
Mip-maps: Supported in hardware, and blended via trilinear interpolation.
Filtering: Custom 3-point bilinear (as opposed to standard 4-point) that blurs current, top left, and bottom right texel.
Texture trick 1: Devs sometimes used 4-bit greyscale textures and relied on vertexs to supply the colors.
Texture trick 2: The 3-point texture filtering can be used to create sharp lines ( 3-point vs 4-point bilinear ).
3D Assets:
Screen: 500-5000 triangles per frame at 30fps or less (untextured triangles render faster).
Characters: 250-750 triangles on average (excluding cutscenes, character select screens, & very large characters).
Display resolution:
Output: 320x240 (384x288 for PAL) or 640x480 (720x576 for PAL), in 15-bit color.
Render: All Factor 5 games (400x440), Perfect Dark (320x222 - NTSC), Conkers Bad Fur Day (292x214).
Output vs Render: Games were often rendered at a lower resolution then the output signal.
Output vs Render: Games were often rendered at a lower resolution then the output signal.
Blurring step 1: N64 uses per-object anti-aliasing.
Blurring step 2: Horizontal line doubling (320>640). Odd horizontal pixels averaged w/ones to their left & right.
Playstation 1 (PS1/PSX):
Textures:
Resolution: 256x256 (absolute maximum), 128x256 (rare), 128x128 (common maximum used)
Bit Depth: 4-bit (16 colors), 8-bit (256 colors), 16-bit (65,536 colors. Mostly just used for background/effects).
Mip-maps: Not supported by hardware, but sometimes done in software.
Vertex colors: Textures w/vertex colors can have texture banding artifacts on some PS1 models (example).
UV's: Stored as integers ranging from 0~255 on both X and Y axis (instead of 0~1).
Note: PS1 basically splits texture memory two rows of tiles (officially called 'pages'), with each row containing 16 tiles. The tiles each store 64x256 16-bit values, so if 8-bit values were used you'd have enough memory for 128x256 pixels, or 4-bit would be 256x256 (example of game running at 256x224). The tiles are used to store the frame buffers and CLUT's as well, so texture memory is quite limited
3D Assets:
Screen: Up to 360,000 flat untextured triangles per second (180,000 when textured/gouraud shaded/lit )
Screen example: At 60fps w/all triangles textured = theoretically 3000 triangles per frame (180,000/60 = 3000).
Character examples:
Crash Bandicoot (732 triangles in first game, no textures)
Spyro (413 triangles in first game, textured)
Crash Bandicoot (732 triangles in first game, no textures)
Spyro (413 triangles in first game, textured)
Display resolution:
Horizontal: 256/320/384/512/640 . 384 has 8-10 blank pixels on each side (emulators crop to 364/366/368).
Vertical: 224/240/256/480/512 . 240=progressive, 480=interlaced, 256/512=PAL-only.
Horizontal: 256/320/384/512/640 . 384 has 8-10 blank pixels on each side (emulators crop to 364/366/368).
Vertical: 224/240/256/480/512 . 240=progressive, 480=interlaced, 256/512=PAL-only.
Switching: Resolution can be switched dynamically (full screen menus are often higher resolutions).
Examples:
Crash Bandicoot 1-3 (512x240 for entire game)
Final Fantasy VII (320x224 / 320x240 / 384x240 . Changes depending on if running FMV, in battle, etc.)
Unique Features / Limitations:
Math: Can't use floats (decimal values), so vertex positions and such are always integers. Fixed point math used for everything.
Per-triangle depth sorting: No z-depth buffer, instead triangles are drawn furthest to nearest from the camera.
Multitexturing: The PS1 can't technically do multi-texturing, but it can draw the same triangle twice using a different texture each time to achieve a similar effect (such as in Gran Turismo for environment mapping on cars).
Playstation 2 (PS2):
Textures:
Resolution: 512x512 (very rare), 256x256 (maximum normally used), 128x128 (common. Fit in 8kb texture buffer if used 4-bit color)
Bit Depth: 4-bit (16 colors) and 8-bit (256 colors) were by far the most common. Higher bit depths normally reserved for special cases.
Compression: Not natively supported in hardware (software solutions were often used).
Mip-maps: Supported but mostly only used in games released late into the systems lifecycle.
Filtering: Bilinear
3D Assets:
Screen: 10,000 to 125,000 triangles rendered per frame (At least until end of 2003 based on this , extra info here).
Characters: 1,500 to 10,000 triangles generally.
Display resolution:
Rendered/Output: Horizontal (512/640), and vertical (224/448/480/540) resolutions can be chosen independently.
Examples: Jak 2 (640x448), Ico (512x224), Ratchet Deadlocked (512x448)
Note: Games claiming to run at 1080i are upscaled via 'field rendering' (1080i mode in GT4 is actually rendered at 640x540).
Playstation Portable (PSP):
Textures:
Resolution: 512x512 (very rare), 256x256 (maximum normally used), 128x128 (common)
Bit Depth: 4-bit all the way to 32-bit RGBA. Up to 8-bit (256 colors) alpha blending.
Compression: S3TC compression supported in hardware.
Mip-maps: Supported (only goes as low as 32x32 ?)
Filtering: Bilinear and trilinear.
3D Assets:
20,000 to 70,000 triangles rendered to screen per frame (depends on target frame rate, CPU frequency, and engine optimizations).
Display resolution:
Rendered/Output: 480x272
Note: Outputs 720x480 when connected to a TV, but games render at regular 480x272 and have no scaling.
Sega Saturn:
(Note: Saturn doesn't use triangles or UV's, instead it generates a 3D image by distorting quads/sprites, similarly to how 3D effects were done on Sega Genesis/Megadrive just at a much grander scale. The 3DO, ST-V arcade hardware, and NV1 GPU also did 3D this way. Also, it splits rendering into a background and foreground layer, with each having their own dedicated CPU with unique features and limitations)
Textures (quads):
Resolution: Width = multiple of 8 (max of 504 ?), height a range of 1 to 255. (64x64 and 72x113 are both valid)
Bit Depth: 4-bit (16 colors) 8-bit (256 colors), 15-bit (32,768 colors)
Alphas: 1-bit (normally), as anything else requires special handling to avoid overdraw issues.
Mip-maps: Not directly supported by hardware, but some devs did implement it in software.
3D Assets:
Quads: Roughly 2,000 on screen at once at 30fps (depending if flat shaded, gourad shaded, and/or textured).
Quads: Roughly 2,000 on screen at once at 30fps (depending if flat shaded, gourad shaded, and/or textured).
Color: 3D/Foregrounds rendered in 15bit color (VDP1 limitation) (backgrounds on VDP2 rendered in 24bit color).
Quads vs Triangles: Due to their shape, creating pointy areas w/quads is done in one of 4 ways;
- Option A. Scale a side to zero, and use vertex colors in place of a texture.
- Option B. Scale a side to zero, and use pre-distorted texture (via texture baking) to offset the pinching.
- Option C. Use alpha to hide half of quad (diagonally) making it look like a triangle.
- Option D. Fold the quad in half.
- Option D. Fold the quad in half.
Display resolution/quality:
Output: Horizontal (320/352/640/704), and vertical (224/240/256/448/480). (320x256 is PAL-only)
Progressive vs Interlaced: Video signal will be progressive unless vertical resolution is 448 or 480.
Resolution seitching: Can dynamically change as needed (full screen menus often higher res then rest of game).
Vividness: Saturn was known to output a slightly darker image then PS1.
Padding: Black bars sometimes added to fill in the screen when outputting to a more standard resolution.
Sega Dreamcast:
Textures:
Resolution: 512x512 (maximum, very rarely used), 256x256 and 128x128 (common).
Bit Depth: 4-bit (16 colors), 8-bit (256 colors), and 16-bit (65,536 colors).
Mip-maps: Supported, and very commonly used (normally with bilinear filtering).
Filtering: Bilinear (common), trilinear (rarely used), anisotropic (never used?).
Compression: Vector Quantization based. Commonly used but very lossy, always results in noticeable artifacts (more info). Texture compression made 16-bit textures feasible for regular use.
Transparency/Opacity: Supports order-independent transparency, the first console to do so.
Display resolution:
Rendered/Output: Games are rendered at 640x480 (standard) or 320x240 (rare), and output at 720x480 (40 pixel wide black bars fill in the extra space on each side but aren't seen due to being outside the display area on most TV's).
Supersampling: supports rendering higher internal resolution for super sampled anti-aliasing ("Omikron" downsamples from 1280x480).
--- Retro Textures/UV's ---
Turn off Texture filtering:
Blender: In shader editor, set the texture nodes 'Texture Interpolation' to Closest. Example.
Maya: In the '2D Texture > File' node, set File Attributes > Filter Type: Off. Example.
3DS Max:
For Max 2018 or newer; Create DirectX > ShaderFX material, Open ShaderFX > Settings > Toggle Advanced Mode, create Texture Map node, in properties set "Sample / Filter" to "MIN_MAG_MIP_POINT".
For older versions of Max; Customize > Preferences > Viewports > Choose Driver: "Legacy Direct3D", and restart Max. In 'Configure Driver' set Texel Lookup to "Nearest". (Note: may cause viewport stuttering). Example.
Modo: Click on Image in Shading tab, Properties > Image Map > Texture Filtering: Nearest
UE4: Open texture, on right panel go to Texture, click bottom arrow, Filter: Nearest. Save. Example.
Unity: Open texture, inspector > Filter Mode: Point (no filter). Example.
Toolbag: Under "Texture" menu in your material there's a "Filter" checkbox. Older Toolbag versions in stead have a "Use Filtering" checkbox in the options popup that appears when pressing the gear icon next to a texture thumbnail.
Make texture fullbright/unlit:
Blender: In Viewport Shading menu set lighting to "Flat" and color to "Texture".
Maya: In top left of viewport set Lighting > Use Flat Lighting. For UV Editor go to Image > Unfiltered.
3DS Max: In top left of viewport set shading mode to "Consistent Colors" or "Flat Color". Else if using a DirectX ShaderFX material plug textures into Emissive and set MaxNumberLights to 0.
UE4: Open material, Set Details > Material > Shading Model: Unlit. Connect texture Samples color to Emissive Color. Save.
Unity: Create > Shader > Unlit Shader. Set its texture to the one you want to be unlit. Create a material and at the top set the shader to the new unlit shader.
Toolbag: To the right of material "Diffusion" label, press the arrow to show a drop down menu with the option for "Unlit".
Pixel snap UV's:
(Note: When working with very small textures snapping the UVs to the pixel corners can help avoid unnecessary texture bleeding, and may also help reduce memory usage since their positions can be stored as integers values instead of floats)
Blender: UV Editor > UV > Snap To Pixels > Corner
3DS Max: UV Editor > Click and hold bottom right magnet and release over magnet with gear icon that pops up. Snap Settings > Pixel Center Snap.
Maya: In UV Editor there is a magnet icon below the menu bar for pixel snapping. You may need to click the minimize bars to the right of the 'dimming' slider to see it.
--- Vertex Colors (lighting / opacity) ---
Vertex color Paint:
Blender: Go to "Texture Paint" tab, and in viewports top left corner drop down menu switch from "Texture Paint" to "Vertex Paint".
3DS Max: Use a "VertexPaint" modifier with the channel 'vertex color' or 'vertex alpha' selected. When in a component mode paint is restricted to selection. Don't switch between Vertex Color and Alpha channel or things get messed up, use separate vertex color modifiers for each channel.
Maya: Mesh Display > Paint Vertex Color Tool.
Vertex color display:
3DS Max:
Right click object > Onject Properties > Vertex Channel Display + Vertex Color or Vertex Alpha. This can also be done in the Vertex Paint modifier.
Display opacity with vertex alpha via shaderFX material where "Color Set Index" = 1 (makes RGB outputs source from alpha), and then connect R, G, or B value to opacity (the nodes alpha output itself is worthless).
Character rigging via Parenting: In the early days of realtime 3D, especially on game consoles, character bodies were often split up so that each limb was a separate mesh (example). These meshes would then either be directly parented to a skeletons bones, or directly parented to each other and use their own pivots for animation. This was mostly done because it was easy to implement and required less memory/processing then the alternatives, but it also allowed for character designs where any part of the body could be swapped out as needed during gameplay (such as swapping costumes, or for violent games where characters could be blown into pieces). Some artists that were limited to using this approach at the time would try to design their characters in ways that would hide the seams whenever possible (behind shoulder pads and such). As skinned meshs started to become more common on consoles, some games would opt for a hybrid approach (such as Skies of Arcadia), where joints that could be hidden used the split mesh method, and joints that were clearly visible would use a smooth deformation method (weighted skinning, vertex animation, or skinned animation baked to vertex animation).
--- Tips / Tricks / Effects ---
Character rigging via Parenting: In the early days of realtime 3D, especially on game consoles, character bodies were often split up so that each limb was a separate mesh (example). These meshes would then either be directly parented to a skeletons bones, or directly parented to each other and use their own pivots for animation. This was mostly done because it was easy to implement and required less memory/processing then the alternatives, but it also allowed for character designs where any part of the body could be swapped out as needed during gameplay (such as swapping costumes, or for violent games where characters could be blown into pieces). Some artists that were limited to using this approach at the time would try to design their characters in ways that would hide the seams whenever possible (behind shoulder pads and such). As skinned meshs started to become more common on consoles, some games would opt for a hybrid approach (such as Skies of Arcadia), where joints that could be hidden used the split mesh method, and joints that were clearly visible would use a smooth deformation method (weighted skinning, vertex animation, or skinned animation baked to vertex animation).
Reflections via mirrored duplicate geometry: For flat surfaces it's possible to get reflections without cubemaps or any fancy shaders. To do this just set the flat surface to a transparent value and duplicate + mirror the visible parts of the scene you want reflected (these copies can be a lower LOD if needed). For smaller reflections like puddles you can copy just the lower parts of a mesh (like the characters legs) and use alpha or stipple to fade them away before reaching the upper parts. This effect can be seen in Grand Theft Auto Vice City (example) and God of War (example). An interactive example of this trick can also be seen on here. You can also render the mirrored geometry to a separate lower resolution framebuffer, or with lower resolution mip-maps, to get a more glossy reflection. Another method, especially if you can't afford to duplicate the scenes geometry, is to simply create an empty 'room' on the other side of the reflective surface and apply gradients and lights to its walls (example1, example2).
:format(webp):no_upscale()/cdn.vox-cdn.com/uploads/chorus_asset/file/10643103/god_of_war_1.jpg)
Reflections via frame buffer as texture: On PS1 one of the methods used to fake reflection was to use the screen itself as a texture via 'double buffering' ; Basically two rendered frames worth of memory is set aside, with one being a completed frame and the other being reserved for the next frame, then each time a frame is output to the screen their role gets swapped. Some PS1 developers realized that if they moved a models UV's to the completed frame (based on their vertex normal directions in screen space) when the next frame started being rendered it could create a semi-believable reflective surface effect. Sometimes triangles would be rendered twice (since PS1 didn't support multi-texturing) to show the underlying texture, with the first pass being at the original UV coordinates and the second pass being at the completed frames coordinates and blended at 50% opacity. Examples of this effect can be found in the PS1 releases of 'Tomb Raider' and its sequels. See here for a more detailed explanation.
Skyboxes using only vertex colors: On consoles where texture resolutions are limited a texture based skybox would look very pixelated or blurry, and likely waste a lot of precious memory. So instead games like Spyro (examples), Looney Tunes Racing (examples), and Homeworld (examples) used vertex color based skyboxes. You can easily do this these days by using a tool to convert a texture to a vertex colored mesh, like this one.
Lights/Shadows cut into geometry: If lighting doesn't need to be dynamic an artist can cut the light/shadow rim into the geometry directly. After cutting the shape into the floor or wall they would then darken the faces within the shadow via their vertex colors. This was done for some games on PS1 and N64 such as Tomb Raider (example) and Banjo & Kazooie (example). If you want a soft falloff simply cut a second rim inside/outside the cutout geometry and blend the vertex colors between the two.
Cell Shading outline: To create a solid outline for your mesh, you can simply duplicate the mesh, push/inflate the duplicate outwards along its normals (such as with the 'push' modifier in 3DS Max), invert the normals, and turn on backface culling. After this you can apply a solid color to it if you want a cartoony outline (example). Note that this may create outlines in areas you don't want there to be any, but simply decreasing the push amount in those areas should solve it (Blender Tutorial). This is generally called the "inverted hull" method, and is often still used today due to its simplicity and quality of the results.
Rim Lighting: Can be achieved using a frame buffer trick; Render the mesh to its own frame buffer, then add one or more brightened copy/copies to the main buffer slightly offset in the lighting direction(s), and a non-brightened copy over top of that. Alternatively apply the tint and offset at the same time the pixels are added to the main buffer, and re-render the mesh on top of it. The first method uses more memory, while the second uses more processing power to generate the final frame. This trick was used in the game Vagrant Story for PS1 (example1, example2, example3) during certain story events. It is often confused with the "inverted hull" technique, but they produce subtly different results.
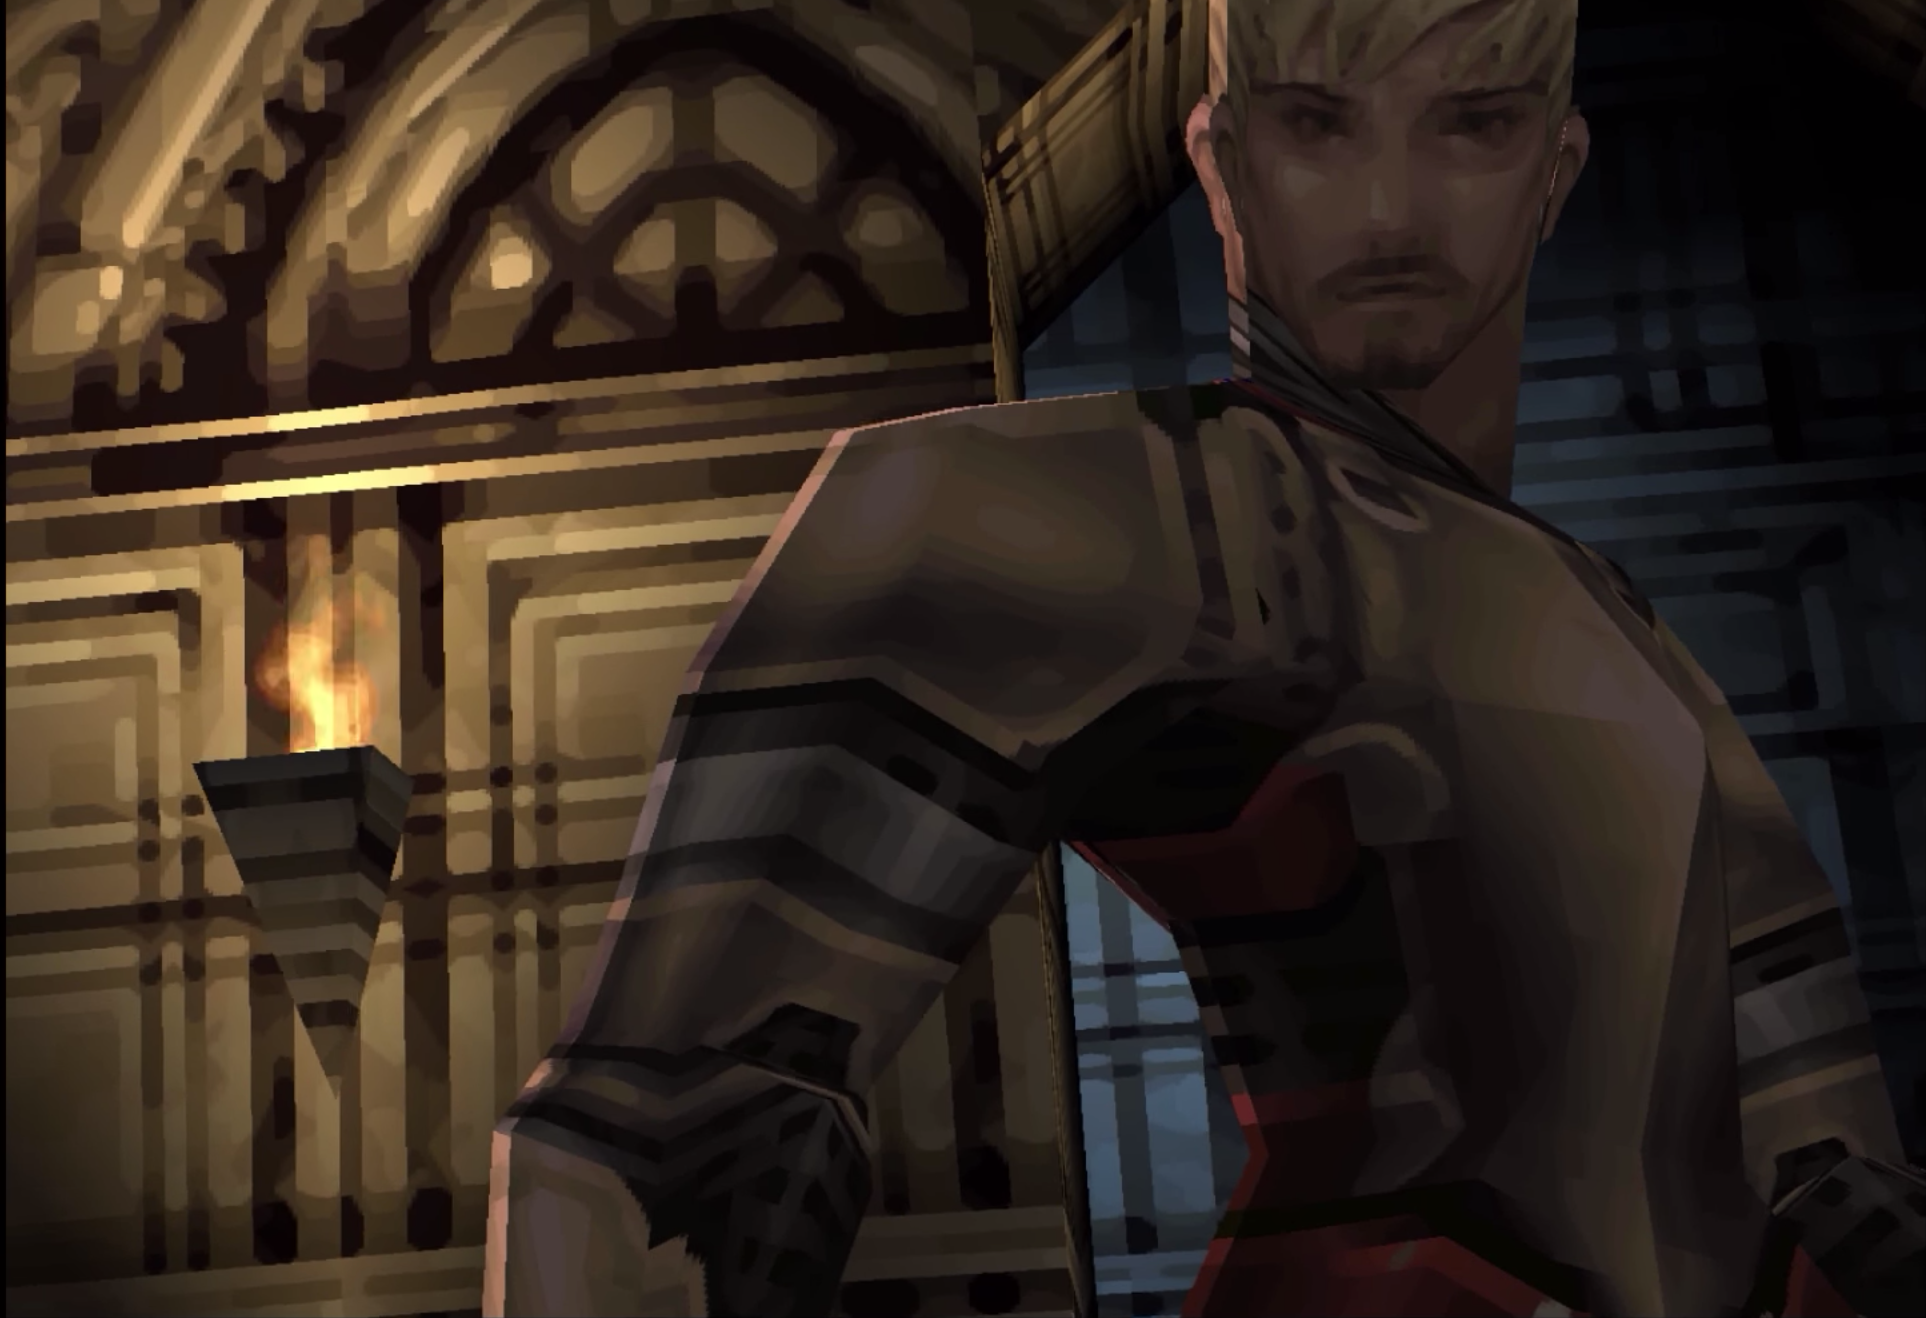
Avoiding pixel grid aliasing: When creating very low resolution textures that have alpha and are in a grid-like pattern, such as a chainlink fence, you can get perfectly clean edges by simply painting the texture as a regular grid (as opposed to painting them diagonally) and rotate the UV's until the pixels on the mesh are at the desired angle. One example of this would be the cloth strips on Tidus clothes in the PS2 game Final Fantasy X (pic).
Sphere billboards: Because a true 3D sphere would require many triangles to appear perfectly circular, even when rendered at a low resolution, many games would instead use a sphere texture on a billboard (quad that is always facing the camera). Coupled with tinting the texture based on viewing angle to fake lighting/shadow changes, it provided a very convincing effect with hardly any performance cost. (example - credit to SimonT for this one)
Hexagon texture tiling: One unusual trick to getting a variety of patterns out of a very low resolution textures is to tile it in hexagonal patterns, as opposed to square grids. This method was used for the sand parts of the ground in Animal Crossing on the Nintendo 64 / Gamecube (example).
Cylinder optimization via alpha plane: To create cylindrical shapes such as tables, barrels, etc. without using too many triangles, you can sometimes get away with creating a lower poly 'body' of the cylinder and create the top/end piece by cutting out a circular shape on a plane using a 1-bit alpha. Depth can also be added by creating a darkened duplicate of the plane underneath/behind the main one (example). Interestingly this optimization trick is still sometimes used today (examples - credit to SimonT for this one).
Texture animation via palette cycling: When using a very limited set of colors (such as with 2, 4, and 8-bit textures) without any color-modifying compression, you can animate parts of the texture by simply shifting the palette values over one space at a time (so the 3rd color become the 4th, the 6th becomes the 7th, etc.). When applied to just a limited range within the palette effects like blinking lights, technicolor shifts (example), or moving water (2D example), can all be achieved with basically no performance or memory cost. The creator of the technique did a GDC talk about it a few years ago which you can view here.
Anti-Aliasing via camera-shake: If a game is running at a very stable 60fps (or whatever the screens maximum refresh rate is), by simply rendering every-other frame with a 1 pixel offset you can create a convincing form of anti-aliasing while in motion. This trick works due to the natural ghosting (partial retention of colors between frames) present in all LCD screens. The PSP game 'Gran Turismo' used this trick (example pics here).
Replies
I couldn't find any comprehensive and artist-friendly resources on this sort of info (mostly just lots of technical documents and dead links), so wanted to compile and share some of it in case anyone here is still interested in this sort of art.
I'll keep updating it over time with more details.
@icegodofhungary Yea I started doing 3D back in 2005 when normal maps and sculpting were just starting to become a thing, but the majority of artists at the time were still doing things the old fashoned way. Back then I couldn't wait for technology to improve, but now I kind of miss when things were simpler.
Thanks for the useful resources
I love how people get so performant when they're limited technically, sick work you showcase here
---
example2 of Reflections via frame buffer doesn't respond
---
GTA has good examples of duplicated geometry for reflections: https://imgur.com/a/QLlzH1v
--
Pixel snap UV's:
Also after being able to correctly snap onto low res textures and display well, and get your sharp result, there's some saving to be done by having round values in UVs, that today's mobile game still do at some point, I knew this step as the 'Quantizer' and we would compare a different UV weight (of a few kb per asset) in 3dsmax Channel Info window
Small saving per asset but significant on the whole game
I made a few small changes to the post:
- Added the GTA example for duplicate geometry reflections
- Fixed broken example link for Tomb Raider frame buffer reflections.
- Added example for glossy reflections (from the PSP game Final Fantasy Type-0)
- Added a blurb about saving memory to the pixel snapping section.
- Added mention about how to do soft lighting/shadows via geometry
Have this, https://www.david-colson.com/2021/11/30/ps1-style-renderer.html
Besides literally making a game on a ps1 this might probably the next best thing?
Could you add the character poly limits for the Dreamcast and add the GameCube's specifications?
There's also this: https://geostegma.itch.io/quicksprites-3d
Also interested in artist techniques for this. Like.... start by filling the whole scene with a dark ambient color, painting in the sun light, etc...
Here's a video from an old Playstation Underground disc that shows how they applied vertex colors to light scenes in Tomb Raider 3 (starting at 3:53):
I was looking at some of the textures from vagrant story and noticed there are several versions of the same atlas with varying levels of contrast. It makes sense that if you are simply multiplying the 8bit vertex color with the texture color, it can only get darker. Sooo, the texture would need to be as bright as it can possibly be.
I was also doing some research and there are some clues (no hard evidence ive found yet) that the vertex color could be multipled or added to the texture depending on what is more fitting for the level. Also, im wondering if they ever multipled the vertex color by a number to increase it beyond 1.0 so that higher value vert colors start to add instead of darken.
Im mostly looking at FFX and Metroid Hunters. From my guess, it looks like it was handpainted instead of baked from radiosity.