Home Technical Talk

Broken Displacement Map - Zbrush.

polycounter lvl 3
Offline / Send Message
Pinned
GarethStandfield polycounter lvl 3
So its broken on afew levels. The end of the sleeve brace thing.

Someone suggested using displacement maps and so far this is what i get.

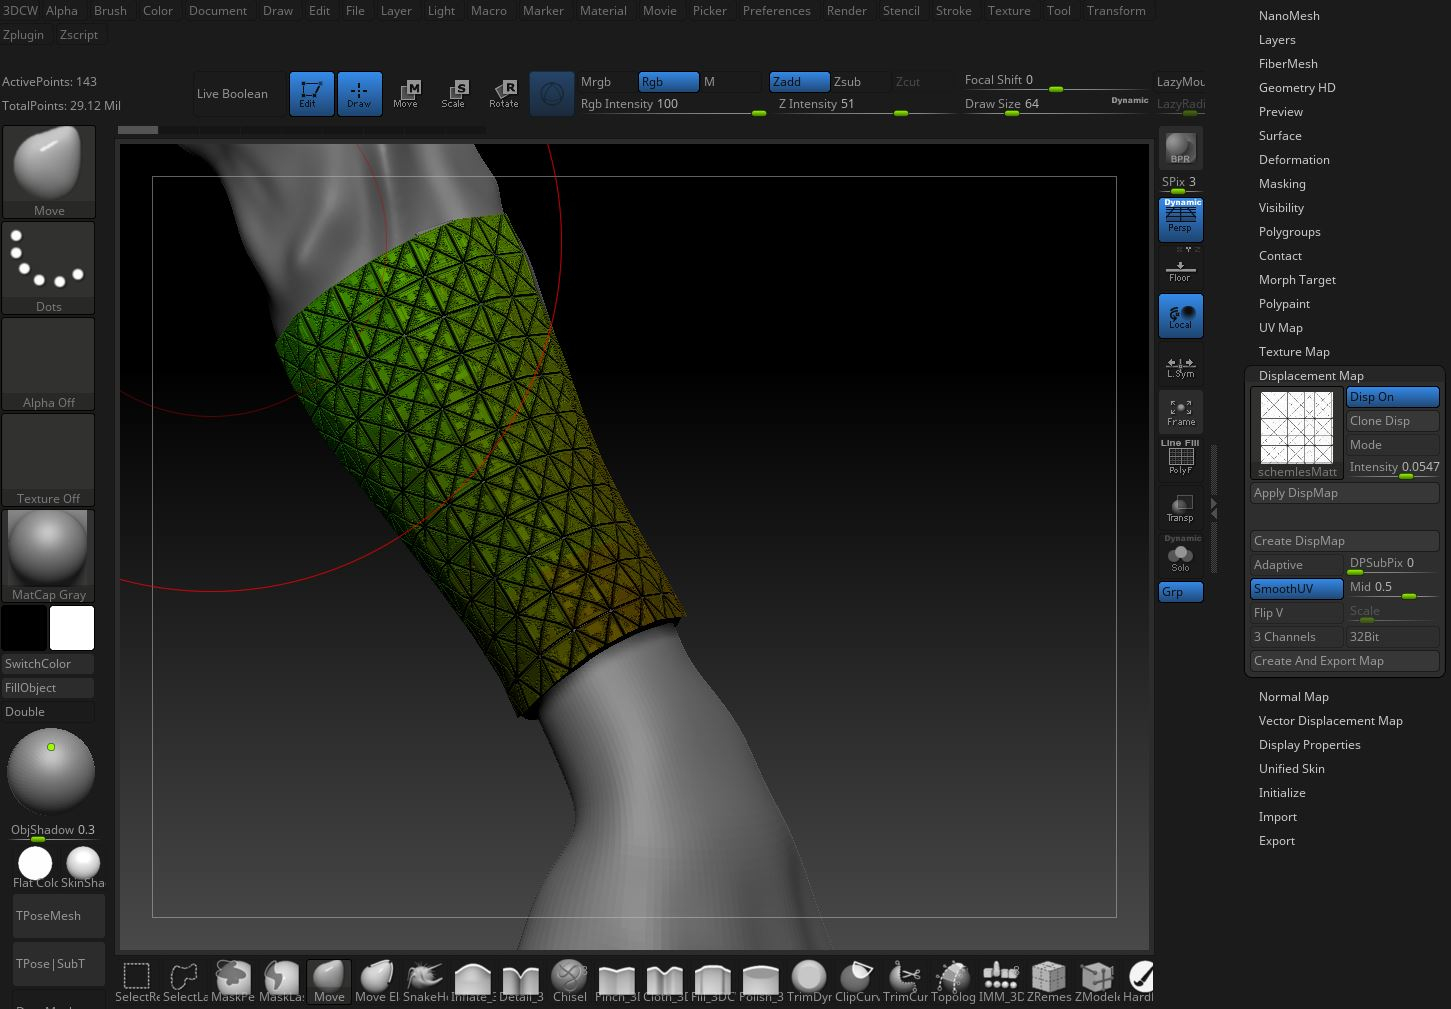
Which as you can see is extremely buggy and broken but sortaaaa can see it is a good direction.

But then you hit apply and it doubles down on total destruction of self.

Any thoughts on whats going wrong with this map?

Replies

  • GarethStandfield
    Options
    Offline / Send Message
    GarethStandfield polycounter lvl 3
    So found a fix for my issue when it came to the level of the map being weird, turned out i needed to change afew things on the UVs, but now its seemed to have caused another issue of a sort of stretching, or blurring of parts of the map? 


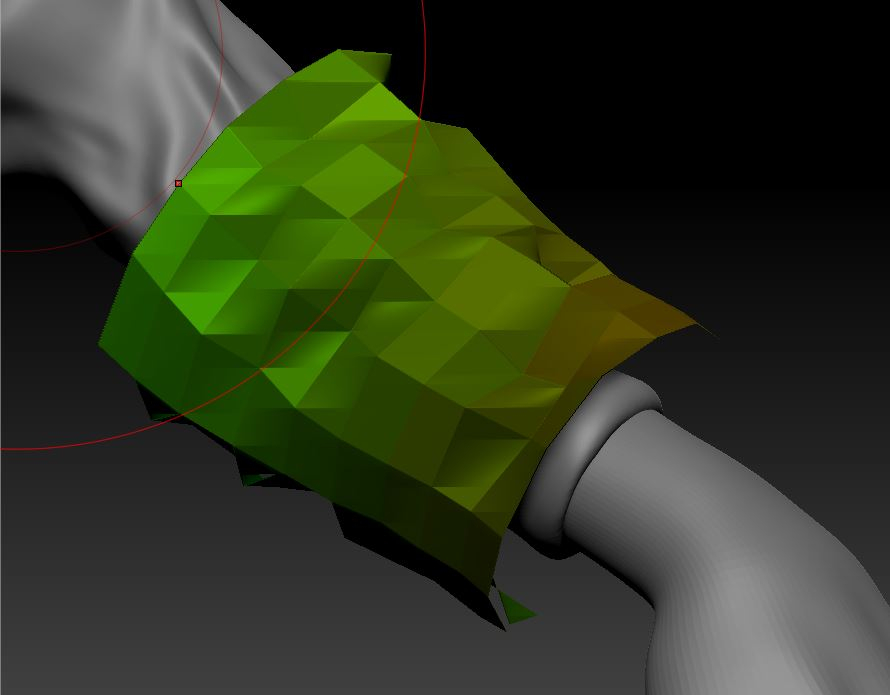
    The top is before applying, as you can see its rough looking, and the bottom is after applying it amplifies the issue. here is the test alpha im applying its 4k as i thought the 1024/1024 might have been the issue, but seems to not change no matter, the fix had added afew issue of its own haha. like the unaligned top cutting it in half and all the other issues above, so not sure if it was the changing of the UVs or if this issue is from something else?   


  • Eric Chadwick
    Options
    Offline / Send Message
    Merged your two topics, this is really all about the same thing.

    About the DM you mentioned in the title, it's better for the community if you add a reply explaining the solution. This helps others that have the same problem, and find your thread.

    I would suggest not trying to throw a gazillion triangles at it and displacement. Rather, model it as specific hardsurface shapes.
  • GarethStandfield
    Options
    Offline / Send Message
    GarethStandfield polycounter lvl 3
    Merged your two topics, this is really all about the same thing.

    About the DM you mentioned in the title, it's better for the community if you add a reply explaining the solution. This helps others that have the same problem, and find your thread.

    I would suggest not trying to throw a gazillion triangles at it and displacement. Rather, model it as specific hardsurface shapes.


    ow alright, well for the green, i had to go into "texture map" and use the "UV check" not "uv map", then the blown out details was the intensity being very sensitive i put it to 0.0005 and it looked okay, still the roughness remains. the mesh exploding was because i smoothed the mesh when i added Geo, the results were much better after adding 5 subdivs with no smoothing. Hope this makes sense ^_^! 

    This was my attempted to model it out of bits, too make it out of one mesh with DAmStanderd came with the same errors of uneaveness.


    So someone suggested displacement would be the way to go to make it more like a brace attached too the sleeve as its alot more accurate but cant seem to get away from this strange roughness and AA like lines. Its a pickle. 
  • GarethStandfield
    Options
    Offline / Send Message
    GarethStandfield polycounter lvl 3
    Alright follow up. Iv... well. Not sure really! ill try explain the madness that lead toot his working abit.

    So i turned on "Quick edit" and smoothed a higher sub division object to smooth it out abit, i then re applied all the maps on a lower intensity, then activated "Mode" and applied the DispMap, then went back in put the "Disp On" back on and turned on mode again and hit it again to redefine and strengthen the features. That course roughness on it sadly is still there and can figure out why it is, but its barly notable and atlesy im getting somewere with it.


  • carvuliero
    Options
    Offline / Send Message
    carvuliero hero character
    Roughness is just texture noise recreate your pattern clean and it will disappear
    Why did you use displacement should be easier to use the pattern as mask and inflate/deflate deformation
    Have you tried nanomesh  ?
  • Ghogiel
    Options
    Offline / Send Message
    Ghogiel greentooth
    What cavuliero said about nanomesh and just using the mask as an alpha with deformation and not as displacement could be very good ideas.

    I think one of the cool parts of the concept doesn't translate though, in that the triangulated pattern imo doesn't look so flat. I think the lighting in the concept on those parts suggests that the triangles have some interesting plane changes.   At the least the height map you have made only really addresses the separation of the triangles and square pattern, and not the plane changes.
  • GarethStandfield
    Options
    Offline / Send Message
    GarethStandfield polycounter lvl 3
    Roughness is just texture noise recreate your pattern clean and it will disappear
    Why did you use displacement should be easier to use the pattern as mask and inflate/deflate deformation
    Have you tried nanomesh  ?
    Yer sadly nano mesh just did not work as the base polys need to be exact for it to line up even remotely,

    The original image is just black and white, so im not sure were to clean up really? 

    Someone else suggested using it as a mask but this was the issue that arose from that, im not sure if im not user standing how to apply it as iv never used this method on something non flat before.


    It also seems to come out very noisy and like there no AA, for a 4k map im not sure why its doing this too the lines. 

  • GarethStandfield
    Options
    Offline / Send Message
    GarethStandfield polycounter lvl 3
    Ghogiel said:
    What cavuliero said about nanomesh and just using the mask as an alpha with deformation and not as displacement could be very good ideas.

    I think one of the cool parts of the concept doesn't translate though, in that the triangulated pattern imo doesn't look so flat. I think the lighting in the concept on those parts suggests that the triangles have some interesting plane changes.   At the least the height map you have made only really addresses the separation of the triangles and square pattern, and not the plane changes.
    So you think i should create a new alpha that somehow raises them abit, or just figure out how to inflate them from the alpha as a mask? like i linked above the things iv found online suggest putting it onto your brush but that creates them were stretch bits that would unusable 
  • Ghogiel
    Options
    Offline / Send Message
    Ghogiel greentooth
    Using a new mask yeah, and then try converting alpha to mask and using the deformation tab I think is the way to do it and doing as little as possible with brushes.  
    I know what you mean about the nanomesh though, you'd have to manually adjust them if you were doing the operation after you have tapered the cylinder to fit the dowanward taper towards the wrist. The solution to that is to nanomesh the shape to a non tapered cylinderfirst then to do the tapering and deforming to fit it the the characters arm.


    I think Eric's first reply is basically the best advice. It's over complicating it a bit no matter which way you go unless it's poly modelled in a simple way. I'd just do something like this tbh

    https://www.youtube.com/watch?v=Yk5YI0MwRSY&feature=youtu.be

    Excuse me faffing with the deformation modifier, but that's roughly how my brain is interpreting the plane changes on the triangles from the concept. But maybe they point outward the opposite direction, worth seeing which way works best, or mayb even doing inward and outwards in a checker pattern or alternating rows looks better. 


  • GarethStandfield
    Options
    Offline / Send Message
    GarethStandfield polycounter lvl 3
    Ghogiel said:
    Using a new mask yeah, and then try converting alpha to mask and using the deformation tab I think is the way to do it and doing as little as possible with brushes.  
    I know what you mean about the nanomesh though, you'd have to manually adjust them if you were doing the operation after you have tapered the cylinder to fit the dowanward taper towards the wrist. The solution to that is to nanomesh the shape to a non tapered cylinderfirst then to do the tapering and deforming to fit it the the characters arm.


    I think Eric's first reply is basically the best advice. It's over complicating it a bit no matter which way you go unless it's poly modelled in a simple way. I'd just do something like this tbh

    https://www.youtube.com/watch?v=Yk5YI0MwRSY&feature=youtu.be

    Excuse me faffing with the deformation modifier, but that's roughly how my brain is interpreting the plane changes on the triangles from the concept. But maybe they point outward the opposite direction, worth seeing which way works best, or mayb even doing inward and outwards in a checker pattern or alternating rows looks better. 


    Damn thats a pretty good idea, iv not used deformers in bloody ages since i stoppe dusing cinema 4d, so will jump into there and use an aray or something to give this method ago, thanks for the advice i can see what you mean now more like pins then just part of the arm, i think i can manually push and pull it in zbrush into the shape of the arm, and will have to sacrefice abit off quality to make the whole thats on the back of the sleeve were a zipper is, but probably better then looking flat. thanks for the brain storming everyone ^_^ will give the ideas a shot!

    I might try the alpha mask way also just as iv never figured our how to use masks as a effective sculpting tool on alot of objects so should be a useful skill to try learn.
Sign In or Register to comment.