ZBrush Decimation and SP baking.
Happy new year everyone! I hope 2021 it's better for everyone.
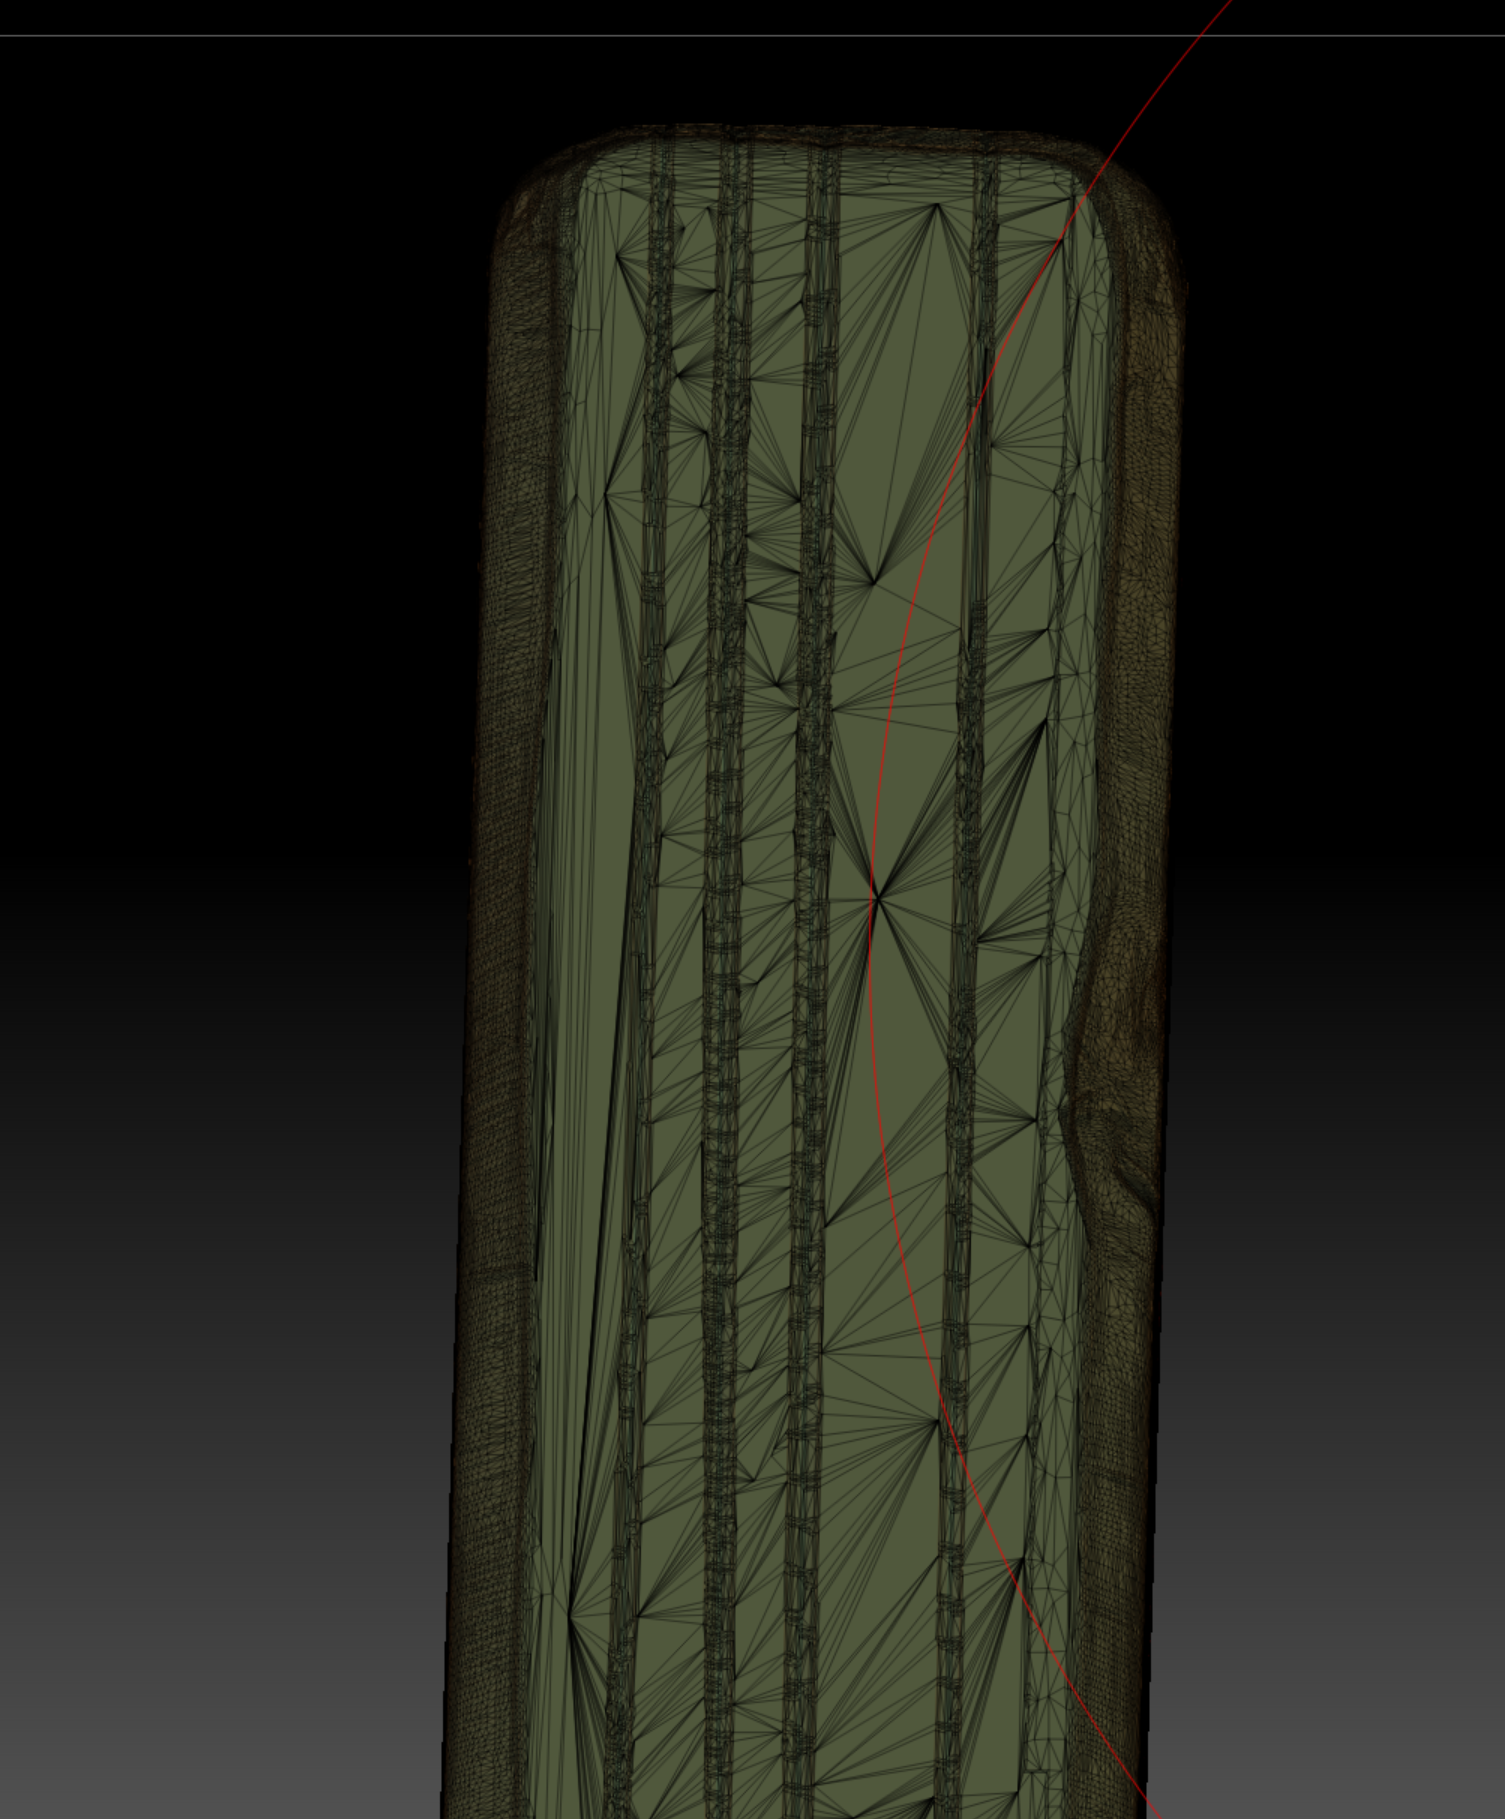
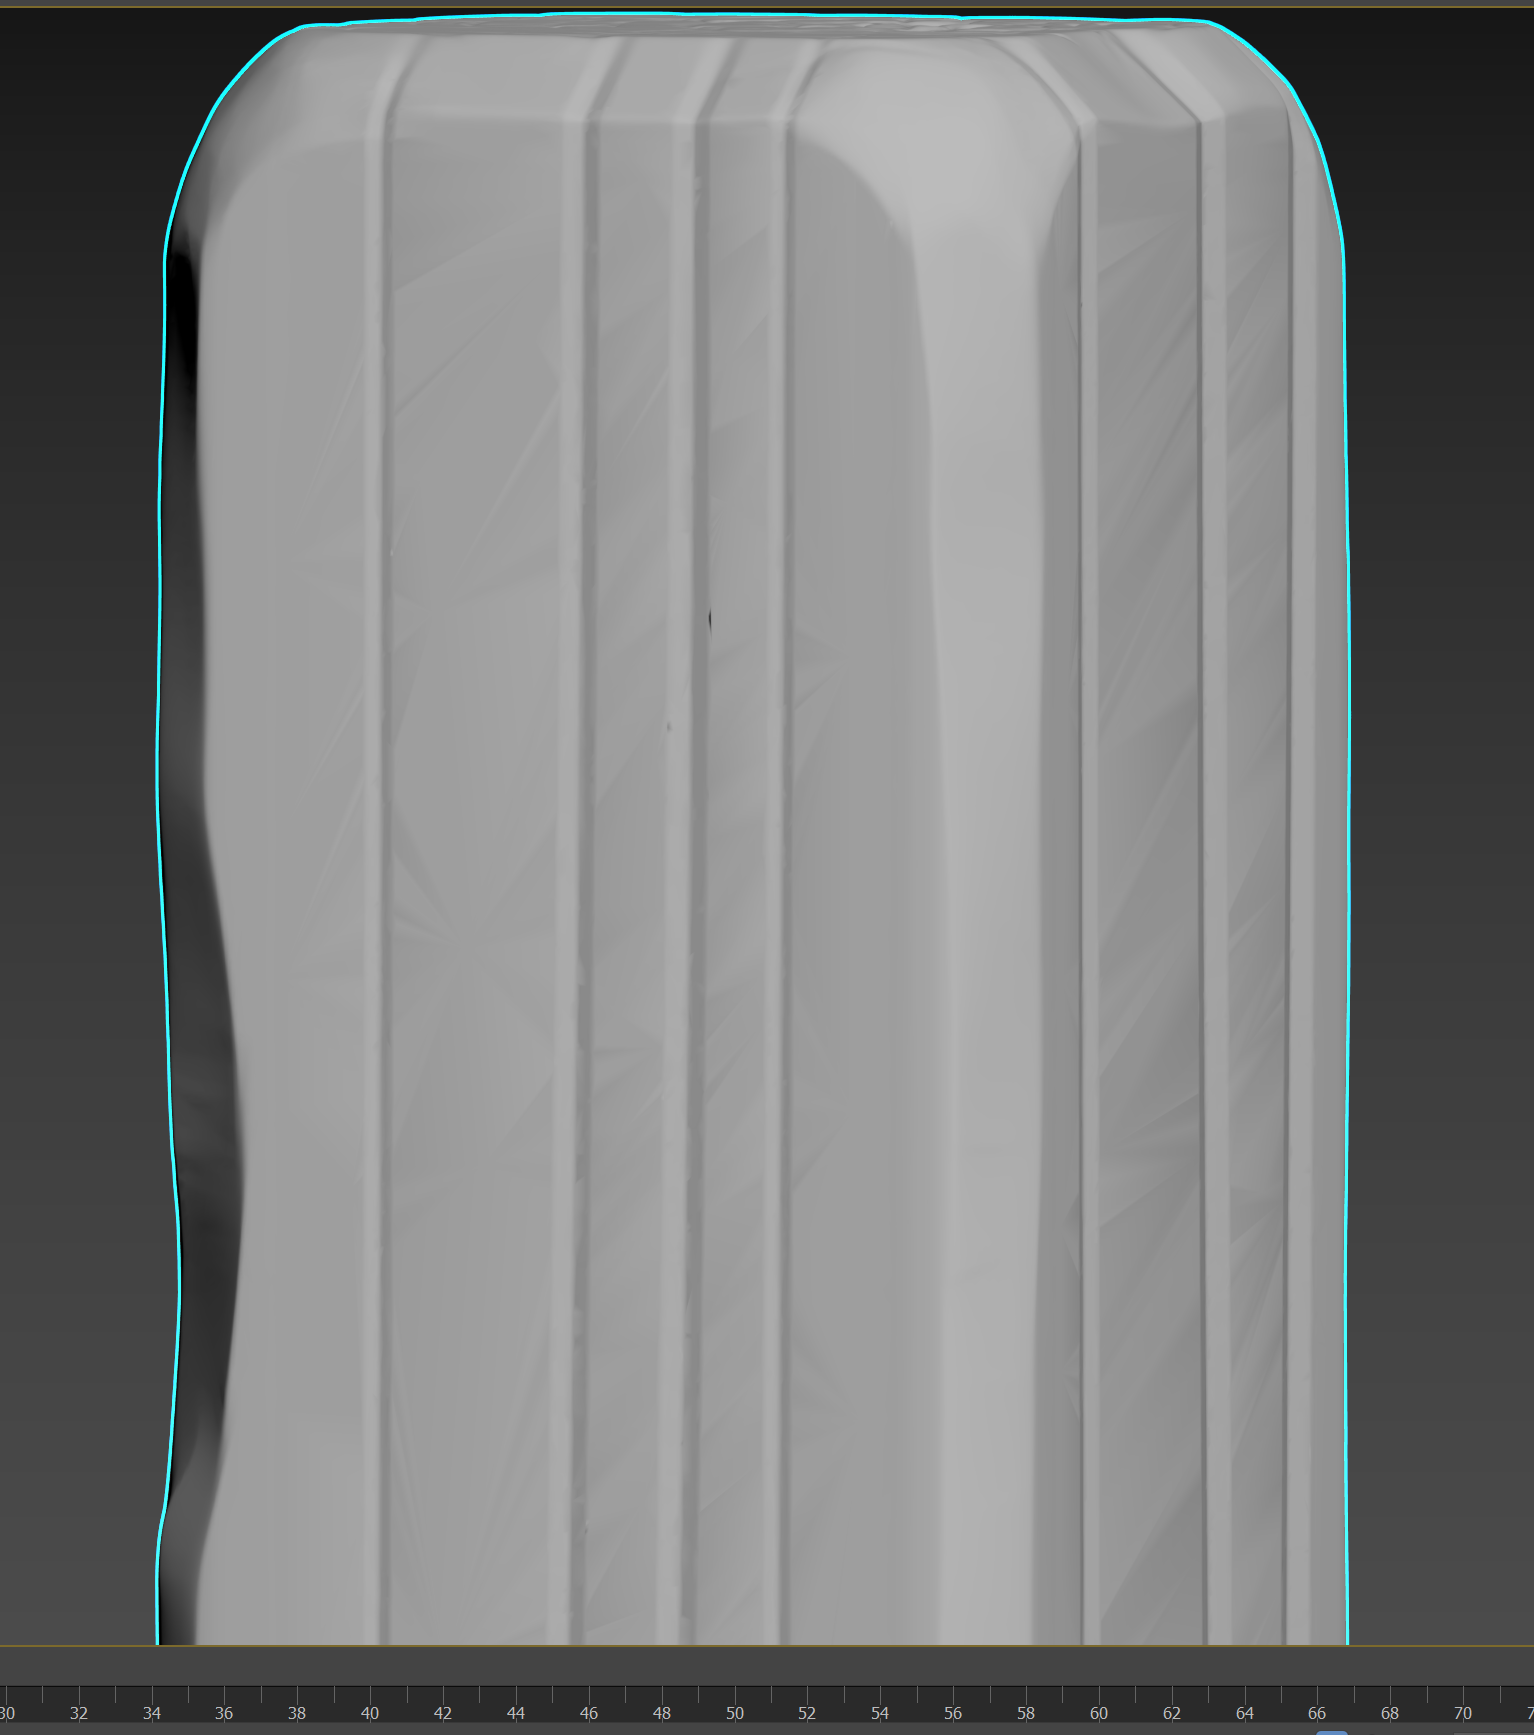
I'm trying to sculpt and bake some wood planks but I have a little issue with the high poly model shading. After I finished the sculpting I did a decimate because my computer can't handle baking with more than 15-16m polygons. As you can see in the screens, the excessive triangulation that is happening on the flat surfaces creates problems with the shading when I'm importing my high poly model into 3dsMax. The issue continues after the final import in painter and even the baked maps have the problem.
So my question is this: is there any way to fix this without raising up my polys in the decimation? Could I fix the shading in 3dsMax maybe?
Thanks in advance!
Note: My workflow is pretty standard. 3dsMax for the blockout geometry, zbrush for sculpting, decimation and import in max for renaming etc and then final export to painter for bake and texturing.


Replies
1. don't need to send the hi poly back to max after zbrush. Just send the Hi from zbrush straight to baker. Can rename and do whatever you to do in there - cut out a step. Only the low poly model needs to get it's UV's done.
2. I'd question that high of polycount for a high detailed character. A mostly flat rectangle seems excessive. Working well within limits of the hardware does a lot to improve productivity. Pushing limits of hardware to sculpt something like this suggest you aren't being as technically efficient as possible. You might be using a selective decimation to keep so much density on the edges? They don't need nearly so much to make that shape.
3. Decimation master is an automated tool. To get clean, precise results, you have to work in a clean, precise way. I'd reconsider the entire workflow. How to do more with less? Are you approaching this item in a modular way? That is the typical method for game assets like this. I am making some assumptions but the questions are rhetorical - don't got to explain to me. If it leads to rethinking workflow and improving, great. If not, don't mind me.
I usually like to import the high poly in max again to do some copy and paste in some geometries to save some sculpting time (for example if I want to bake 4 stones on a plane I just sculpt 1-2 stones and copy paste them backwards etc, I could do that in ZBrush but I like the precision with max)
I totally get what you're saying. I'm kind new to this and everything in my workflow is always up for some feedback. What would you suggest other than exporting my high poly direct from Zbrush?
I'd suggest to go ahead and bake out your current pillar. But then do another experiment. Start a pillar from cube primitive. Subdivide it minimally to sculpt similar details on the broken edges. Shouldn't take more than a few thousand triangles at the most to get similar level of detail as in your screenshot, I'd expect. No need for decimation then.
Use separate floaters for the non-silhouette changing grooves. It's superfluous detail so a couple repeating pieces should be enough. I think that's the sort of detail trim sheets excel at. Or can probably accomplish directly in your texturing app as well. Worth trying a couple different ways. Just keep in mind baking from a high poly source is often the slowest way to accomplish things. I only do things that way as a last resort basically, but that's just me.
Then compare the two final results. Can you see a difference in quality? And which way went quicker and required less waiting around for machine to think? Remember the final result is a texture: an image file with finite resolution/texel density. So if you spend time sculpting detail that is greater than the final result is capable of showing, that was wasted time.
oh, and about duplicating repeating items in max : again, why not bake the items first and then duplicate the low poly models afterward?
I then started simplifying all my block out assets in simple geometries so I can reconstruct them AFTER the bake. I, then, imported these geometries to ZBrush for the sculpting so I can bake, texture them and get the texture and the bakes lows in max again to make all the assets just from one texture set. This is my complete model (it consists of some different sizes of wood planks, and some iron parts that I need):
So about the shading problem I currently have, the only solution is to export my high poly model directly from Zbrush? Is the no way to fix it from max? Also, is there an option in painter to bake from 2 different high poly models so I can divide the total polygons and get around my limited memory?
Thanks again for your time!
You could certainly bake separate parts of the same trim sheet, then composite them together in 2d afterwards. Either with Designer, or Photoshop/Gimp.
The shading problem is due to what you are forcing decimation master to do. There is big flat areas with no detail and then little grooves with high detail. So the most efficient way for it to remove triangles is from the flat area, leaving a lot of long thin triangles. That's where the shading issue comes from. Maybe there is some way to hack a fix for that but it's not solving the real problem.
You could fuss around with using polypaint to get more evenly distributed resolution from decimation master (hold control and hover over the button in decimation master that says "use polypaint"), but I think this isn't solving the larger workflow related issue.
Looks to me like you have designed a thoughtful workflow, but room for improvement. Just keep the principle of efficiency in mind and you'll be getting better each time. Also take some time to review tutorials professional enviro guys are putting out, even if it's something you think you already know.
My end conclusion is that problem was created mostly from the difference in detail between the edges and the flat surfaces. Baking curvature map from mesh and not from normal eliminated the problem as a whole in baking. (I really need to start updating Substance when I can instead of going in "let's do it tomorrow" mentality).
Thanks again, and this is the end result for everyone that's interested:
Have a great weekend!
https://www.artstation.com/artwork/lxXK4z