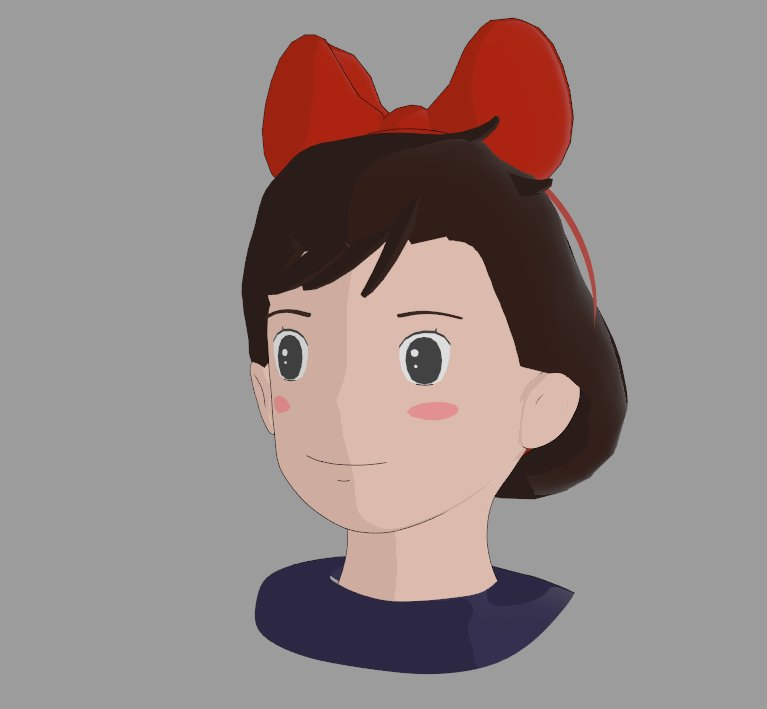
[Finished!] Kiki's Delivery Service - Kiki head study
Hi all!
I was inspired by this video on Arc System Works stuff on Guilty Gear Xrd and how they created a 2d look in 3d( https://www.youtube.com/watch?v=kZsboyfs-L4) and decided I wanted to learn about that, using a character from one of my favorite movies, Kiki from Kiki's Delivery Service!
This is my first time trying to make a face, so I'm already seeing things that I need to redo with the face topology. I'll rework that before moving onto other parts. Eventually I want to build a facial rig to try to match the animation from the film. But that's for another week...
I'm building this with the intention of putting it on Sketchfab, so I have to work with the limitations for that, e.g. faking the cel shader look, using the inverted hull method of creating an outline, etc.
Anyways, here's my WIP of the her head!


Any feedback is always appreciated!
I was inspired by this video on Arc System Works stuff on Guilty Gear Xrd and how they created a 2d look in 3d( https://www.youtube.com/watch?v=kZsboyfs-L4) and decided I wanted to learn about that, using a character from one of my favorite movies, Kiki from Kiki's Delivery Service!
This is my first time trying to make a face, so I'm already seeing things that I need to redo with the face topology. I'll rework that before moving onto other parts. Eventually I want to build a facial rig to try to match the animation from the film. But that's for another week...
I'm building this with the intention of putting it on Sketchfab, so I have to work with the limitations for that, e.g. faking the cel shader look, using the inverted hull method of creating an outline, etc.
Anyways, here's my WIP of the her head!


Any feedback is always appreciated!

Replies
I think I'll try to nail down the face some more before moving on to the bow and hair..
Now it’s time to rig the face...
Finally finished the eyes for now. Here's some expression tests.
Time to move on to the mouth!
It’s not perfect, but it’s getting there. I could keep tweaking this, but I think I am getting close to the end; this has already gone longer than I was planning...
Unfortunately for various reasons, I couldn’t get the animation onto Sketchfab - but I do have a static pose that you can check out:
https://sketchfab.com/3d-models/kiki-face-kikis-delivery-service-b825b651e83a4f0dbe53de4c54ffd74e
Great work!
If you want to be able to get a little closer to the wireframe, you can go to the Sketchfab link and turn on wireframe.
Under the hood, it's mostly lots of wire deformers, blend shapes (for the mouth), and a loooot of shrinkwrap deformers to keep everything attached to the face. Much of the controls also toggle, so you can change the mouth or eyes between being open and closed, or change the visibility for the different eyelid lines.
@Ashervisalis - Thank you! This is actually just a playblast in Maya! It's using Arnold shaders, but the way they are set up is a little bit different so they can show up in Sketchfab:
The gist of it is you use the emission in your shader for the color when it is in shade, and the base color when it is in light. Turn up metalness so both colors come through. Then make your environment light with an image that has a clear distinction between black and white so there's no falloff. And then you have it!
I still had to mess around with the normals of the face so that they looked nicer than how they do by default, but that's the basic idea. You'll also notice that it isn't perfect - because the metalness is turned up, there's a bit of a white sheen to stuff (you can especially see it on Kiki's hair) - but it does get you pretty far!
@Pav3d - thanks! This was the shot I was trying to match (unfortunately the audio isn't present - there isn't a lot of clips from the movie online, ah well)
Here's a clip showing the shot I was trying to match - sometime I might bring the two clips together and match them up for a comparison.
Doing this shot kind of exposed the limitations of the rig I built; the mouth setup especially started to go a little whack by the end of the shot (you can see the outline of the mouth getting a lot thicker by the end, and the tongue and teeth are never really quite straight). Originally my intention was to try to get this onto Sketchfab. If I were to do this again, I would probably try using animated textures for the mouth shapes and maybe the eye blinks as well. Ah well, we live and learn!
And with that, it's time to move on to something new...