How to unwrap and texture large assets [Tutorial]
The tutorial consists of two parts. In the first one I will explain the standard way to unwrap an asset, the second part explains how to do it for large assets. Part one is mainly just for reference though.
I won't get too deep into detail here. The tutorial is only to get you a basic understanding of it.
Also, please excuse the a bit shitty looking asset I used. I created it just for demonstration purposes.
Now let's get into it:
Part 1: How to (usually) create and unwrap a small or unique asset
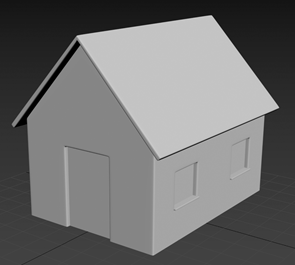
Step 1, create your lowpoly:

Step 2, Unwrap:

as you see in the picture, there is one unwrap for the whole asset, and it’s
packed into one UV-space.
One unwrap means one material and one material means one texture. So if you have a large
asset, your texture later also needs to be very large, in order to look crisp.

I’ve created a material called “House” here. This will later contain the texture for the whole house.
Step 4, create a highpoly:

I have created a highpoly out of the lowpoly here. On the left side, you see the highpoly with support edges and without the turbosmooth applied. On the right the turbosmooth is added.
Step 5, baking and texturing:

After baking the normalmap and creating the texture,
the house will now look like this and the texture for it like the one on the
right.
(I did the baking & texturing in substance painter here)
Advantages:
- because you can bake every detail you want into the
normalmap, the asset only needs very few polygons.
- it’s easier to add detail to the asset, because you can just paint it into the texture (no decals needed)
- it may be a bit quicker
Disadvantages:
- you need a unique texture for every asset in your scene
- the texture size needs to fit the size of the asset. A very large asset, also needs a very large texture
- it takes more effort to change the look of you asset afterwards, because you always need to update the whole texture.
--> Therefore,
when you create a scene that contains multiple assets, that share some
attributes (like a city, where multiple houses have the same type of roof or
wall),
it makes sense to do the unwrap differently.
Especially when the assets are large so each one would also need a large
texture.
That brings us to part 2, and the main part of the tutorial:
____________________________________________________________________________________________________
Part 2: How to (usually) create and unwrap large, or more
generic assets
Step 1:
start with the same lowpoly you had before
Step 2, unwrap:
This time, instead of unwrapping the whole asset, we create a different unwrap for each part of the asset that is supposed to have a different material.
(from left to right: Walls, Roof, Door. These are just some parts of the asset I created a screenshot from)


The UV layouts also don’t have to fit into the UV
space in the lower left corner anymore. It is even unwanted, because in this UV space there will later sit a tilable texture.
We can later adjust the look of the texture on the asset, simply by scaling,
moving or stretching the UV layout.
Step 3, creating Materials:
Instead
of one material for the whole Asset, you now need to create a material for each
part of the Asset.
Each
material contains a tilable texture like this, (and all the PBR-maps going with
that):


Step 4, soft edges:
Because we can’t bake a normalmap with this type of
unwrap anymore, we now need to chamfer the edges directly in the lowpoly.
Therefore, if you use 3ds Max, add an edit poly modifier on the mesh and make sure to check “Preserve UVs”,
so the unwrap doesn’t get destroyed on the edges.
After adding the chamfers, you may have to play around with the smoothing groups a bit, to achieve the best possible smoothing.
In my case, this is the result:


If you want to get more details into your asset, like dirt, cracks or maybe some ornaments, you will need to do all of that with decals now.
Advantages:
- you don’t need any extremely large textures. Instead
you have multiple smaller textures, that will still look crisp on your asset.
This will save a lot of memory and computing power
- you can reuse your tilable textures/materials for multiple assets in the scene
- it’s easy to adjust the look of your texture afterwards. For example you can just scale the UVs of some parts to make the texture look larger or smaller there. Or you can simply change one material, without needing to create a new texture for the whole asset.
Disadvantages:
- since you can’t bake a normalmap for your asset, it needs to have a few more polygons
- it’s not as easy to add detail to the asset as with a unique texture. You need to work with decals a lot.
Now I hope this tutorial has helped someone.
Bye,
ElKaWeh