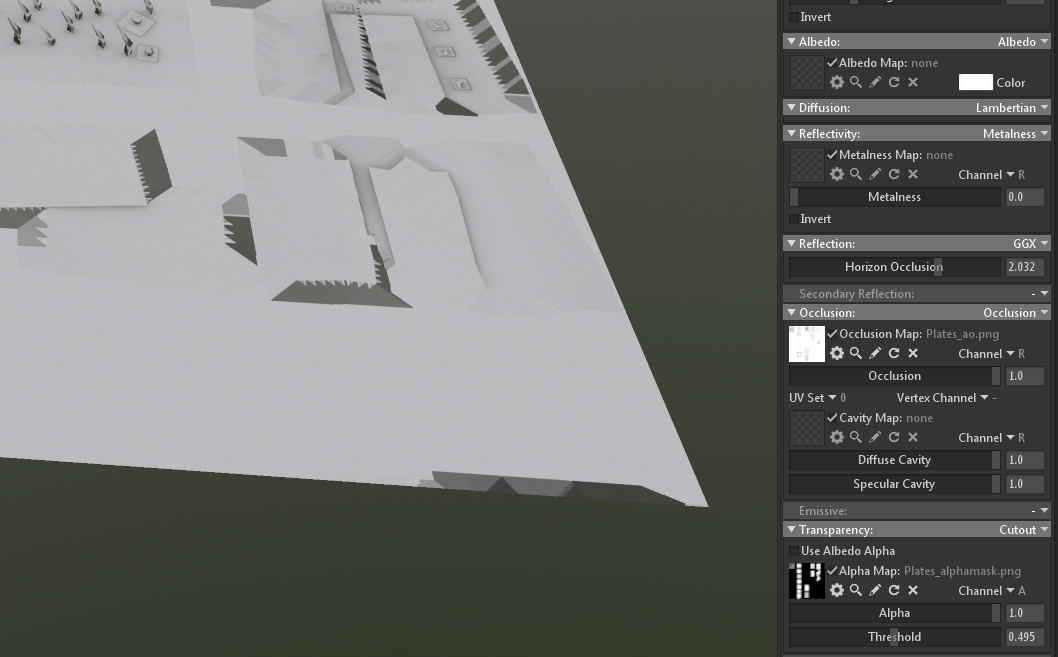
Previewing baked textures in material
Hey,
So when I bake something, the previewer does apply the normal map to a new material onto a mesh
However any other textures are not applied, which is rather annoying, especially if you need to test for alpha for baked planes
Could this be fixed?
Then also the alpha map that is generated by marmoset does seemingly not work in the material?
Currently I need to test my bake output in my 3D software which seems very unnecessary
Is there any workaround or fix for this? And why does the transparency input not work, what do I have to do there?
(Changing threshold or alpha dosn't fix it. It is set to cutout.)


Replies
As to why this isn't working, by default the transparency input expects the content to come from an alpha channel, so change the alpha dropdown from A to R, and it should work.
Maybe the channel Letter could have the respective color, then it would stand out more
So I just enable the slots and then it works automatically, I see
Would be really nice to have this by default / as a setting
Thanks!
Btw in Marmoset the AO always comes out extremely strong and broad, can we maybe get a curve or slider for attenuation or such? (especially with floor occlusion its absolute extreme)
or is there any other way to affect it?
If you want less broad AO in general, you can try adjusting the Search Distance setting. By default this is set to 0, which means the ray search to infinity. If you want finer scale AO, try setting this to a non-zero value. The value is whatever units you have your Scene Units set to in the Scene object. So if that is Meters, a value of 1 in the Search Distance field means the rays will search for 1 meter before giving up.
Here's a gif to illustrate:
Here you can see that its a really big difference in quality:
(Default, Photoshopped default, cutoff)
From my knowledge is my photoshopped version closer to ground truth but surely depends on engine, workflow or desired style. Also notice how the original has this strange looking gray circle "plateau" effect on the circle inlay at the right, while the one with the curve shows more of a smooth falloff inwards, while being the same render.
---------------------
Here I made a comparison:
Cinema 4D AO (5000cm ray length)
Marmoset Default (notice how there is maybe 10-20% pure white left at best, everything is darkened)
Cinema 4D Plane
Marmoset Plane
Marmoset plane at 0.2
Notice how even at 0.2 or default there is almost no white point anymore in the entire texture / image, leading towards that the entire
texture in engine being darkened (and if you have other shader effects, like grime or reflectivity affection, even worse)
Here is Xnormal plane (sort of in between C4D and Marmoset 0.2) but it retains the white
C4D (I usually turn down the black to be more gray, so it would look a bit more like the others - in most cases at is is a bit exaggerated)
Marmoset
xNormal
For the marmoset one, the falloff seems to be too linear, it should have more of an inverse exponential falloff
The AO bleeds very heavily into the rest to the point where almost no white point exists
Im sure one can debate which one is the most correct or the best but given that it really should give some artistic choice there
especially as art styles, engines and taste vary
In cinema 4D there is a gradient,
which is a perfect solution for this, because;
A - It is automatically a curve the user can affect
B - Its extremely easy to understand
C - You can make cool effects or even add colored AO and the sorts which would allow more workflows
and styles with the marmoset bake. Maybe some R-G-B mask based on AO attenuation even.
I would definitely be satisfied with a simple "Power" > Contrast value as number that could be tweaked however. But surely a cool feature for a marmoset update.
Here is also a pic from Radeon Pro Render, there is zero settings so they must think that is accurate
I try to get an Octane picture too if you want.
Funny related anecdote I just realized:
Bought octane to render out images for our game, but it also only had a ray distance setting no contrast, their AO is very weak and I needed it stronger to stand out on small images, so as it gave no control, I had to ditch it completely despite spending 400$ and render out everything in cinema.
They did add it recently however.
Btw, aside of the AO thing, marmoset is making the workflow really much easier.
If you want a very specific look to the AO, I would suggest baking out a 16 or 32 bit map and adjusting it in Photoshop. You can apply a curves adjustment or a gradient map to get a similar effect as with the C4D example. You could create an action once you've nailed down the style you want.
We may consider adding some extra controls if there seems to be enough interest for this, but for now, editing in post is your best bet.