Home Technical Talk

3ds Max / Substance Painter - Problems with Normal Maps

arkaneXXI
polycounter lvl 10
Offline / Send Message
arkaneXXI polycounter lvl 10
Somebody knows what can be the cause of this problem in the edges caused by normal map?
The problem happens in both, 3ds Max and Substance Painter. I tried to remake the model and the UV, but the problem is still the same. I don't know what else can I do.
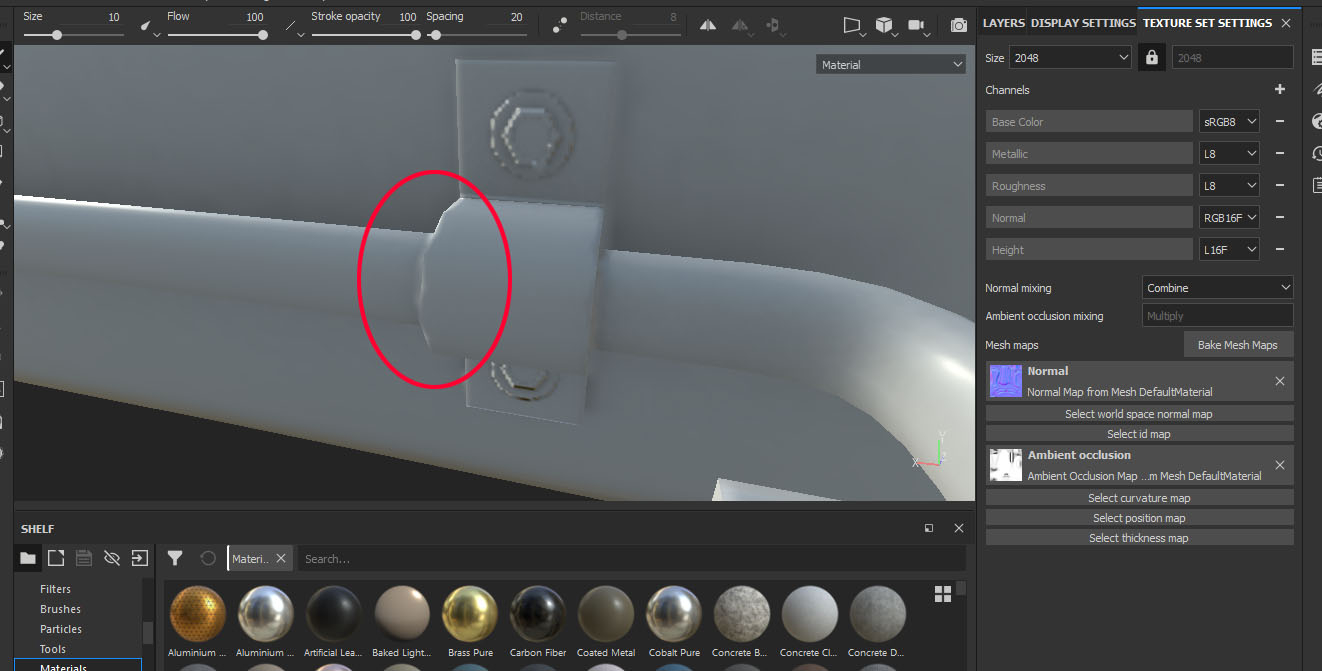
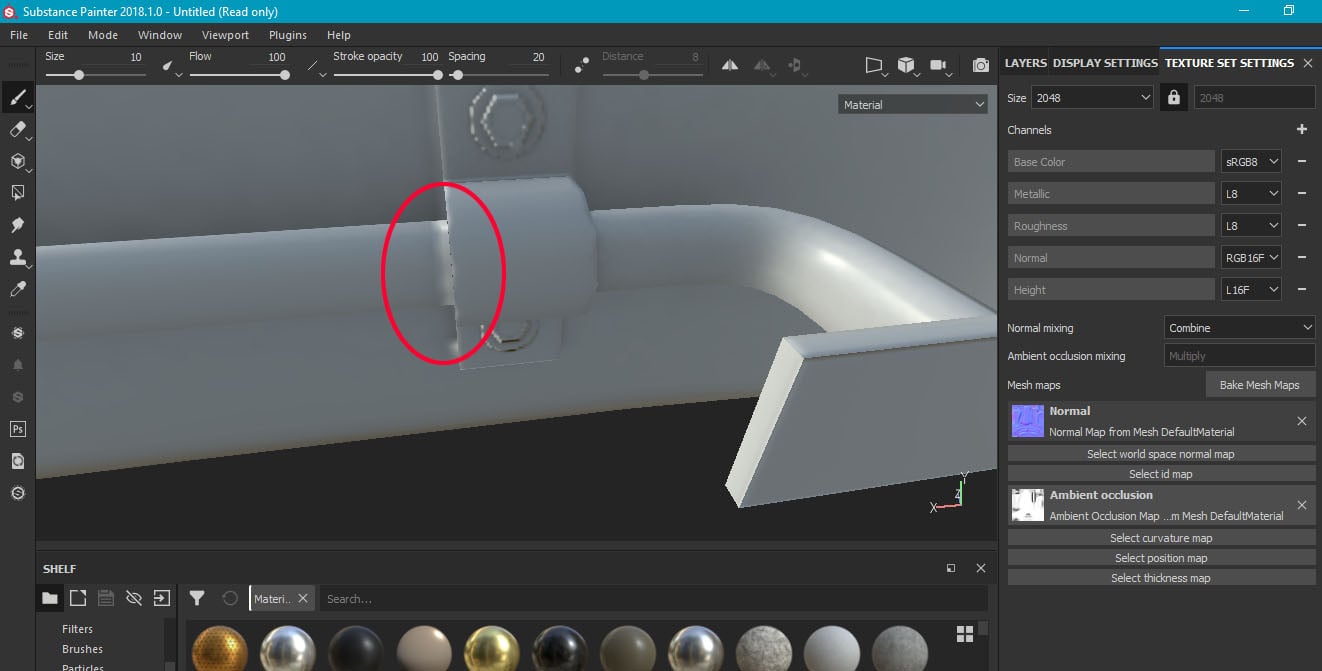
I don't have problems with the rest of the model. It's just this area.

Replies

  • carrottoptw
    Offline / Send Message
    carrottoptw polycounter lvl 5
    Are you baking from a high poly? is the bracket a separate piece of geo? Are you using "Mesh by name" in sp if so?  Are you using smoothing groups in max? So many questions lol.  Maybe upload the scene to test? :)
  • arkaneXXI
    Offline / Send Message
    arkaneXXI polycounter lvl 10
    Thanks for the fast reply!

    Here I leave the details:
    - Yes, I'm backing the normal map and AO from a high poly model.
    - The bracket is welded to the tubes, but separated from the piece behind. I never tried to separate the tubes from the blackets. I'll try it now. Maybe that can solve the problem on the tube but not the problem on the bracket's edge (I guess).
    - Yes, I used the option "Mesh by Name" in Substance Painter.
    - Yes, I'm using smoothing groups and I tried to change the values and didn't help.

    - Using the Cage in 3ds Max or doesn't using it in Substance Painter, doesn't solve the problem.
    - Chamfer the bad edges doesn't help.
    - I also tried to cut the cluster of the UV along the annoying edges and didn't help.

    I wasted one month already trying to solve this.

    I'll upload the file.
  • arkaneXXI
    Offline / Send Message
    arkaneXXI polycounter lvl 10
    Here is the 3ds Max file with the high and low poly models with the suffix _low and _high in the end of the name to export to Substance Painter. I deleted the part that was fine.
    https://www.mediafire.com/file/928xj47bb08k4f1/Test.max/file

  • Ghogiel
    Offline / Send Message
    Ghogiel greentooth
    I can see a few issues off the bat.

    UV issues:
    You have overlapped UV shells. Offset stacked islands or you will probably have baking errors.

    You have hard edges on the low poly model, but the corresponding UV edge is not split. You'll get incorrect normal map pixels at those edges. You basicaly get a gap in the projection along the line of the hard edge and a hard transition from one normal direction to the other. Split all smoothing groups to their own UV island is the solution, max has a button you can press in the UV editor window that is called "flatten by smoothing groups".

    Modeling issues:
    The high poly mesh shading where you circled it on your bake is butt. You probably should make the bracket and the rail 2 separate objects and not connected, since why would someone make a bracket if not to hold a separate object? it all being manufactured as a singled molded piece all together doesn't make sense to me.

    The shading issue is that face smoothing generally looks terrible when it has to compensate for 90degree angle changes like on your mesh. Notice the first edge loop on the highpoly starts where the weird shading on your bake stops. Add a darker material and up the gloss and spec to carefully inspect how a model shades, (including the high poly!) in the future.

    Anyway, you could make the bar highlighted in green it's own smoothing group to fix some of the shading/ detach it to a second object.

    details modelled like this will look jaggy af

    That's a straight on view of the nut, that's what the baker is going to see and nothing more. Modelling realistically in these types of circumstances doesn't yield good results in normal maps. You need more bevel and chamfer or you end up with the baker trying to cram that details edges into 1/2 a jaggy pixel line width.


    reset xform


  • arkaneXXI
    Offline / Send Message
    arkaneXXI polycounter lvl 10
    Thanks for the detailed reply.
    - I have separate the symmetric UV clusters/islands in another test, and the problem wasn't solved. I also tried to separate the UV clusters by smoothing groups using that option and I think the problem wasn't solved either. But just in case, I'll check it again.
    - You are correct about the brackets. I should separate them from the bar in the high resolution model.
    - I know the 90º corners are problematic for the Normal Maps. The problem is how to solved. I also had the problem of the black edges before and couldn't solve it in 3ds Max. But that didn't happen in Substance Painter.
    - About the bolts, I didn't worry much about it because the model won't be seen so close. And at distance, it looks okay. The result looks bad from close because the resolution. If I use a 2048x2048 resolution, looks better. But isn't necessary for this model.

    Anyway, the main problem is the "biten/melted" edge of the bracket (first image), more than the edge between the bar and the brackets. I'll correct these things and then upload the results.
  • Ghogiel
    Offline / Send Message
    Ghogiel greentooth
    arkaneXXI said:
    Thanks for the detailed reply.
    - I have separate the symmetric UV clusters/islands in another test, and the problem wasn't solved. I also tried to separate the UV clusters by smoothing groups using that option and I think the problem wasn't solved either. But just in case, I'll check it again.
    - You are correct about the brackets. I should separate them from the bar in the high resolution model.
    - I know the 90º corners are problematic for the Normal Maps. The problem is how to solved. I also had the problem of the black edges before and couldn't solve it in 3ds Max. But that didn't happen in Substance Painter.
    - About the bolts, I didn't worry much about it because the model won't be seen so close. And at distance, it looks okay. The result looks bad from close because the resolution. If I use a 2048x2048 resolution, looks better. But isn't necessary for this model.

    Anyway, the main problem is the "biten/melted" edge of the bracket (first image), more than the edge between the bar and the brackets. I'll correct these things and then upload the results.
    Ahh. You are probably refering to the waveyness to the normal map on the edges of cylinders. That is correct behaviour ^_^.  You can minimise it with a load of different tricks. But it's not wrong there is wavey and is expected result from what you are sticking into the baker.


    Usually I would just hand tweak the cage (as in do not use push) and/or add more geo to the low poly as cylinders and call it a day, with the rare adding more loops to the low poly, bake object space, and transfer to tanget space on the proper low poly cylinder type of thing. 
    Follow all the links in the polycount wiki normal map projection section http://wiki.polycount.com/wiki/Normal_map

    and also https://www.youtube.com/watch?v=MnuK6xyi-qY


  • arkaneXXI
    Offline / Send Message
    arkaneXXI polycounter lvl 10
    I have added more geometry to the low poly model using the tool "Connect Flow". This reduced the problem on the brackets edge, but I still have the problem on the tubes edge.


    I have separate the brackets from the tubes on the high poly model, but I think I must bake the normal map of the brackets and tubes separately too. Anyway, I think I can solve that in photoshop too.

    After solve that problem I'll focus on the bolts. About that... I also increased the size of the cluster of the bolts on the UV.

    The UVs are still mirrored, to save space on the UV and make the clusters biggers to add more details later in the color texture.
  • arkaneXXI
    Offline / Send Message
    arkaneXXI polycounter lvl 10
    I have baked the tubes and brackets in a different meshes:


    Besides, I increased the antialias to 8x8 and the bolts look better now without modify the high poly model (just in the brackets, I need to do the same with the tubes).
  • arkaneXXI
    Offline / Send Message
    arkaneXXI polycounter lvl 10
    I have another question.

    I have baked one element and then the another one and then I mixed bot normal maps in Photoshop. But I think this isn't the best way. What do you recommend me to do in this case?

    This is the result with the normal maps and AO applied in 3ds Max:


    The normal maps of the bolts looks very weak (compared to Substance Painter and I'm using the normal maps amount value at 100) and I think I must bake the AO with all the elements together to add some AO in the space between the tubes and the brackets. Anyway, the previous problems were solved.
  • musashidan
    Offline / Send Message
    musashidan high dynamic range
    You don't need to composite the map in PS. That's what the 'bake ny mesh name' feature is in SP.

    Name your meshes accordingly and with a _low and _high suffix and make sure bake by mesh name is active in the bake settings in SP.

    Export your low and high meshes in a single .fbx each and SP will read the names in the file.

    Also, Max is the last place you want to view the result. It uses its own tangent basis and you need to disable gamma to view it properly in the viewport.
  • arkaneXXI
    Offline / Send Message
    arkaneXXI polycounter lvl 10
    You don't need to composite the map in PS. That's what the 'bake ny mesh name' feature is in SP.

    Name your meshes accordingly and with a _low and _high suffix and make sure bake by mesh name is active in the bake settings in SP.

    Export your low and high meshes in a single .fbx each and SP will read the names in the file.

    Also, Max is the last place you want to view the result. It uses its own tangent basis and you need to disable gamma to view it properly in the viewport.

    I know that, but if I have a mesh named "tubes_low" and another one named "brackets_low", the geometry of "brackets_high" won't affect to baking of the "tubes_low" textures in this way?

    For example, if I do an AO, the geometry of "brackets_high" won't cause shadows in the AO of "tubes_low" ?
  • musashidan
    Offline / Send Message
    musashidan high dynamic range
    AO is different. You need to set it to 'always' in the AO settings.

    Have you read the documentation at all?
  • arkaneXXI
    Offline / Send Message
    arkaneXXI polycounter lvl 10
    AO is different. You need to set it to 'always' in the AO settings.

    Have you read the documentation at all?

    I just started using Substance Painter with this model and didn't have enough time to read all the documentation but some videotutorials. But I got it now. I just had to attach the high poly bolts to the high poly brackets in 3ds Max before export it because this model doesn't have a "bolts_low" mesh for the "Bake By Mesh Name".

    Here is the result:


    There are still some ugly dark borders in the lower part of the brackets but, I'll leave it like this for now.

    Thanks for the help. Problem solved.
  • Assassin115
    Hi! Did you solve this problem with ugly dark borders? If yes, how did you do it cause I’m having the same issue?
Sign In or Register to comment.