Unreal Engine - Artist's Guide to Optimize [WIP]

B3D Game Dev
http://b3dgamedev.com
It's still in it's early phases of development, but there are tips on unreal tools already in there. I'm always open to questions or comments/suggestions. So please take a look. My main goal is to educate people who are wanting to get into the gaming industry without falling into massive amounts of debt. If I help at least one person, then I feel like I've accomplished something.
Thanks
I'm logging updates and creating easy-to-navigate google docs that will include an outline. Information will still be here, but it's much easier to reference the docs.
Updates;
- Updated Master Materials breakdown on 4/16/2019
Google Doc: https://bit.ly/2Gq5Wi9
- Updated Lighting section on 3/18/2019
Google Doc: https://bit.ly/2Hufhaq
Hello everyone,
I'm not great at introductions so I'll just get right to it.
I've been working in UDK and Unreal 4 professionally now for around 4 years. I decided to start an optimization guide from an artist's viewpoint. I am currently and an environment artist, but I've tried to saturate myself with the techy side of game art for a couple years, all in my free time (which unfortunately is very very little. There are tons of resources scattered around the internet on optimizing your assets, materials, UVs, etc. But I thought it would be nice to have a singular go-to guide.
I did write this up on my own (quickly) and I'm fully aware that these suggestions are platform specific. I am also very open to anyone pointing things out that are incorrect or arbitrary, in fact I encourage it. This is an iterative process I plan on keeping updated as I learn new things (profiling, tips and tricks, etc).
OPTIMIZING & PERFORMANCE
A look at optimizing for gaming projects in Unreal Engine 4 (4.19 Currently)
There’s really no clear definitive way to start your optimization pass as it all depends solely on your target platform. In my experience, which is primarily PC, this should be a pretty good guide to start getting some of those frames back.
Artists
Unused Assets & Redirectors
Remove any unused assets.
Deleting, renaming, moving; these all leave behind redirectors. A redirector is something that tells the engine where something has been moved to. For example, if you move a material somewhere that has been applied as an override in a sublevel, you will need to have all associated assets checked out and saved/submitted so they know where each other are. Without checking the other referenced assets out, a redirector is left behind. Later on when all assets are available, you can run a redirector fixup commandlet, or manually fix it inside the editor.
Textures
Compression Types
Albedo textures should stick to BC1 compression unless you can get away with a single channel albedo tinted in the material. In that case it can be treated as a packed RGB or a single low resolution alpha compression.
Packed RGBs utilize the masks compression (linear)
Normals use BC5 compression.
Single channel textures can be packed into RGB masks.
Never use the alpha channel!
This rule is based on specific use. If you only need an additional channel, it's okay to use it. But if you have room in a packed texture elsewhere, consider packing the map into that channel (green channel preferably).
LOD Bias & Streaming
Run through the textures and adjust the LOD Bias to see if any noticeable or very little changes occur in the resolution and use of the asset. By raising the LOD Bias, you can cut the size of the textures memory considerably.
Check that the texture is streaming properly. If the texture is not set to a power of 2 resolution, it will not stream, meaning the texture will never mip down.
Merging, LODs, HLODs and Proxy Meshes
For meshes that are used a lot; combining the meshes into larger combos can help to reduce draw calls. This should be a balance of size and amount. Be sure your combos don’t get so large that they become difficult to occlude entirely.
Combine like-meshes only (use the same material and are generally close to each other in the level).
LODs are an integral part of optimization. Unreal has options for auto-generating LODs, which are useful to create starting LODs.
LODs can have their own materials - check for ways to reduce material costs, like cutting normals, masking, transparency, specular information, etc - and apply these to the LODs. This is very useful for masked materials and translucent materials.
Make sure you’re making LODs for meshes that actually benefit from them. Some assets with reasonable tri-counts may not even need an LOD. I can't remember the number, but I think it's anywhere from 600 - 100 tri (need source).
Meshes with vertex colors will need decent supportive geo to be able to LOD down as well as keep vertex color information from getting completely ruined. A ‘pseudo-fix’ is to enable LOD dithering in the material detail panel.
HLODs and Proxy meshes are the next level of LODing. Both types of LOD take existing meshes and combine them into a lower quality mesh (proxy mesh) with its own combined textures and material. In most cases it’s pretty bad visually, but that’s the point. At a distance you won’t be able to tell that one big ugly mesh just magically switched places with 20 - 30 smaller higher quality meshes. This is usually a huge performance gain. Things to watch out for is material metalness. If you disable metalness on the proxy mesh that requires metalness maps, you will see a pretty evident pop when it switches, even from a distance (from experience).
The proxy mesh tool needs to be enabled in the project settings under Editor -> Hierarchical LOD Mesh Simplification settings. Select ProxyLODMeshReduction and restart the editor
Proxy mesh tool reference;
https://docs.unrealengine.com/en-us/Engine/ProxyGeoTool/ProxyGeoToolReference
Lighting Information and Optimization
General Lighting
Lighting will have a huge impact on how well your scene or game performs depending on which platform you are targeting, if any. These tips should help you narrow down which scenario you choose to go with as well as give a little insight on the use of each, as well as tips.
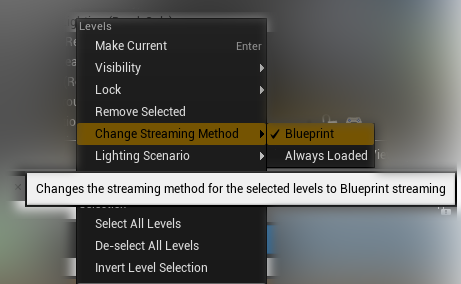
Place your lighting in one or two sublevels. If you are using dynamic lighting with a mixture of static lighting, use two. One sublevel should be set to static, with its streaming option set to blueprint. This ensures the static lights get baked, but the sublevel is not loaded at runtime. The dynamic lighting sublevel can be left at default settings (always loaded).

Mobility
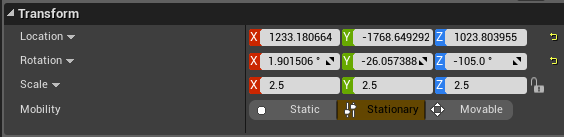
Static Lighting
Static lights are lights that are “baked” into your scene. The light color and shadows are compressed into textures. There is no overhead during runtime when using static lighting. But those maps are loaded into vram and with large scenes, they can become problematic.
Static lighting cannot shadow moving objects such as players or other dynamic assets.
The quality of the shadows are directly related to the resolution and layout of your asset’s lightmap. (see lightmapping) - Higher resolutions produce better shadows. For softer shadows, increase the light source radius on your light.
Stationary Lighting
Stationary lights are a mixture of both static and dynamic lighting. The shadows and indirect lighting are both baked light and shadow maps, however the direct lighting and its color can be changed at runtime.
Stationary lighting is typically used for sunlight (directional).
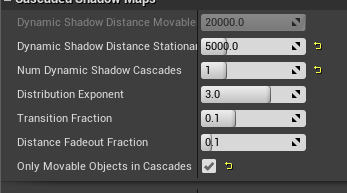
Stationary lighting shadow costs come from movable objects.
To help the cost of dynamic shadows, modify the dynamic shadow distance for either movable light, or stationary light.
For softer shadows produced from your stationary light, enable “Use Area Shadows for Stationary Light”. This produces softer shadows depending on the distance from its caster. Having proper lightmap resolution will help this effect.
Movable Lighting
Movable lights are 100% dynamic and their preferences can be changed at runtime. They produce no shadow maps or lightmaps and have zero indirect lighting influence (global illumination).
The cost of movable lights depends on how many objects the light effects and their triangle count.
More Tips & Performance
Use spot lights as opposed to point lights when possible.
Point lights cost the same as 6 spot lights.
Set the attenuation radius of spot lights to affect only what they need to reach.
Adjusting the inner cone angle will soften their shadows and penumbra.
Adjust each lights draw distance and fade range to help with each light source performance cost.

Where possible, disable dynamic shadows on your placed lights.
Disabling shadows altogether will also help, this is an easy way to create cheap fill lighting. (also can create bleed effects)
Stay away from volumetric fog
Fog is cool, it’s even cooler when you see light shafts scattering in it..but it’s expensive. There are cheaper ways to produce fake light shafts.
Volumetric fog can be enabled in the exponential height fog options.
Disable translucency lighting on lights that don’t need it.
Using more than one lightmass importance volume is okay to do.
Placing one large volume over the level may seem like the correct thing to do, but it’s easier to maintain and control important areas by using multiple volumes. There is no effect on performance and it allows you to focus the lighting importance to areas that are more active.
The character detail lighting volume should be used in areas where it’s only necessary.
The character indirect lighting volume increases the samples of indirect lighting within the volume. Generally these sample spheres are only generated above character height level so that they are always lit. And for the spheres to generate, there needs to be a ground mesh with collision.
Lightmapping
Lightmapping is necessary for when you are using static lighting setups in your scene. It’s a UV layout, generally in the 2nd UV channel, that Unreal uses to bake light and shadow maps, which are then compressed and used at runtime.
Lightmaps should be hand crafted in your 3d software of choice. However, depending on the complexity of your asset, Unreal has a very handy tool that will lay them out for you.
Rules
Lightmap UVs should never overlap each other.
UVs should stay within the 0-1 UV space.
Because lightmaps scale with video settings, making sure there is proper padding between shells will ensure that your light bake stays consistent through low settings to high.
For better quality, consider mimicking your smoothing groups when producing the lightmap UV shells. There are tools for Maya and 3ds Max that will do this automatically for you.
Keeping the UV shell edges straight will produce crisper shadows and can help remove ‘stair-stepping’.
Every face counts and every face gets lighting and shadow information. By unwrapping your own UVs, you can prioritize shells. For example, if you have backfaces (these should be deleted anyways), those faces can be minimized and packed into their own little space away from the important shells, which can then be made larger to get better resolution.
Editor Tips
To generate lightmaps in the editor, simply check the box “Generate Lightmap UVs”. Min Lightmap Resolution is important here; This is the lowest resolution to use, so keeping it low is fine (default). The source lightmap index is the UV channel that you want Unreal to use to make your new lightmaps. Destination lightmap index is your new lightmap UV channel (in Unreal, index 1 is UV channel 2).
More lighting resources;
Cache Shadows: https://docs.unrealengine.com/en-us/Engine/Rendering/LightingAndShadows/LightMobility/DynamicLights
Lighting Troubleshooting Guide: https://wiki.unrealengine.com/LightingTroubleshootingGuide
Unwrapping Lightmaps: https://docs.unrealengine.com/en-us/Engine/Content/Types/StaticMeshes/LightmapUnwrapping
Performance Team / Profiling
I’m working on this section.
Rendering Method(s) and how to choose.
Forward
Deferred
Console Commands
Blueprints Nativization
Ticks & Runtime Elements
Python Scripting
Modifying *.ini files
Plugins
Profiling
Resources:
Performance Guidelines for Artists and Designers
https://docs.unrealengine.com/en-US/Engine/Performance/Guidelines
Console Commands for Unreal Engine
https://digilander.libero.it/ZioYuri78/
Replies
I should also add that if you view the HLSL code it will show sampling the alpha channel as 2 texture fetches, but the assembler will optimise this to 1 texture fetch.
So you're saying that by removing the alpha channel, it drops a texture fetch. Me, assuming a texture fetch includes full rgb values - I would think you could benefit from using a new texture where you could store more info in the other two channels. Me personally, I've just noticed the texture size is always doubled so I've stayed clear of using it in studio projects.
Texture fetches can be expensive so you want to keep this as minimal as you can. Yes if you require other data than always try and pack in RGB wherever you can (prioritising the G channel as this contains an extra bit). But if you have a left-over channel then it's probably best to shove this in the alpha of another texture, unless there's a specific reason not to do so like a detail texture.
tl;dr it's contextual to what you are doing
Hope that makes sense!