FWVN - Modeling/Topo Shading Issues
I've started fleshing out our assets for said game project specifically some wall pieces and whether I use Max or Maya and whether its FBX/Obj and no matter how I fine tune the amount of smoothing groups I'm receiving several key problems that under mime the point of the FWVN SC/AI technique.
Honestly I've been battling with these issues for a while but figured in a professional environment I need to really get to the bottom of what is going wrong here.
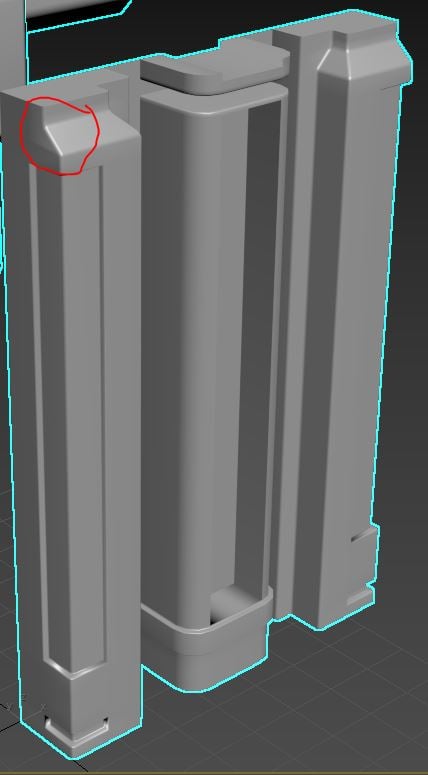
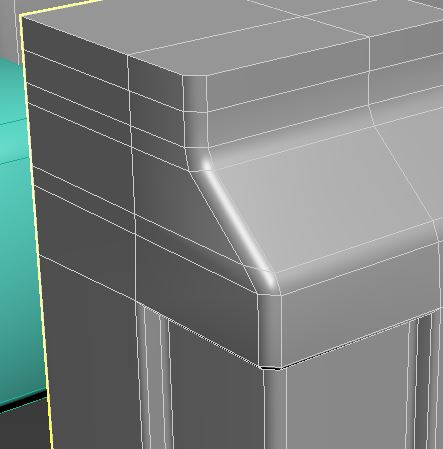
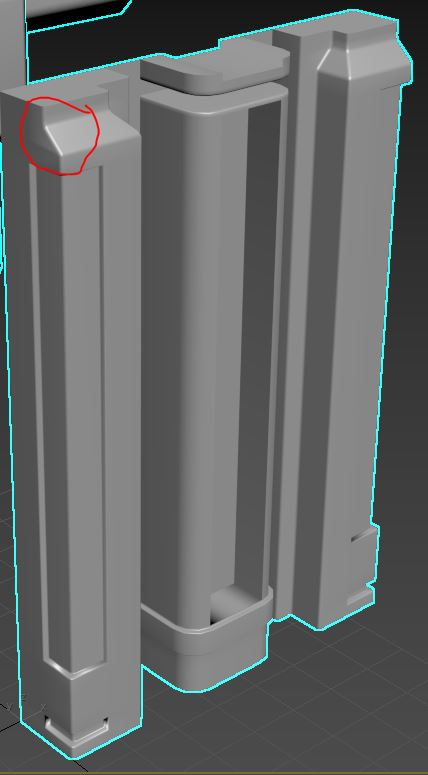
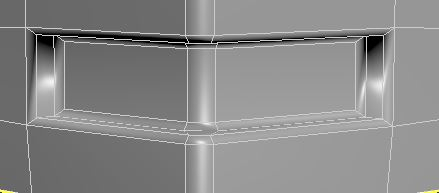
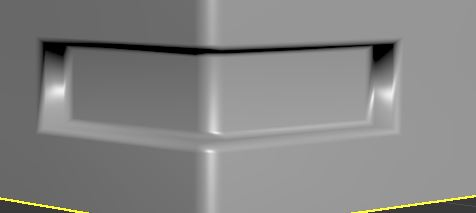
Topology isn't by any means final but I can't be battling issues this bad on flat surfaces). All the geometry is planar on the surfaces, snapped everything to be certain nothing has slightly moved thus bending faces that are intended to be flat. Mesh cleanup results in no detected 'non-planar' faces on the side circled in red. To be sure of this I have remodelled this numerous times cleanly and still receive that strange gradient/pull on the side.
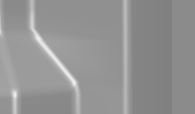
The last 2 images baffle me because they have a single chamfer support around the inwards extrusion and yet the shading acts like I haven't supported this area (yet this works above - an area with almost identical topology, as shown in the first image).
I'm out of my depth now and thought it's best now to ask some professionals. If there's a gap in my knowledge of the technique I need to figure this out and move forward asap.
I appreciate any help going on the matter. Exhausted, taking on way too many roles, ha


Replies
Normals on the side issue are as follows:
I've managed to fix the above issues with quite a bit of messing about but don't feel confident in the workflow personally.
Currently trying to figure out the best workflow approach here. I'm generally speaking trying to transition from Maya to Max. Now because I'm not as familiar with the modifier stack and what does what I'm applying automatic scripts in Maya and then manually snapping verts to be perpendicular where they haven't been adjusted properly by the automatic script. It's a little painful but seems doable.
Tried a couple of automatic scripts for Max which seem as effective as Maya but the manual adjustment is proving difficult thus far. Normal modifiers seem to allow for averaging norms but I just want the ability to set some norms to face (such as the side above to ensure it's flat shaded) or to move the norms manually myself and snap in directions.
As far as I saw there are some topology issues.
adding chamfers in those places will stop the 'fight for normal' between neighboring faces. Each pointed edge has only two vertices.
Every vertex on them has only one normal direction and at the same time four faces which share this normal.
This scenario will always look bad. Only two faces can look good as one vertex normal can smooth only two surfaces on both sides of edge.
To relax this light artifacts, you need add additional two vertices. So every corner will have 4 instead of 2 vertexes. This way, bigger polygons can have full vertex normal direction 'for them self' at the cost of smaller polygons. You will end up with light reflections artifacts but only on small faces which is totally fine
You can adjust them by hand ( very brave ) or by using some vertex normal weighting scripts.
I've since fixed the bevel and been progressing and finding new problems with the whole technique.
I have a general understanding of face/vertex normals I just can't seem to put it all together properly right now. I've been using automatic and manual scripts on top (but this seems flawed in the latest 3DS Max 2019 - whenever I add an edit poly/symmetry or another manual edit normals modifer atop an automatic script it just simply breaks the shading. Also smoothing groups seem locked in an can't be changed after an automatic script modifier is applied. I've tested this time and again in different ways with the same results.
This is making the application of the technique a nightmare unfortunately. Another thing that's confusing me is the use of the automatic face weighted normal scripts. It seems that almost every normal that should be perpendicular tends not to be quite perpendicular so I have to go through and manually change every single one whether I use the copy and paste within the edit normal modifier or select a bunch of planar normals and hit average normals. This is a lot of cleanup and seems to defeat the point of using the automatic scripts that are available?
For reference the automatic scripts I have tried are:
- IFWNormalsFree
- Max FWVN Script
Obscura recommneded a script that gets vert normals from face:
- GetVertNormalsFromFace_0_2
But this seems to completely ignore any use once I layer it on top of the automatic scripts (basically what I mentioned further up in this post).
Eager for an efficient and straight forward workflow. I don't mind some manual clean up but I'm spending way too long on the process currently. Is this just a case of the algorithms can only get so close due to software restrictions and we generally settle for only using the manual tweaks in areas that are completely incorrect and settle for the ones that aren't perfect but still look alright? Is that the trade off?
Essentially my understanding is perpendicular norms immediately before and after a chamfer/bevel (Maya background, brand new with Max) result in really tight and crisp rounded bevels.
For clarity I've separated the back wall, tops and bottoms into their own smoothing groups as this seemed best practice due to sharp/unimportant or not viewed areas (correct if I'm wrong):
Vertex normal direction is based on proportion between size of two or more faces and angle between them.
This is how Maya normals works and most scripts in Max ( Max background, 'hates' Maya ).
To workaround this, you need to 'force' or convince vertex normals to point in direction you want, not algorithm in program.
In Max you have some sort of vertex normal 'hierarchy'.
- Unspecified displayed as blue: These are the normals that the modifier derives from smoothing groups and initially assigns to the modified mesh vertices. 3ds Max calculates the direction of an unspecified normal based on the average facing of all polygons to which it belongs that are in its smoothing group.
- Specified displayed as cyan: These are normals that are intended for use by particular corners of particular faces, without regard to smoothing groups. For instance, you might create a box, apply Edit Normals, select a group of normals at a particular vertex, and click Unify.
- Explicit displayed as green: These are normals that are set to particular values. For instance, if you use the Move or Rotate command to change a normal from its default value, it has to be made explicit, so it won't be recomputed based on the face normals.
In Max there are only few places where explicit normals get preserved: editable poly, editable and edit mesh and edit normals modifer.Applying any modifier able to reindex subobjects, will destroy all explicit normals: edit_poly, face_extrude, chamfer, shell, slice just to name a few.
Maybe you would try this ?:
http://www.scriptspot.com/3ds-max/scripts/vertex-normal-toolkit
not free, but it makes vertex normal perfect perpendicular to faces and a LOT more.
discussion about it is here:
https://polycount.com/discussion/206583/vertex-normal-toolkit-for-3ds-max
Just watching the videos, noted that you're the author - looks like magic tbh. Is it really as simple as pull in any mesh and voila. A lot of our geometry and assets for the game are likely to be more along the lines of AI/SC with maybe hints of Dead Space, sharper edged with neat/tight bevels catching highlights and not as retro as AI (less larger bevels). In short, the video I watched shows you applying superb normals to much more complex meshes than the majority of ours are likely to be. What are you applying to most examples, is it face weighted normals or just outright perfect perpendicular ones?
I've also had a look at your scene examples, pretty sweet - was hoping to see more single chamfer assets as per my specific workflow, just a tad cautious it may not work quite as I hope. Pretty much everything that allows on the silhouette is going to be a single chamfer in our workflow. Decals/trims covered etc just need to nail this aspect.
If you are not using any 'fancy' algorithm, all faces are weighted. But this weighting is not calculated for entire object, just for the given layer.
This way if your layer contains faces sharing the same normal direction they will become super flat.
If you select green faces and add them to any layer, normals for those faces will be calculated as they were a separate object.
To imitate this effect make a selection and detach them. If any 'patch' will contain faces pointing in different directions, normals will be calculated "maya way" for this patch.
And yeah, the biggest disadvantage, changes made to mesh 'after' will destroy normals.
After any change you can pick mesh again and regenerate them as layer setup is always preserved
( even if changes are drastic you do not loose layer setup, just new faces may be assigned to wrong layer or not assigned at all ) as long as you do not use edit or editable mesh. If you have to, use it on a non instantiated copy.
P.S.
If most of your assets will have flat surfaces, IFWN should be enough, even free version.
Paid one should be enough if difference between chamfer and surface is hard to distinguish.
With VNT, all is clear and predictable.
My above mesh was a case of separate smoothing groups so my hard 90 degree edged back wall, tops and bottoms were separate and then - apply automatic script, manually tweak a lot of chamfer/bevel based norms to be perpendicular.
With your toolkit the mesh example shown in this thread would be effortless I assume to generate a face weighted equivalent (perhaps better) without manual adjustments and tweaking? It's this bit that concerns me, whilst I can fix a mesh I want to be certain it's correct without having to analyse each norm and I want it to be as quick as possible because I have so much to do it's ridiculous, don't we all.
If this is the case which it seems to be from what videos I've watched (got the car one on 4x speed currently) and the scene I've checked out. Really impressed.
If you will find anything which will cause you to do it manually, let me know. By e-mail preferably. Or here if you want a witness
I will do my best to help. For free of course
The 'inverted' nature of this toolkit is the more complex mesh is, the more impressive results you may achieve
You may expect no worse quality than on those examples in the scene you saw.
This car you saw is a simple object in comparison to those where I work
I'm glad you like it
Ha, it must be hard to be active and helpful in threads similar to mine and not be biased towards your product. I'll test the theory
Did you add the P.S. after my last response, I swear I didn't see it:
Alright I've tried the free IFWN and generally speaking it's great, but the cleanup I had to do manually. Perhaps it's a misunderstanding of whether I should have assigned proper smoothing group separation first (Which I attempted to do) or whether to detach aspects of the model and such.
Generally the results for this were sweet but I still wished it just made things perpendicular around chamfers so it took a while cleaning this up. Curious what's the difference between the free and paid?
Regardless of whether IFWN will suit my intent and purposes/workflow or not I'm genuinely intrigued by VNT and like the idea of having a handy toolkit there. I noticed in the thread the only real constructive criticism you had was that it's a tad destructive which I generally try to avoid but nonetheless I'm still very tempted to grab this if it eliminates a major step in my workflow and overall pipeline then I'll likely buy VNT.
Ultimately I still feel a little uncertain with the whole thing (I feel the Max transition didn't help matters but nonetheless) this is massively down to an experience in Max thing.
I really do appreciate the comments though as I do anyone, I appreciate the lack of time most people have. In my instance I'm working on a game project (with intent to demo and pitch in the next year), working on several packs for the Epic Marketplace and will soon have a 9-5 industry related job to balance with, eek!
I bought IFWN. The difference between paid and free one is paid version has adjustable threshold from which faces are considered as flat. Helps detect chamfers.
My whole point is not to advertise VNT, it is just another tool with its own pros and cons.
It solves a lot of lightning artifacts and mid poly meshes ( well, maybe all ?? ) but it brings other problems like collapsed stack.
And as you said, you are new to Max, so it is good to know what you can expect and why.
It helps a lot later on, saves some ( not all
Indeed, destructive nature of this tool may be an issue but all comes to priorities.
For me personally, all modifier stack is essential ( probably I will never switch to other program because of that ) but only to a level when
I'm fully satisfied with the result. And according to Max nature, normals last.
Good luck !
Last question - mesh projection (Because I can only see what's going on in the videos) how exactly is this executed? Say for my purposes of face weighting. Is mesh projection a part of that and does your kit generate these meshes itself somehow or do we have to prepare those meshes ourselves?
Cheers!
Projection is usefull only when mesh shape is very uneven and unpredictable in terms of topology.
Two options: you make it by yourself or you can recreate it from projection gizmo as starting point.
When gizmo is active, right click on gizmo icon and a new object will be created in the scene.
This is a new addon since v1.20, not shown in any video at the moment.
You do not need nothing super fancy. more important is to keep it equal in terms of topology density.
Actually everything is presented and explained on loooong video.
P.S.
It is easier when you stop thinking your solution will save the world
Try to use noors normal thief:
http://www.scriptspot.com/3ds-max/scripts/noors-normal-thief
Okay no worries so in the case of the mesh in this thread that wouldn't suffice with a plane I'd have to make a projected mesh to get a set of normals or is this just another method atop others? Basically just making sure this doesn't add another issue for me personally in making custom meshes for all of my assets. Thanks again!
P.S. I'm heading out shortly but I'll watch the video later this evening and pay attention to the different uses.
To this moment nobody
Projection from another object is last possible option when no other will give satisfactory end result.
Weighting based on topology is good enough when mesh is relatively simple and has predictable shape.
Projecting from gizmo is another step when topology is not so clean or has thin ald long triangles and at the same time polygons are not aligned. This method bypasses all topology, set normal directions based entirely on gizmo shape, size and position.
As a good example lets take a car wheel. All normals calculated without projection from other mesh.
The same both balls, shields...
Last thing. If it is not a problem, please send this mesh to me, I will prepare a calculated version and then you will have something to compare.
I think it is a good idea to watch looong video. Not entire, in the description there are some shortcuts to see what's the most interesting.
It is boring unless you are about to know how normals work in Max and how you can bend them to your needs.
I'll send you the mesh regardless before I start and you can give me a quick pointer/example of how you'd generally make it work for that model if that's alright?
Thanks for all the support and swift responses. Fingers crossed for some great results.
- Wayne
BIG thanks for your trust and support !
I will do my best to not disappoint you, promise
If you have anything which bothers you, send.
Best through an e-mail.
No worries, tool looks superb.