Home Technical Talk

Texture Image Baking: How do I smooth jagged edges?

polycounter lvl 9
Offline / Send Message
Ladytron polycounter lvl 9
Hi. :'(

I'm baking a Texture Image for my 3D Model, but I'm having issues with jagged edges.  Some parts on of the image has Jagged edges. 
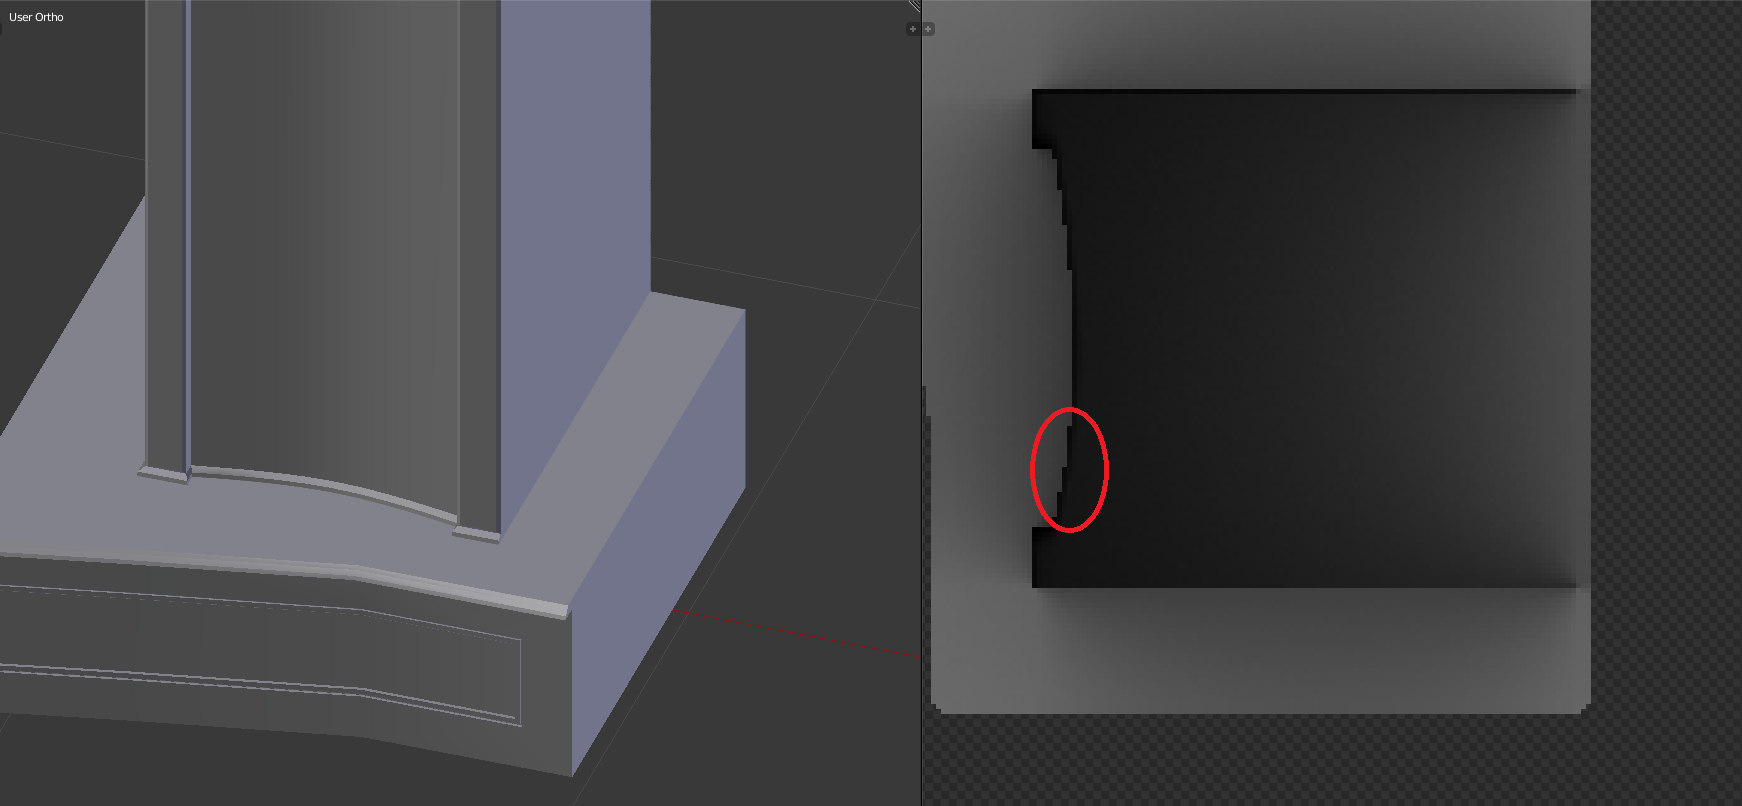


The edges shows when I apply the Image to the mesh in UVMapperPro, which means it will show up when I put this object in my game. I seem to be having the same issue mentioned here  when it talks about Anti-Aliasing. In the paragraph it mentions this:

For the high-poly model, turning on super-sampling or anti-aliasing (or whatever multi-ray casting is called in your normal map baking tool) will help to fix any jagged edges where the high-poly model overlaps itself within the UV borders of the low-poly mesh, or wherever the background shows through holes in the mesh. 


 I  have Anti-Aliasing set to 16, and I thought this feature was suppose to prevent jagged edges from happening, but it doesn't. :(  It does fix it in that image though, so I don't know what I'm doing wrong. Maybe I need to click something in the options?  

I really don't know how to fix this except to manually edit the image in Photoshop, but I was hoping that this could be fixed in Blender. I've been searching for hours  for a solutions!

Any help would be much appreciated! 
<3 

Replies

  • Eric Chadwick
    I'd this on the edge of your UV, or is it inside a UV shell?

    If it's along the UV edge, no need to worry. It will never be seen on the model.

    Just add padding around the edges to prevent bleeding.
  • Ladytron
    Offline / Send Message
    Ladytron polycounter lvl 9
    I'd this on the edge of your UV, or is it inside a UV shell?

    If it's along the UV edge, no need to worry. It will never be seen on the model.

    Just add padding around the edges to prevent bleeding.
    Thank you for replying Eric! <3

    Do you mean if the mesh part is inside the other mesh or is on the surface of it? If so, it is on the surface of it. It is not along the UV Edge it is on the surface in the middle and you can see it on the Model when I apply the texture, which is the problem. :(


    I am also now noticing the jagged edges on other parts of the mesh, mainly the planes with an objects on it as you see the photo above. 

    I'm not sure what you mean by "padding around the edges". Do you mean increasing the Margin in Bake? If so I have but it wouldn't matter anyway since it is not the edge that is the problem, but the shadow from the other object on the plane that is jagged. I hope I'm making sense. Of you look at the photo you can see what I mean. 
  • Mark Dygert
    Usually it means your UVs aren't straight which means you have a lot of diagonal lines which will be jagged. You also have a lot of really thin, really sharp details on your high poly model which won't bake well or hold up at lower resolutions. 

    Straighten your UVs, make your details chunkier and more rounded and you should be much better shape.

    It will also help to post pics of your normal maps too, that way people can see your UV layout and if there are any common baking errors.
  • gnoop
    Offline / Send Message
    gnoop sublime tool
    Looks like Blender , right?   Blender bakers, both Cycles and original just couldn't  do anti-aliazing  on geometry edges.  An only way is to render 2 or 4 time bigger image and  then downscale manually.  

  • Ladytron
    Offline / Send Message
    Ladytron polycounter lvl 9
    Usually it means your UVs aren't straight which means you have a lot of diagonal lines which will be jagged. You also have a lot of really thin, really sharp details on your high poly model which won't bake well or hold up at lower resolutions. 

    Straighten your UVs, make your details chunkier and more rounded and you should be much better shape.

    It will also help to post pics of your normal maps too, that way people can see your UV layout and if there are any common baking errors.
    Thank you Mark for replying! <3

    So, you mean straighten the UVs in UV/Image Editor?    What do you mean by making my "details chunkier and more rounded"? I mean I kind of understand what you mean, but an image example would help a lot. Only if you don't mind of course.  o:)

    Maybe I am misunderstanding you but I don't have a Normal map I baked this in Ambient Occlusion mode (if that is what you meant - sorry I'm still learning). 

    Here is my UV Map (please let me know if I did  it correctly):


    gnoop said:
    Looks like Blender , right?   Blender bakers, both Cycles and original just couldn't  do anti-aliazing  on geometry edges.  An only way is to render 2 or 4 time bigger image and  then downscale manually.  


    Thank you gnoop!   <3o:)

    I don't know exactly what you mean, but when I created a new image in UV/Image Editor I made it 2048x2048. I also made a size 4x bigger, but still got the same jagged edge. If that is what you meant. 

    May I ask which 3D Program doesn't have this problem with jagged edges when it comes to image texture baking? Is it all of them or only Blender?
  • gnoop
    Offline / Send Message
    gnoop sublime tool
       I meant if you want 2048x2048 texture you bake it 8196x8196 in Blender and then downsize it back to 2048x2048  in any image editor.  Well, if Blender wouldn't hang for such an output size (depending of how much RAM you have).  It would do it much longer too.

      Any other soft has anti-aliazed baking option. I don't know why Blender omits this.    Try  Xnormal, free for commercial use  too,    It has anti-aliazing option ( not in GPU mod although)

    Also keep in mind that Blender Cycles  seems ignoring any custom edited vertex normals or what people call face weighted normals ( Normals> "Set from face" button in Blender)    while Blender original (old) renderer bakes them  just right but doesn't have cage option.    And while the cage is often redundant for models with face weighted (edited/rotated) vertex normals,  sometimes you still need to bake over a slpit (sharp) edge where the cage  is  desirable.   In that case Xnormal  is also an answer since there it could use both the cage and whatever edited/rotated vertex normals you exported with your fbx or obj file, even add hi-poly objects own normal map  over target low-poly object baked normal map

    ps.  In your top picture example you would probably always see some black pixels "bleeding"   in AO map.   Just kill that black thing in Photoshop.
    You could even use that UV space for some other details  if insert some polygon there ( making it single/connected mesh with the column)  which you could remove later since nobody would ever see what's beneath the column anyway.  
        It's actually better to have them connected. It does a few extra polygons but you wouldn't see so called Z-fighting/flickering  in a game engine, especially with that tiny step in the base of the column. 
       If you do the base and the column a single connected mesh and have a UV seem in between you could care less of baking aliazing in Blender since Cycles would do padding (margin) there. Same with the belt on the chest.  Could be split/sharp edge/uv seam there so no aliasing issue also .

    J


  • jakemoyo
    Offline / Send Message
    jakemoyo polycounter lvl 6
    I would also second the recommendation of using any other means of baking than blender. God bless em, but the baker is no good. Xnormal is good and free, substance is what I use, marmoset Is also good I  hear. 
  • Ladytron
    Offline / Send Message
    Ladytron polycounter lvl 9
    Aww thank you guys so much for replying!  <3<3


    gnoop said:
       I meant if you want 2048x2048 texture you bake it 8196x8196 in Blender and then downsize it back to 2048x2048  in any image editor.  Well, if Blender wouldn't hang for such an output size (depending of how much RAM you have).  It would do it much longer too.

      Any other soft has anti-aliazed baking option. I don't know why Blender omits this.    Try  Xnormal, free for commercial use  too,    It has anti-aliazing option ( not in GPU mod although)

    Also keep in mind that Blender Cycles  seems ignoring any custom edited vertex normals or what people call face weighted normals ( Normals> "Set from face" button in Blender)    while Blender original (old) renderer bakes them  just right but doesn't have cage option.    And while the cage is often redundant for models with face weighted (edited/rotated) vertex normals,  sometimes you still need to bake over a slpit (sharp) edge where the cage  is  desirable.   In that case Xnormal  is also an answer since there it could use both the cage and whatever edited/rotated vertex normals you exported with your fbx or obj file, even add hi-poly objects own normal map  over target low-poly object baked normal map

    ps.  In your top picture example you would probably always see some black pixels "bleeding"   in AO map.   Just kill that black thing in Photoshop.
    You could even use that UV space for some other details  if insert some polygon there ( making it single/connected mesh with the column)  which you could remove later since nobody would ever see what's beneath the column anyway.  
        It's actually better to have them connected. It does a few extra polygons but you wouldn't see so called Z-fighting/flickering  in a game engine, especially with that tiny step in the base of the column. 
       If you do the base and the column a single connected mesh and have a UV seem in between you could care less of baking aliazing in Blender since Cycles would do padding (margin) there. Same with the belt on the chest.  Could be split/sharp edge/uv seam there so no aliasing issue also .

    J


    I understand somewhat of what you're saying. I'm still learning. I'm trinyg to get better at meshing and uv mapping. 

    jakemoyo said:
    I would also second the recommendation of using any other means of baking than blender. God bless em, but the baker is no good. Xnormal is good and free, substance is what I use, marmoset Is also good I  hear. 
    Hi, jake. Thank you!  <3 I will try this program you've guys suggested. I heard of Marmoset but it is expensive. 

  • Thanez
    Offline / Send Message
    Thanez interpolator
    @Ladytron
    Marmoset has a free trial that you should absolutely try out and decide if the time and effort it saves you is worth your money. It is very easy to use, and way quicker than most bakers because it uses your GPU to do the calcz. What it offers you in this case though can be done with any photo-editing software worth it's name, free or paid.

    Skip this paragraph to go straight to the solution. Your issues aren't UVs or the shape of the occluding model (in this case the pillar), but simply that the pillar is occluding light (the dark shadowy parts), and your baker doesn't do AA on the result. One pixel is determined to be 100% occluded, and the very next one is 30% occluded. Simply because pixels are square, they can't conform to a curve, so when you've got a curved shadow, on both sides of the pillar wall you'll get a bunch of pixels that don't conform to the curve. On the outside of the pillar you'll get the dark errors, and on the inside you'll get the bright errors.

    Here are 3 simple solutions, best to worst according to my preferences:
    -Bake your maps at 2x the intended resolution (2048x2048 instead of 1024x1024) and scale them down to intended res in Photoshop or GIMP. Both of those will do apply an AA-resembling algorithm in order to decide the value of each pixel, essentially applying 4xAA. Any higher than that is not needed in any realtime application, but do test and see that for yourself. This is my preferred one, because baking often creates some wildcard issues, like missed rays, grainy pixels, etc. These issues will also be mitigated by applying AA.
    -In Photoshop, blur those edges with the blur tool set to "brighten". That'll push the dark pixels inward underneath the pillar without wrecking the surrounding AO. This is time-consuming and opens you up to errors by forgetting to do some parts.
    -If the pillar is a separate mesh than the floor (looks like it is judging from the first pic), move it a little bit upwards. That'll give your floor mesh some breathing space for the occlusion to blur itself inward and underneath the pillar, but won't mess with the surrounding occlusion too much. This gets really boring on models with lots of floaters, and is really detrimental to your workflow if you want revisions to the model.

    Do poke me for further info if needed :)
Sign In or Register to comment.