The BRAWL² Tournament Challenge has been announced!
It starts May 12, and ends Sept 12. Let's see what you got!
https://polycount.com/discussion/237047/the-brawl²-tournament
It starts May 12, and ends Sept 12. Let's see what you got!
https://polycount.com/discussion/237047/the-brawl²-tournament
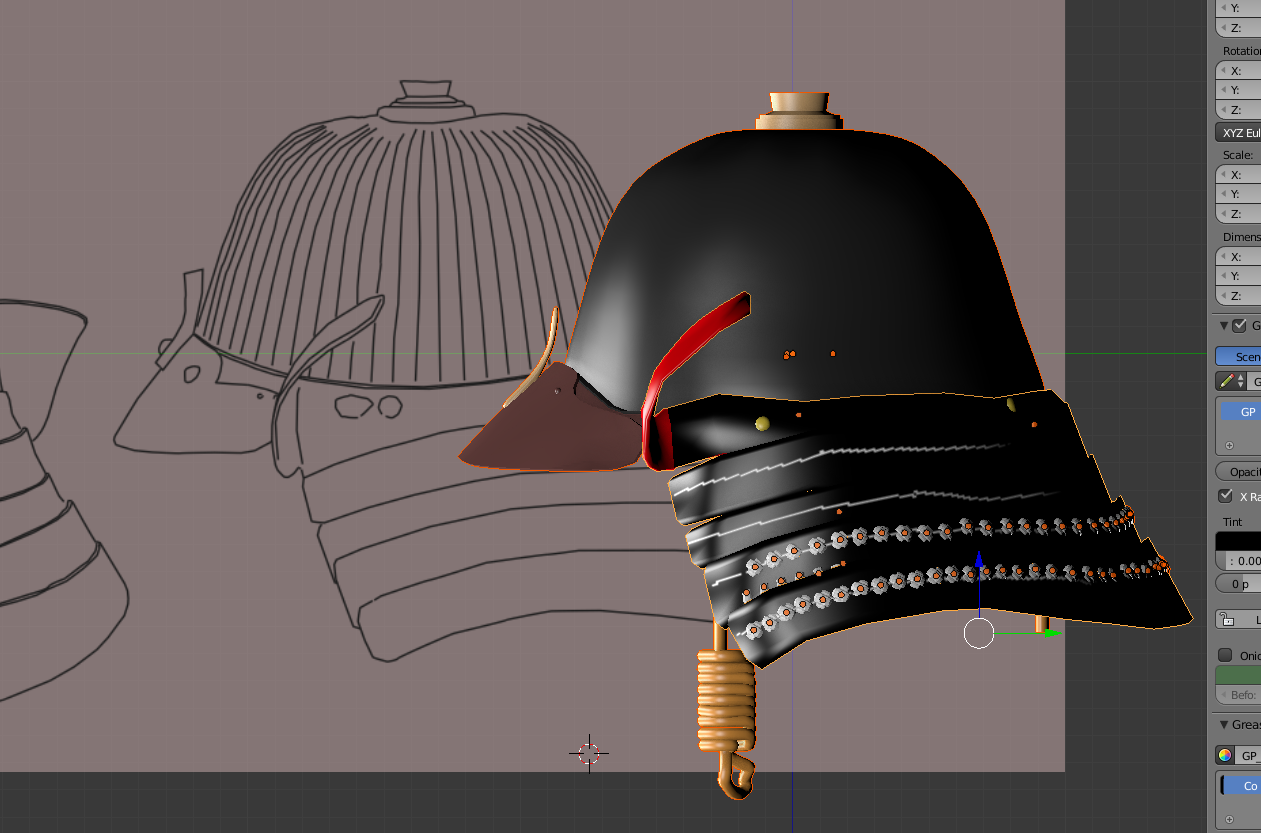
[Blender] I need some suggestions for the best way of doing the lacing on this 'samurai' helmet...
I'm doing a samurai helmet, its taking a lot longer than expected as the helmet has a complicated pattern of lacing. the photo examples supplied are one of many types of lacing found, you can ignore the laquering on the armour, I've already worked out how to do that.
whats Im having trouble with is working out the best way of doing the lacing, if this was 2010, I would have just had a single large poly with all of all the details drawn on to it, but as we are in 2018 and polycounts can be a little higher I think its better to physically make the lacing.
I've done one version which is just a 2d image with an alpha (the texture was done in Substacne designer, this render in Marmoset has height as well but it doesn show here too well), like hair/beards on game characters,
the other attempt is with lots of individual meshes representing the lacing, however each one had to be individually placed, manipulated to fit and I'd be honest, it looks a damn mess,
and it looks a bit odd. there must be a better way?
so could someone suggest a better way? something which has maybe an array included or adjusts the roration of the face of the object so its always correct?

here is the outline I drew to work from, with a different model which I was also trying to work out a solution for the lacing.


Replies
In your case since you are trying to create a lot more laces I would model something that looks like the laces. Then to place them select an edge loop from the metal plates of the helmet and convert it to a curve, and then for the lace use a combination of the array modifier with "Fit Type" set to the curve and a curve modifier also set to the same curve, and then modify the Tilt of the curve with Ctrl+T to set the orientation of the laces.
Remember to move the lace to the origin of the curve before using the modifiers, so it clones along it (for this you can place the 3D Cursor in the origin of the curve and then move the lace to the 3D Cursor). If you don't know how to do this here is a tutorial https://www.cgtrader.com/tutorials/1669-how-to-repeat-an-object-along-a-path-in-blender
Another way of doing this could be modelling the lace and then converting it to an InsertMesh brush in Zbrush to place them manually for more control.
Hope it helps!