Home 3D Art Showcase & Critiques

[UE4] Stylized Character Game Model: Roxie - Looking for feedback

polycounter lvl 5
Offline / Send Message
blueblur22 polycounter lvl 5
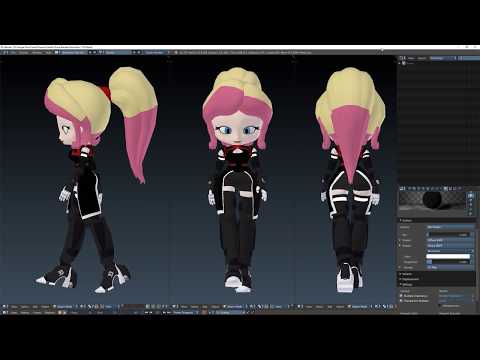
Hello! I work full time and have spent the last 2 years or so teaching myself UE4, Blender, Photoshop and Substance Painter in my spare time as a hobby. I've created Roxie with the goal of creating a 3D stylish action game (Devil May Cry, God of War, Bayonetta, etc.). The character model needs to be capable of pulling off some relatively extreme poses so I can't really get lazy on the topology and texture work.

Concept Design


I'm looking for feedback on a lot of different things in particular, but I'd love to hear whatever else the community here has to say. Specifically I'm looking for a peer review of:
  • Topology
  • Rig (for building CGI video in blender and also used in UE4) - I used Blender Rigify Human Meta-Rig
  • Texturing that is sharp, game engine efficient and animates well (minimize stretching)

And here's what I know is incomplete or has problems:
  • The face/skin texture is temporary
  • Eyebrows are missing
  • When bent all the way back, the knee cap comes through the thigh (see right knee in pic below)
  • If the character arches their back, the texture on the belly of the corset stretches unpleasantly
  • Face rig is not yet usable. It still has the default auto-weights. I'm not sure if I should spend the time to properly weight paint it and use the bones or just go with shape keys and delete the face bones.
  • The shorts are meant to be a kind of latex/plastic. I think I need to start over the normal map as the current wrinkles on it don't seem to make it look like latex. Alternately I'm considering bailing on the plastic pants and just making them a black cloth material (like women's running shorts).
  • I'm not entirely happy with how the ponytail sometimes has some sharp bends when posed certain ways (see pic below). I'm trying to figure out a way to make it bend smoothly without just piling on a ton more polys.
  • There are way more polys than needed on the blue light beams between her prosthetic and stubs. I'll get around to optimizing that later.


Close up of the corset and center flex point on the sides.

Close up of the cannons on her heels. The are currently rigged/animated to retract into the foot (nobody needs to walk around with cannons on their arms and legs ALL the time, right?). The red light are a sort of power meter and are set up so I can turn each of the 4 bars emissive layer on/off to indicate the current charge level.


Here's a short animation of a walking loop I created. I was able to import the model and animation into UE4 and program her to walk/run/jump and a few other things as proof of concept.

https://youtu.be/E3criAE1q48


Thanks for looking and I'd love any feedback!

Bonus Concept Art

Replies

  • blueblur22
    Offline / Send Message
    blueblur22 polycounter lvl 5
    I took everything I've learned so far from baking/painting the rest of the materials on this model and created a new material and normal from scratch for the shorts. It's not perfect (maybe the wrinkles need a little more work?), but at least now I think it actually looks like a glossy plastic-like fabric.

  • Ged
    Offline / Send Message
    Ged interpolator
    nice materials and details. I have to admit your edge flow and polygon density needs refining if this is for animation. The corset looks relatively clean and has a lot of polys and the legs look really lowpoly and chunky which is inconsistent. The face just doesn't seem to have good edge flow or enough well spaced edge loops to really hold up well especially compared to the corset. It looks like you've pretty much nailed the concept and the shapes so that's good! you probably want to look at some good retopology ref perhaps stuff like this https://www.pinterest.co.uk/pin/448248969142783873/?lp=true
  • blueblur22
    Offline / Send Message
    blueblur22 polycounter lvl 5
    @Ged Thanks for the feedback. I'll take a look through some of those face topology references and see what I can do to clean things up.

    I was under the impression that a typical game model goal is to try and minimize poly use whenever possible with the exception of joints and flex points. The corset and bust need to be flexible, but the legs outside of the knee & ankle don't bend. However now that you point it out, the legs don't manage a consistently clean silhouette like the corset does... so yeah I'll definitely be reviewing the topo on them.
  • Ged
    Offline / Send Message
    Ged interpolator
    Minimising polys is important but so is being consistent in your approach to modelling the forms. You are right in that its all about silhouette, the corset has this nice silhouette with good rounded edges because the poly density and edge flow are good therefore the rest of the character should have that same level of care. This way the silhouette of every part of the character will look consistently good from any angle. have a look at models like this https://www.artstation.com/artwork/rADWm or this https://www.artstation.com/artwork/1nn1Bq the edge flow is good, the quads aren't stretched in weird ways, the face has more poly detail than the rest of the body (as this is what people will look at most in most games) and the silhouette is consistently smooth even though this is a quite low poly model. The key is to add poly loops only where the character needs it(mostly in rounded areas or areas of detail) but in flat areas have less loops but still enough to keep the silhouette good and keep in mind how limbs etc will move and bend with animation. Oh and you could try an anisotropic shader on the hair maybe? Your'e doing really well especially with the material work! keep going :)
  • blueblur22
    Offline / Send Message
    blueblur22 polycounter lvl 5
    I spent the weekend reviewing the examples you posted @Ged and searching out a few more like them for reference. Using those, I and spent a day working to make the topology more consistent with the corset as you suggested. I've done nothing with the head/hair yet. The legs+feet got the most attention. (Note the arm cannons are a separate mesh from the arms)

    I'll admit I'm a little concerned with the amount of extra poly that was added to the total. But being that nobody online can seem to agree on a target poly count for games character assets and nearly every pro example I found of a comparable model had similar numbers, I'm probably just being paranoid with my inexperience.

    If I stick to this density, cleaning the the hair and face will likely add another ~200-500 more poly.

    Approx 23.1k Poly (converts to 42.7k Tri)


    Additionally I put together this scene and an experiment to fiddle around with lighting, particles, scene composition and really just for a fun change of pace. I also learned that I'm really unhappy with how poorly the ponytail animates right now, so that's a thing.

    Credit to Spacescan for the warehouse
    Credit to hjmediastudios for the mech

  • Ged
    Offline / Send Message
    Ged interpolator
    The shapes youve been working on look cleaner well done! you are right that there are probably more polys than you need in some parts now especially the shoes and behind the knees and ankles. If you are baking from a highpoly then you dont need so much density of polys - just maintain the silhouette, but youve improved the overall shapes of a large majority of the model now so its up to you if you want to remove some edge loops. What sort of polycount would you like to aim for? if its for a fancy ps4 game with not many characters on screen then Id say around 30k-50k triangles is fine, if its for a mobile phone game with a fair amount of characters on screen then you are talking like 2k-4k triangles. For us as artists Its more about having a consistent art style and this includes having a fairly consistent good edge flow all over the character and your doing well so keep it up. These are just my opinions and suggestions so feel free to act on what Im suggesting if you like but if you have other plans then do that. looking forward to seeing the face finished and the final presentation :)
  • blueblur22
    Offline / Send Message
    blueblur22 polycounter lvl 5
    @Ged The target platform is PC for now. I'd love to imagine porting the game to PS4/XB1 in a distant future, but that's so far down the road that I'm not going to plan anything around it.

    Target hardware is something around a GTX 670 minimum requirement for 1080@60fps, medium settings. After doing a lot more research, it seems like poly count isn't a huge factor on modern hardware within reason. Most AAA games push 100k tri on the player character. Taking note of this, I made a new model for the face this weekend and I really like the results.

    First one is the old face, second is the new one.

    Some of the major design changes are:
    • New mouth design (better for animation)
    • Added the eyebrows
    • More defined facial structure
    • Eyes moved up and closer together
    • Eyelashes are more defined
    Approx 29.2k Poly (converts to 54.7k Tri)
    My justification for the significantly higher rez mesh is because I need the face (mouth in particular) to be able to stretch into highly expressive shapes. Like the concept art above, I need to be able to stretch the mouth in a somewhat cartoon-ish way.

    New topology, which seems to animate really well in some quick testing so I think I made the right call.

    Reference used


    I think I'll do a touch more cleanup on the forehead and under the ears, but otherwise I'm finally feeling comfortable unwrapping and texturing the face.

    Sketchfab model above is updated to this new one and as always, feedback is appreciated!


  • Ged
    Offline / Send Message
    Ged interpolator
    good call making the face better for animation. Some loops seem very densely packed together but if thats what you want or need its up to you. Glad its coming together well for you now.
  • blueblur22
    Offline / Send Message
    blueblur22 polycounter lvl 5
    Aside from the little quirks I keep running into that take some minor tweaking of the model the more I push her during the animation process, I think this one can pretty much be call finished. Just wanted to post the final results as I'm really happy overall with how this project turned out for my first modeling effort. I might post some video in-engine later once I have some more of her move set functional with semi-polished animations.

    Rebuilding the face mesh was absolutely the correct decision. Now that I'm building a library of expressions with shape keys, there was no way in hell the super low poly face was going to pull off what is needed.... and UE4 doesn't seem to care about the final poly count on this model anyway (~ 30k poly/60k tri).

    I am running into a problem I didn't expect in UE4... where Blender set my expectations that something like subsurface scattering specific areas of an object was just a mask away, UE4 expects whole objects in a model to be set to subsurf mode or not subsurf mode.

    The face+neck is its own object so that's not a problem, but the torso is one whole object too which means the skin visible on the arms, thighs and cleavage are also linked to the vest/corset/shorts/prosthetic limb caps. I'm afraid if I break the skin portions of the torso into a separate object I'll have problems during animation with visible seams or clipping... Not to mention much modification to correct that might mean redoing a lot of texture work. :anguished:

    If anyone has a suggestion on a good way to deal with that, I'd love to hear it. Otherwise I might have to just accept not using subsurf in-engine.


Sign In or Register to comment.