Normal & AO maps problem
Normal & AO flawed in Substance Painter
Hello,
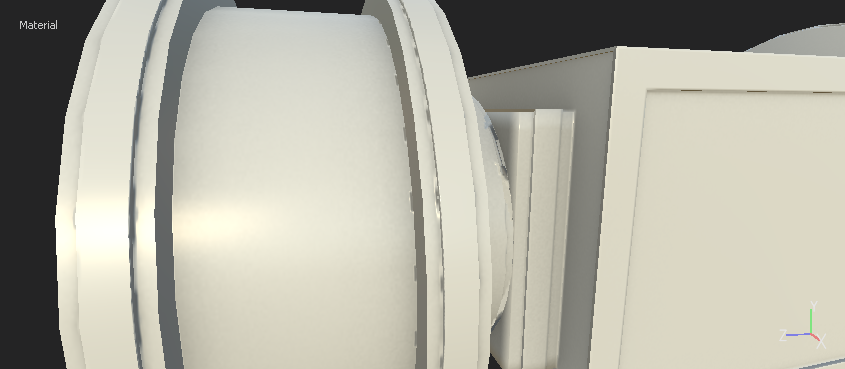
I've exported both my low poly and high poly models to Substance Painter 2 as .obj files, with faces as triangles (I need my model to be triangulated for the game engine). The issue is that when I bake maps from my high poly, it produces this weird result with Normal & AO maps:

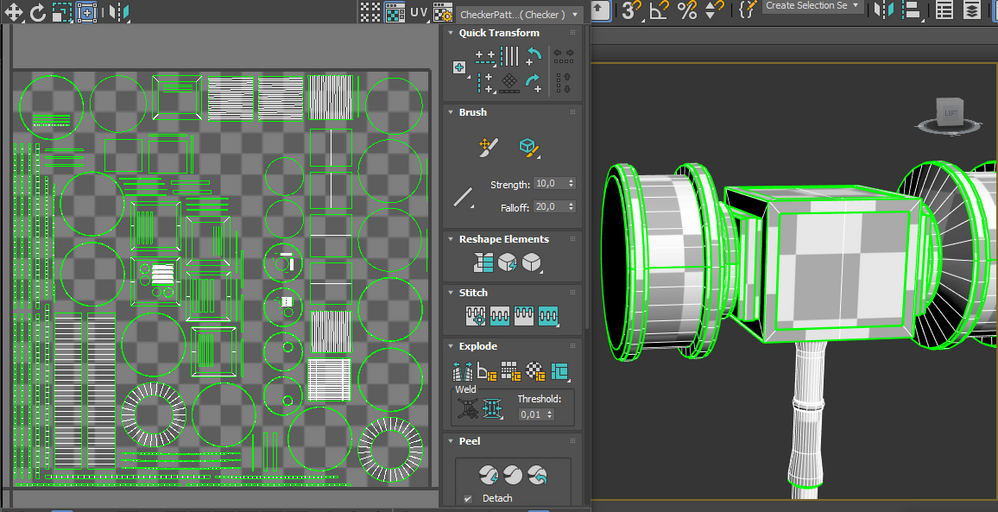
I'm guessing this is because of a mistake in 3ds Max, I don't know what it is though. This is my UV map:

All help is appreciated!
Links to files:
https://www.dropbox.com/s/omzu8ujp7kl0y81/Hammer_HP.obj?dl=0 - High Poly
https://www.dropbox.com/s/th1ojv5colra2sn/Hammer_LP.obj?dl=0 - Low Poly
https://www.dropbox.com/s/ompytmqo0slvkf7/Hammer5.max?dl=0 - 3ds Max project file
Replies
1. There are many edges and vertex alone in your uv layout, those are parts of your mesh that wr not properely unwrapped, some of those are hole loops of faces.
2. There are projection/overlap issues because you have multiple meshes in one object. You should make them separeted and naming them properly to use with the substance naming convention (match by mesh name).
3. You can move some of those circle inside the bigger ones to have a better texture usage.
Optional
1.You don't need to triangulate your highpoly.
2. Obj may cause problemes when exp/imp, would be better to use fbx if obj is not required.
3. You could mirror the cylindrical front part with the back to make the uv usage even better, and then just rotate one of them like 90dgree, so it would be harder to see that it was mirrored.
I wasn't able to find those edges/vertex, could you indicate them please?
Also I've detached all of the different elements, but even when baking maps from the low poly mesh the result is still the same:
Sadly I need this to be in obj format because the game engine doesn't support fbx.
Also, do you really need those small strip around the clynder and the little shallow extrusions in the hamer body? because those could be baked in the normal map only.
Those edge strip i can see in your uv layout too, but i can't see the vertex in it, however since our uv layouts are pretty much identical, i think that they are there, but hided somehow.
How would I bake those extrusions in the normal map only? Simply by adding them on the high poly model and then baking the map from it? The thing is though that I need to assign different materials to those, so if they were simply part of the map but not of the geometry, how could I later select them in Substance Painter and give them a different material?
Anyway here's the low poly with quads (I've done some edits so the UV map might look a bit different):
https://www.dropbox.com/s/t743tza059t9gxb/Hammer_LP4_Quads.obj?dl=0
Not uploading the high poly simply because as I said above it's identical to the low poly, just with subdivisions. I'm getting this issue even when baking maps from the low poly anyway.
Thanks a lot for the help, this issue's haunting me, I can't figure out what the heck is causing it.
I kinda reworked everything.
1. Those vertex floating/overlaping on your uv layout are just parts of the mesh that you forgot or made a mistake when unwrapping, you fixed some of them in this last version of the low that you uploaded, but some of them where there still. 3ds max problably have an option to sync the 3dview with the uv layout, this would make easier to find them.
2. To fix the problem with overlap you have to separete the meshes and properly name them, in this scrensshot every color is a seperated piece with a diffrent name, for both the highpoly and lowpoly. Exmp (Handle_high), (Handle_low).
Some of them you don't need to separate, you will learn with time and practice what will and what will not cause overlap.
This uv layout was quicly done, but as you can see i put some smaller pieces insede those big circle and squares. Now, you can see too how those small strip both in the hammer body and the front part kill a lot of texture space and they end up beeing too thin in the uvlayout, you would have problem with that if you would use a small texture. i will show you an alternative for that latter.
You could aslo just merge that handle ring into the lowpoly handle.
Now, i don't really know how the smoothing groups and opensubdv works in max, but you should aim for somewhat of clean and rounded edges, the edges of your hp seems to be too hard, maybe was a problem with compatibility when export/import. Since i don't know really what the problem is, here is an screenshot of the hp i did just for reference.
Here is an alternative of what you could do to not use those strip in the low poly mesh, as you can see the low poly is only a cylinder and box, but you get clean details and a much better use of the texture space, notice that the details in the highpoly aren't really straight down, they have a little offset so the normal map can capture it well.
To solve the problem with the different material, you should make a second lowpoly just for the ID mask, with edge loops where you want the diffrente material, and set a diffrent material for that part before export, or you could just mask it inside substance painter too, you can find tutorials about that in their youtube channel.
Here the bake from Substance Painter
Those are very common problems, i would strongly recommend you to watch the substance painter tutorials from allegorithmic on youtube, i guess you are starting to learn about baking now? if yes, i would recooment you to read the tutorials about baking in this forum on technical talk too.
Also Marmoset Toolbag website has a pretty good one: https://www.marmoset.co/posts/toolbag-baking-tutorial/
Fbx+Obj: https://mega.nz/#!9251FbaL!whQgvvN2Zj6CAS645aCHtmP14Bg_BOepCLb16Lwce8U
Thank you so much for investing all that time of yours trying to help me, I really appreciate it. Thanks to you the issue is now solved and I can finally proceed with texturing my mesh! And yes, I'm relatively new, I've been trying to learn 3d modeling and texturing by myself for the past year or so, even though at a clearly slow pace.
Thank you again, really.