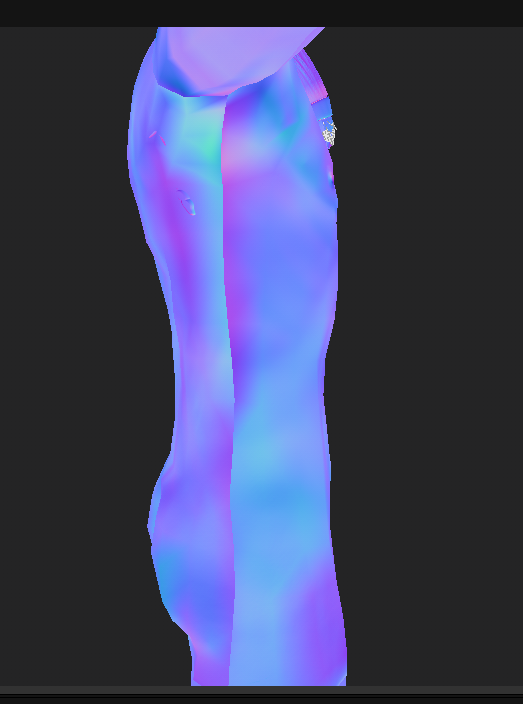
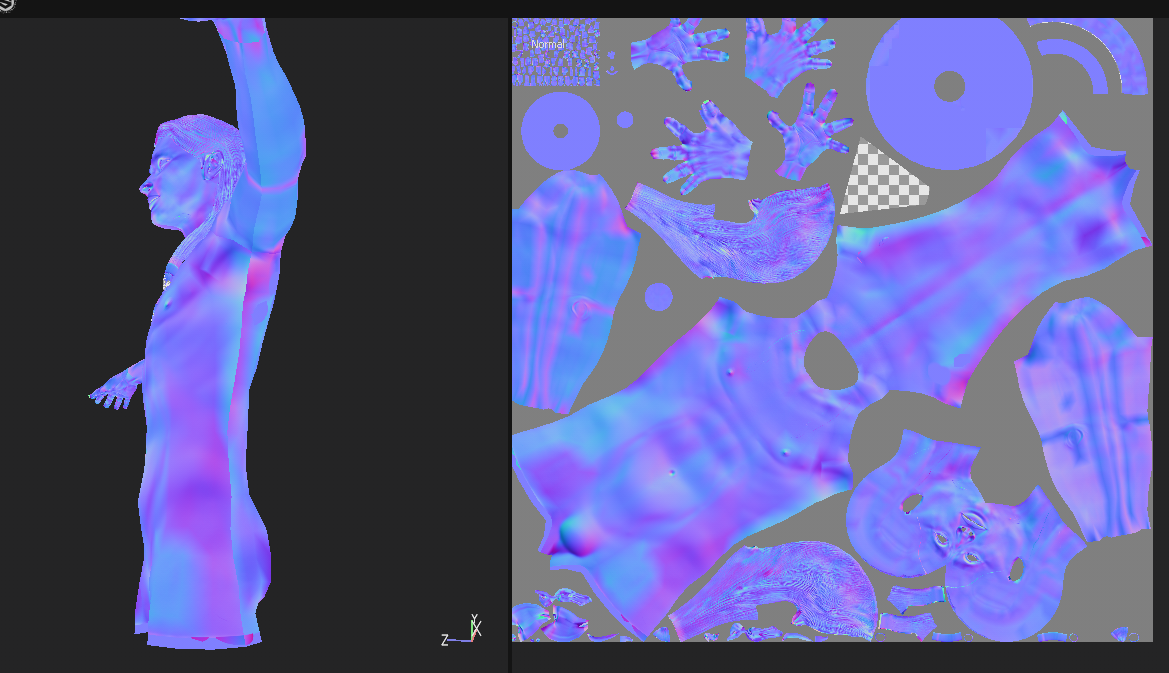
Another normal map issues thread - issues at seams - Maya LT
Baked in Maya LT 2018.
Seen in Substance Painter. OpenGL format.
I don't have any mirrored geometry. I double checked all of my face normals, and pressed "conform" just to be sure.
Baked using "closest" ray hit, no bilinear filter, tangent space normals... what else?
Would using a cage solve this problem? The rays are coming out from the low poly, they pick up the closest normal they hit... why would this cause such consistent reversing at the seams?
I have read just about everything you can find online about normal maps. No, that doesn't mean I really understand what the heck is happening. I'm not a computer science person -- not very clever at all. I've been able to figure out enough to do some troubleshooting, but I still get this weird behavior at the seams.
The artifacts -- I know how to fix that, don't worry about that.
Thanks for any help


Replies
But, at the seams, why the sudden reversal or colors? Doesn't that indicate a change in normal direction?
Phew. I was gearing up for a big shooting of the troubles.
Yes, precisely
I would advise you to take some time to think about this further, to really understand the relationship between your UVs and the TS normalmap. It is indeed a bit counter-intuitive, but only if you don't take the time to really think about what the RGB data is representing in relation to your UVs.
EDIT. just noticed you actually bake in Maya instead of Painter. Iirc Maya has it's own tangent-space so you might get shading errors in Substance/Unreal as they both support MikkTspace.
But the difference between directX and openGL, I have no idea what that means, it's just that I had to choose openGL for my map to display properly in Substance. So, I need to clarify what is going on with that to be sure it's going to work in engine.
Reason I bake in Maya is because I want to explode some parts of the bake. Like the eye balls, I don't want them picking up parts of the surrounding face. I am not sure how baking in Painter works, but maybe I ought to learn about that. But it seems like, if I exploded my mesh for baking, then I'd have to export/import twice to go back and recenter my meshes? That's why I've avoided it. But even if that is not the case, and it bakes each object in a standalone space, then would my ambient occlusion be correct?
You should take a look at the match by name feature in both Substance Painter and Designer. You basically name your corresponding low and high meshes accordingly and it will bake them in sort of groups and not need to be exploded.
https://support.allegorithmic.com/documentation/display/SPDOC/Matching+by+name
The diffrencen between OpenGL and DirectX when it comes to normal map, is just the direction of the green channel or (Y axis), (Y+ = OpenGL), (Y- = DirectX), some aplications use OpenGL like Unity, and some uses DirectX.
Like Mirbobo said, you should think about the tangent space that the programs that you want to export your meshes are using to compute the normals. In Substance, you can choose between keep your tangent space, or let substance compute it. Generally is best to ask for substance to compute them since it will use MikkTspace, and both Unreal and Unity are using MikkTspace too.
About the baking, im a begginer so im not really sure about it, but i think that exploding your mesh and baking them in (standalone space) will give you the same results, since both methods are just isolating different parts of the mesh. And to export them to substance is pretty easy if you will use their name convention system.
I'm going to do some optimization with the UV's (that was only a test, as I generally still have some troubles with map baking), and then try out baking in Painter. I wish I had done this sooner, as I've wasted quite a bit of time with exploding meshes.
http://wiki.polycount.com/wiki/Normal_Map_Technical_Detail
Alright, I know a bit more about map baking now, but now I'm entirely confused about how to set up a new workflow. I've got all these different programs -- Maya LT, Zbrush, Xnormal, Substance Painter -- but the confusion really sets in when you start thinking about each programs unique requirements for grouping, naming, importing and exporting. I need to take some time to figure this out, but I'm also trying to get this character done in a somewhat timely manner.
The biggest problem I have is the export polycount cap from Maya LT. I like to do my retopo and UV unwrap in there as I'm really familiar with it and can do it much faster than in Zbrush, so it makes sense to do my baking in there as well as everything's all set up already. But then there is the issue of making sure I'm working in sync with unreals shader requirements, so it would make sense then to use xNormal or substance for the baking. Then I get into problems like, do I export the lo poly meshes from maya, and the high from zbrush -- which can be kind of confusing because you aren't exactly sure everything is going to be matching up, for instance for some reason the scale of some of my meshes changed, I have no idea why. Or whenever I bake in Xnormal, my smoothing groups don't seem to register.
These are all things I can figure out individually, of course, but it would be really awesome if somebody with similar restrictions could share their general workflow.
Anyway, when I find a decent workflow for my specific applications, I'll share it here as I'm sure there are other beginners using Maya LT who may face the same dilemma. (correction: I'll just make a separate thread to detail my solution, as the original purpose of this thread is not relevant)
The sharp shadows at the armpit and the brow -- are these the kind of issues you were talking about? (or do I just need to tweak some vertices?)
....because this is what the hi-poly looks like in Zbrush. The game res with the normal map looks all lumpy.
2 - Put all the odds in your favor, and use a tool that allows you to both bake *and* display your results at the same time - like Toolbag3 and Xnormal. Once (and only once) you get that to look right, then it will be a good time to start investigating what it takes to get the results into the game engine of your choice.
I'll need to hit this with a fresh mind on Monday. I'll give xNormal a shot as it's free and I already have it, though I have been interested in checking out the marmoset programs as they seem pretty popular.
*Actually, I see that toolbag3 has interactive updates for the map baking, and boast being an artist friendly program, annnnnd has several lengthy tutorials on map baking, so I may try out the trial version.
But I found a really great, visual tutorial that has some images that really help somebody like me "see" what is really happening when baking, so I thought I'd drop it here for future troubleshooters. Even if you aren't going to use Marmoset Toolbag, this is the best resource I've found for visual learners, and explains in lucid detail much of what people have been explaining to me here:
https://www.marmoset.co/posts/toolbag-baking-tutorial/
My final advice to people who may be sharing my same difficulties -- although it has definitely helped me a lot to scour the internet, reading and asking questions to try and understand map baking, the fact is that it is a time consuming and kind of unforgiving part of of the process. Buuuuut, man! Marmoset Toolbag really makes it sooo much faster and intuitive.
I tend to be against having to use "crutches" to do things, but you've got to give yourself a break sometimes. And why throw rocks when laser guns exist?
Thanks so much for the recommendation @pior
*butt has no detail because it's hidden beneath clothes. Just there so I had some volume to work from.