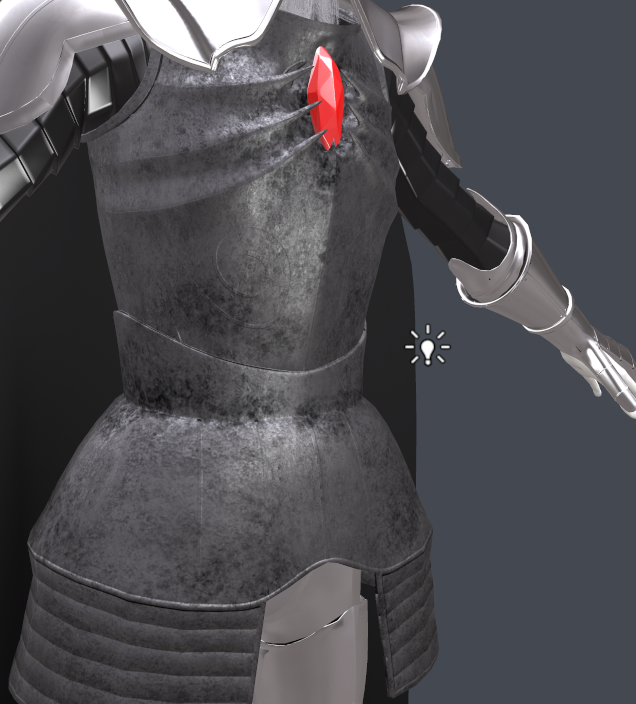
Metal workflow?
I'm texturing an armor and I'm having some issues, I'm currently trying to figure out the best workflow of how to do this quickly. Some say you should use the gloss map as a spec and then the specular map serves as the color of the specular light. I found this didn't work very well. Currently I'm using an albedo map for base color, a normal map, a spec map which a brighter version of the albedo map and I use the same map for the gloss. Kinda looks like metal I guess, but I want this armor to be black.
Making the spec map darker is going to kill the specular light, making the gloss map darker is going to make the entire model rougher and less metal looking. How do you create a black armor?

Making the spec map darker is going to kill the specular light, making the gloss map darker is going to make the entire model rougher and less metal looking. How do you create a black armor?

Replies
I changed it from specular to metalness and without any map the result seems ok? Not sure if this is how you're supposed to do it, any heads up would be appreciated otherwise I'll proceed since it does look like metal now.
And there's one more issue, when I zoom out nasty seams appear, do you really have to expand each uv island within photoshop maybe with stroke or something to make these disappear?
https://www.marmoset.co/posts/basic-theory-of-physically-based-rendering/
https://www.marmoset.co/posts/physically-based-rendering-and-you-can-too/
https://www.marmoset.co/posts/pbr-texture-conversion/
Once you understand the fundamental concepts of how the texture maps work in a PBR system, you should research the material you're trying to create, find many images of that surface type and study how reflective it is, how glossy it is, etc. Your two posts show drastically different materials, which makes me think you're not quite sure what you want to create.
As far as seams when you zoom out, generally this means your maps do not have padding. Padding is usually added to your normal, ao, etc when baking your textures from the high poly. Crank up the padding value when you do that. You also need to make sure there is enough space between your UV islands, so they don't bleed into each other when the textures mip map.
I'm pretty sure I understand the concept of how the maps work, what gloss or roughness is for example. The rougher an object is the less light is refracted from the material and the spec map value should just stay at 0.5 because it's just used to determine the specular color. So you expect a black and white gloss map to be enough to make something look very metal like and the albedo map to make the metal look black but that just seems to make the armor look like this.
Yes it's metal but it's not black metal, some of the blackness from the albedo map is shining through but not the amount I'm hoping for. And lowering or inverting the gloss map don't do anything, it either kills the spec or you get a similar result. I guess I want a material similar to this:
Just with a surface that has far more texture I just can't figure out how to do it correctly. Maybe remove the albedo map all together and just use a gloss and a spec map? I find this confusing, maybe black metal is an oxymoron and what black armor actually would need to be shiny is a clearcoat layer or some specular paint or something? If that's the case, is there a clearcoat option in marmoset?
Now, It looks like you're trying to create some sort of blackened metal. So the first question to ask is, what makes the metal black? Is it painted black? Is it some sort of coating? Is it oxidized? Doing a little research it seems like some sort of oxidized "blackening" coating is most likely. Oxidized coatings are used to prevent corrosion and reduce reflectivity. https://en.wikipedia.org/wiki/Black_oxide
For something like this, you would probably want to use a black or near black diffuse, and then a reflectivity value that is closer to than of an insulator (around 4%) than a pure metal (usually 70-100% range). When you have a very dark diffuse, even low reflectivity values like 4% can seem very reflective.
Then it's simply a matter of observing the material and coming up with a good gloss value. Toolbag doesn't have a clear coat shader, but I don't think it's necessary in this case.
This is diffuse = 0 and spec at 4%.
Lighting is very important too, try to pay attention to the shape of the reflections in your reference to see understand the lighting setup for the photo. Your lighting setup that you seem to have here is very ambient, I would recommend placing some spot lights around and adjusting the light width and intensity to get something more like your reference.
4% is in linear space, to play around with this, unload the spec map and set the specular intensity value to 0.04. You can play around with values here, maybe try 0.04 to 0.08 or so.
Now, when using a specular map generally the texture is loaded in gamma space (sRGB), which means 4% = 56,56,56 or hex #383838. Try playing around with a flat color for the spec, I think you have too much variation there now. The reflectivity of a material doesn't tend to change unless the material itself changes. For instance, if you have a steel surface with a rubber coating, and you have some edge wear where the rubber is scratched away, the areas where the rubber is no longer visible would be steel, so the reflectivity would go from 4% to maybe 70% or so in those areas.
Generally the gloss map is where you should throw all those scratches and other micro detail. In the screenshot I posted the gloss is about 75% - gloss maps tend to be linear space so you can simply use a value of ~75%. Try making that your mid-range with darker and lighter values for variation. To experiment I would suggest clearing the gloss map and playing with the slider here too. Due to energy conservation, the rougher the surface is, the wider and dimmer the specular highlight is, which makes rougher materials appear less reflective. It looks like your gloss map is mostly in the low values, so it's probably too rough.
Before I add any detail to a texture, I block in simple values using the sliders in TB, it's really quick to create a base material this way, and it's useful for getting a feel for various materials and settings.
Again, throw some lights in there too. Your lighting is very flat atm, so there are no spots where your material is picking up interesting highlights.