Shader Forge - World Position Vertical Gradient help please
Hey all,
So I've recently purchased Shader Forge for Unity and have been testing it out. Our current project involves a vertical gradient shader similar to the style you see in Monument Valley (totally different art style, just looking for a similar gradient effect!).
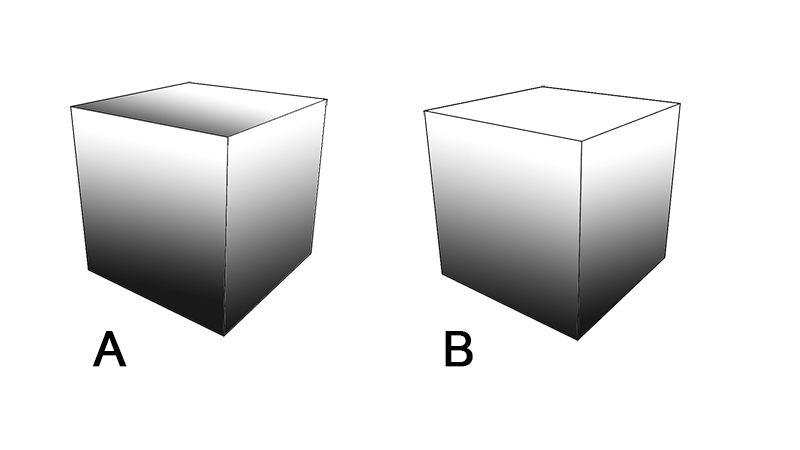
So far I've been able to get it working that it uses the UV Co-ords but that makes the gradient appear on the top of cube shaped objects which I don't want happening. I've tried searching for this and really can't find what I'm looking for. I found a shader by bcatcho on github that does what I'm trying to achieve but his is written in shader code which i don't understand so wanted to replicate it in Shader Forge so I can tweak things myself. His uses the objects local position to apply the gradient whereas I want to use world position, so smaller objects might have a flat colour of the starting colour of the gradient while taller objects you'd see the full gradient effect.. kinda thing
I watched/followed the Shader Forge tutorials on creating gradients but they're just applied straight to objects and I can't figure out how to get it to use the world position
I'm thinking I need to use the Normal Position node but I don't know how to hook it up to get what I'm after...
I'm gonna attach an image of what I mean to help clarify. Cube A is what I currently have using the UV Co-ords (i don't want that gradient on the top of the cube) but Cube B is the style i'm trying to get. Any bits of advice would be greatly appreciated!!

Replies
Shader forge version of James Arndt's shader
Thanks a lot for this! I've replicated it in my own scene now and it's working exactly how I wanted it to
Is there any way that I could use a diffuse texture with this? Like, for instance, if I wanted to have this gradient effect overlaying a diffuse texture. I am trying to get a very slight detail of texture to come through on the models (very minor but visible) but I see there's no way to hook in a diffuse on a custom lighting setup.. Would this node tree work in a diffuse slot instead of the emissive? I've never been sure why the gradients are always shown in emissive slots
If you want to use a texture, add a texture2d node. Then add a new multiply node. Connect the new texture2d node to the A input of the multiply node. Connect the output of the old multiply node, which is currently connected to the custom lighting slot, into the B input of the new multiply node. Now, take the output of the new multiply node and connect it to the custom lighting slot.
If you ever want to add a texture to something, generally you just add a 2D texture node and multiply it by whatever else.