(Solved) Terrible normal map shading errors inside UE4, expert advice desperately needed.
Alright, one more try, the previous post got removed for some unknown reason.
I have the following high-poly and low-poly assets:
HP - https://drive.google.com/open?id=0Bxiv4nwNFlKhcllvaU1nTERlcEE
LP - https://drive.google.com/open?id=0Bxiv4nwNFlKhV0xfVE1jVE9lcUE
I go through the following steps to get my normal map:
1) The mesh is all smooth edges and averaged. I triangulate in Maya, export as FBX with smoothing and triangulate "on"
2) Import the LP into Substance Painter with "compute tangent space per fragment" ticked
3) Set my baking ray-trace length to 0.03 for both front and back shots and get a NM that displays correctly in SP
4) Import the LP into UE4, "import normals" and "mikkTSpace" selected
This is what I get inside UE4:
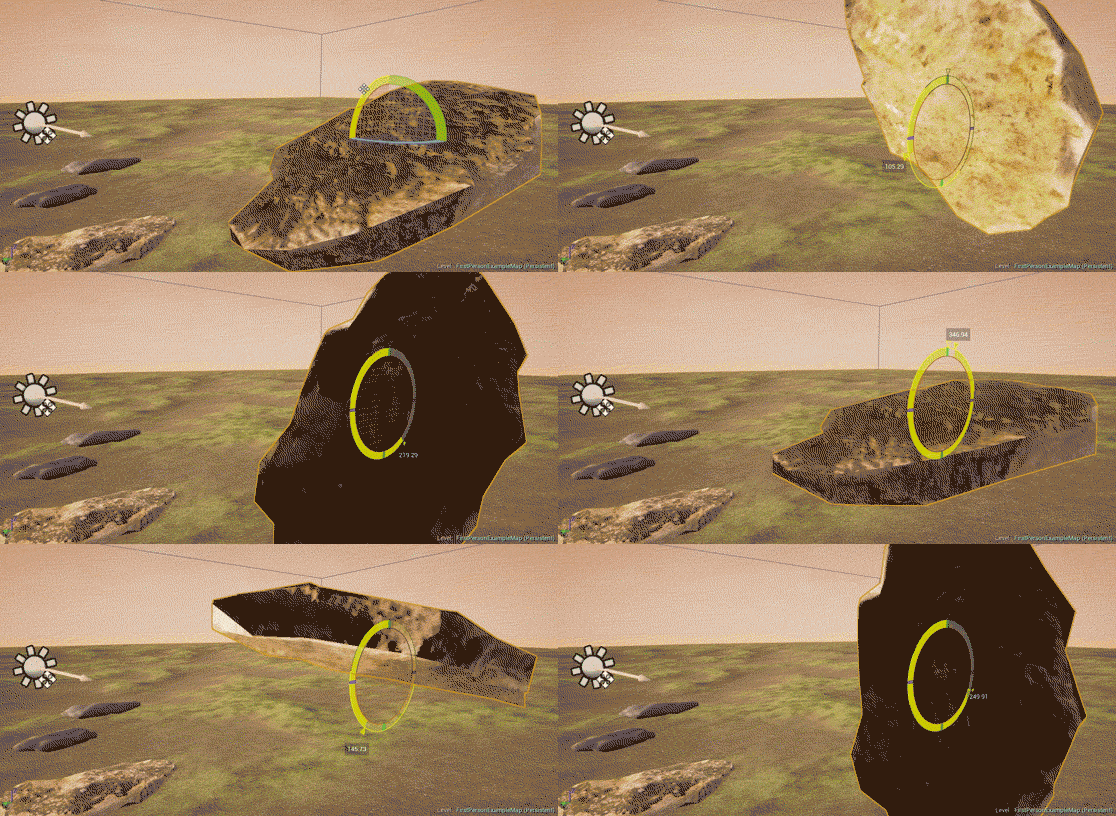
This is the lighting seam up close:
This is what the LP looks like from almost the same angle in Marmoset 3:
So I have at least two distinct issues here, whether they are related I can't tell, but:
1) The mesh has a very obvious lighting seam at the UV island border
2) The mesh shades incorrectly, with the top UV shell getting "shadows" in direct sunlight
The issue is definitely with the NM, as it's lit more or less correctly just with the diffuse texture in the material. Things that I tried to no avail: bevels on sharp edges, more UV islands for places with sharp lighting brakes, hard edges at uv island borders, baking in xNormal (exactly the same result, compute binormal in pixel shader "ticked"), baking with a cage.
I would be very grateful is someone more knowledgeable than me would have a look at this, since I've been stuck at it for an embarrassingly long time and am about to give up on this whole thing. Thank you.
I have the following high-poly and low-poly assets:
HP - https://drive.google.com/open?id=0Bxiv4nwNFlKhcllvaU1nTERlcEE
LP - https://drive.google.com/open?id=0Bxiv4nwNFlKhV0xfVE1jVE9lcUE
I go through the following steps to get my normal map:
1) The mesh is all smooth edges and averaged. I triangulate in Maya, export as FBX with smoothing and triangulate "on"
2) Import the LP into Substance Painter with "compute tangent space per fragment" ticked
3) Set my baking ray-trace length to 0.03 for both front and back shots and get a NM that displays correctly in SP
4) Import the LP into UE4, "import normals" and "mikkTSpace" selected
This is what I get inside UE4:

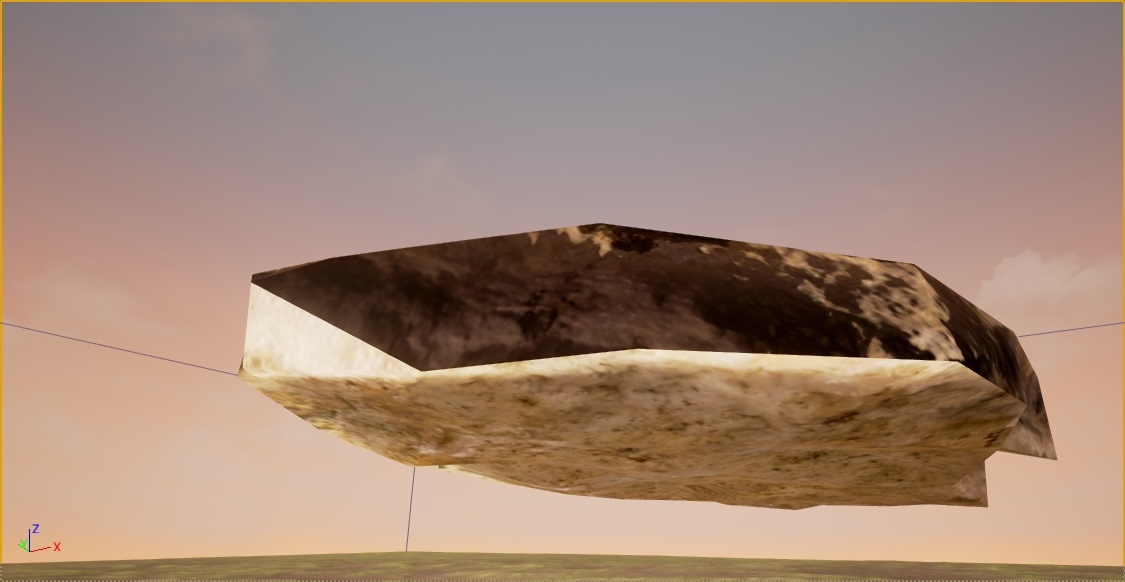
This is the lighting seam up close:

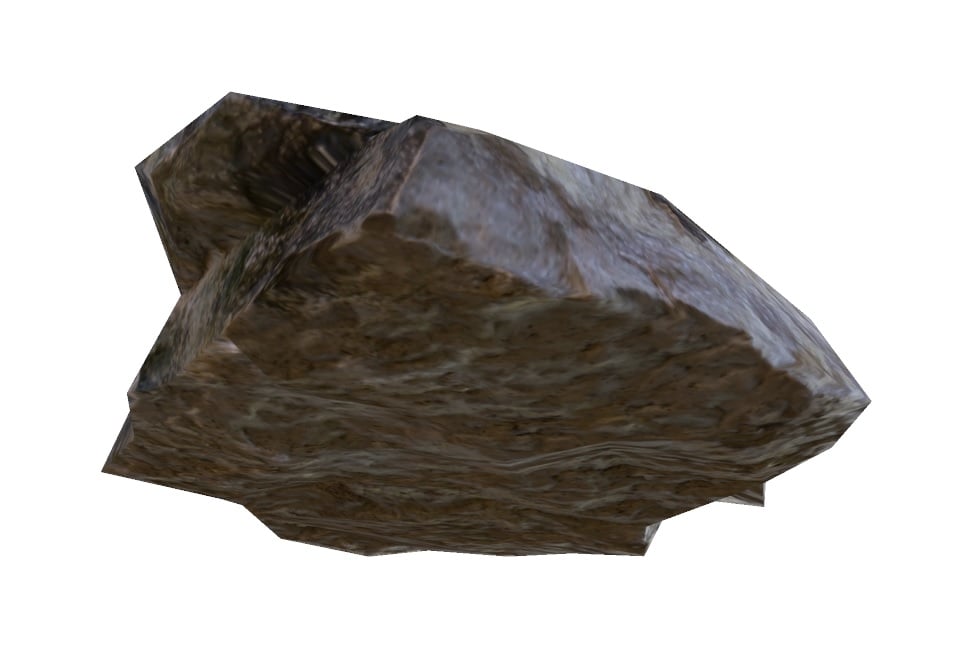
This is what the LP looks like from almost the same angle in Marmoset 3:

So I have at least two distinct issues here, whether they are related I can't tell, but:
1) The mesh has a very obvious lighting seam at the UV island border
2) The mesh shades incorrectly, with the top UV shell getting "shadows" in direct sunlight
The issue is definitely with the NM, as it's lit more or less correctly just with the diffuse texture in the material. Things that I tried to no avail: bevels on sharp edges, more UV islands for places with sharp lighting brakes, hard edges at uv island borders, baking in xNormal (exactly the same result, compute binormal in pixel shader "ticked"), baking with a cage.
I would be very grateful is someone more knowledgeable than me would have a look at this, since I've been stuck at it for an embarrassingly long time and am about to give up on this whole thing. Thank you.
Replies
Could be just an inverted Y channel though.
I also tried many different variants of UV island arrangement, some with lots of open space around uv islands, I even tried painting out normal map uv island borders with 128,128,255 in photoshop. Also tried that "squarish uv island" gimmick (distorts your albedo on texture projection in maya and doesn't solve my issue with the normal map).
Material:
Texture settings:
Thanks for looking into this by the way, was hoping for someone like you to have a look :-)
It feels like a borked mesh to me - the normal map itself looks legit.
It's not unheard of for unreal to ignore mesh import settings. Delete the mesh from your project, save and reimport. Post up your import settings as well just in case..
Every setting is default, normal import was set to import normals and tangents.
Import settings, but I've tried them all:
Does it still "shadow against the sun" if you rotate it? And what is your engine version. Mine is 4.14.3. I guess I need to try it with a different one...
PS.
I should also probably mention that I've tried perhaps some 15 to 20 differently decimated and UV mapped versions of the same source mesh with this same issue every time. So simply deleting and reimporting it probably won't do the trick :-(
Any extra uv channels etc it could be mixing up? Zeroed transforms etc etc.
Did you import the normal map as something else and then switch it afterward?
poopipe said: That can be painful if the asset has ties to blueprints or levels. Instead of deleting it and leaving a bunch of broken links, I'll import the asset to a different location, delete the old and then use the replace feature and point it to the new asset. Then you can move the new asset where the old one was.
I am a noob at all this stuff and especially Maya, so could you please clarify this bit here with the "zeroed transforms" and how it could be affecting normal map baking. Pretty sure though I centered the pivot and froze transforms though the meaning of these actions is not entirely clear to me (apart from the pivot thing).
I'd assumed the wonky textures in the screenshot were down to parameterisation
I'm pretty sure you don't want to flip the green channel if you're using substance "directX" format normal maps in Ue
fwiw. I've imported the mesh and normal map posted and it's rendering fine on 4.17.1
just a thought - is the texture sampler set up right in your material ? if it thinks it's reading a normal texture (as in not a normal map) that could play havok with the normals
edit : just read your reply - i think we posted at the same time ish..
You've zeroed your transforms - as long as the object wasn't in a group it should all be well.
Transforms can affect all sorts - for example normals which could affect the way tangents are passed through to the shader - not that it's very likely to be an issue. You could try unlocking your normals and setting them up again.
Because the mesh and normal map worked ok for both me and Obscura I'd start to look at either a material problem (try a simple non-parameterised material) or a bug in 4.14. Have you got other meshes in that worked?
All the normals maps imported correctly straight up. I don't recall ever having to change my normal map compression or texture group in UE4 since I started using it just over a year ago. Also, flipping the green channel has a very negligible effect on the appearance of the mesh at all.
About the NM and the diffuse being the same colour, that's just a generic UE4 placeholder texture for the master material. I use an instance with the mesh and plug my textures there.
About the blueprints, only default FPS character stuff, no blueprints on any of the meshes in this scene.
For posterity.
Looking back at this issue and how a noob like me could approach debugging an issue like this, I have to say, that there were no other objects with unique normal maps authored by me in this scene (only beveled hard-soft edged stuff using tiling textures). However, other purchased marketplace assets with complex original topology, specifically the "Driftwood pack" rendered fine, so I guess this wasn't an issue with the engine afterall as we can all now tell.
Thanks for all the participation.