Tutorial "How to change default Marking menu in Maya"
Briefly about me – I do low poly with textures. ( Concept by Joe Mad )

I posted this picture here just do not let you run too fast ( especially when you notice not so interesting stuff..it will be booooring. Yeah. So, drink triple espresso pls. I insist.. )
And another one more thing. My english is a bit wooden...So, i couldn`t translate jokes from rusian. PLS. Put you own funny jokes everywhere you want. Now. Thant`s all. Let`s go!)
Customization of default Marking Menu in maya

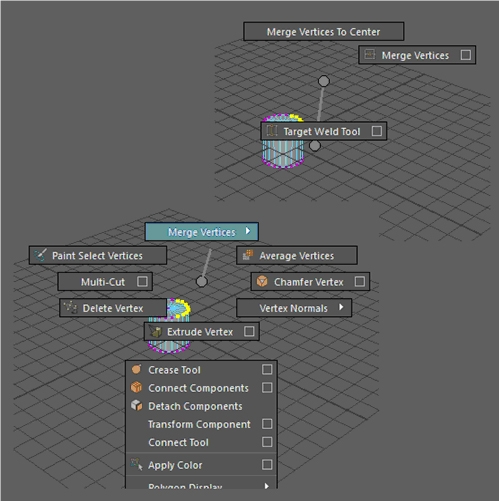
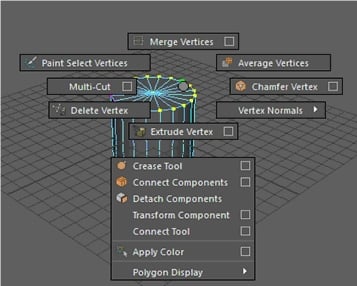
Tell me please, does anybody use Extrude Vertex?
And here

What about Poke Face? Bevel Face? Or maybe Wedge Face? How often? Just interesting.
All right. Let`s get started. For example, i use "merge vertices" and "merge vertices to center" very often. But in maya 2016 their position are too far from fast applying.

So, using default tools, i mean specifically in maya, we can`t change it

Yes, there it`s impossible. We have to get to the maya`s mel files. How can we find out where to look? Let`s open script editor ( don`t ask me where it is )

Turn on Echo All Commands

Now, let`s create some object ( I`ve made cylinder ), than select a few vertices and in the script editor write a bunch of “/” in order to understand from what point we should start to read.

Now, let`s execute any command in MM, for instance i`ll do the average vertices!

And push....

Maya has showed us a bunch of code among which is contexToolMM. I don`t remember exactly what does there is, but it isn`t what we need. Further, we just knew what command was executed. But the main thing is that command located in MM for edges.
Now, install the Total Commander ( TC ), we need it for searching on PC – where is located our .mel file with that command!
We will seek in C:\Program Files\Autodesk\Maya2016\scripts\others
I don`t
remember how, but i found out that this folder contains all MM .mel files ( at
least – the main part )
In TC press - search files!

Write the place for searching – our dir, as in the picture, press “with text”, write there our command and let`s search!
As you see, TC found 3 files, in the name of one of them is our MM. The name is contextPolyToolsVertexMM
Now i`m going to tell you one very important rule.
Don`t change anything in the maya setup files. I mean DO NOT change files in this folder C:\Program Files\Autodesk\Maya2016. Specifically in our case - here
C:\Program Files\Autodesk\Maya2016\scripts\others.
Copy the file contextPolyToolsVertexMM from C:\Program Files\Autodesk\Maya2016\scripts\others to C:\Users\Volodya\Documents\maya\2016\scripts
Volodya is the name of your PC. It`s hint)

Now let's digress a bit. As you understand, maya keeps the settings in 2 places. The first is where you have installed your maya - C:\Program Files\Autodesk\Maya2016. The second place is where maya keeps custom settings -C:\Users\Volodya\Documents\maya\2016
If you want to reinstall Window, found new job or briefly – just would like to reinstall the maya, but you`re lazy to set up the maya again – you should copy contents of this folder C:\Users\Volodya\Documents\maya\2016. This is your settings, except probably hotkeys. They are supposed to export in Hotkey Editor. And that`s all, no pain more!
One moment. When maya in first launch ask you – will you create default settings or copy them form previous version – press default. Sometimes maya transfers your settings with bugs, i mean hardly perceptible and naaasty!
We slightly digressed. So, we have copied our file contextPolyToolsVertexMM to C:\Users\Volodya\Documents\maya\2016\scripts. Now maya has two similar files in different places. Which one she is going to consider as foreground if they`re going be different? The one in your scripts, in the C:\Users\Volodya\Documents\maya\2016\scripts.
If maya finds there some file, she uses it and doesn`t look at the same one in install folder. So, your hands are free to make any experiments without fear to break something. If something goes wrong - you can delete it and maya will run well
Now, please, open contextPolyToolsVertexMM, press “search” and the main thing, everyone who is afraid of MEL, keep calm, it`s very simple, almost copy paste

Write AverageVertex and press – find!

So, all what we need are these lines. What do all these mean?
Flag –label is the name of our command which we can see in the MM. If i want to change it - i write in this way, for instance -label “i love my wife”
Flag –command – you know what it means. You can write there your script or the name of global proc. Just read how Autodesk has made it.
Flag –radialPosition means the locations of your command in MM. For example, if you haven`t this flag - the command will be below, look at the picture

Flag image – it`s our icon! You can put here your picture. Just write the name here and paste the image into this dir C:\Users\Volodya\Documents\maya\2016\prefs\icons. You can find somewhere all maya icons and be happy changing them for your goals
One more thing. How to create the submenu

At first write the block without command`s flag, but with the flag –subMenu 1
Than put your blocks with command`s flag which will be in your submenu

In the end you should have this text “setParent –m ..;”
Just learn, how it was been written before you!
P.S. In this screenshot i`ve deleted some blocks for simpler reading.
So, let`s start to change! I want to move “merge vertices” closer to me
Let's get and delete all unnecessary things, like when we clean our PC

Save it ( check your directory again, it should be \Volodya\Documents\maya\2016\scripts )
And finally close and reopen maya

Looks like maya isn`t broken)
After few weeks when i`ve changed my MM – i started to forget which MM file applies to every specific command. And i decided to make a small summary in order to don`t forget and seek it again. I hope it`ll be helpfull for you. If you can`t find something you need – try the way above
// General
initHUD - Heads Up Display
selectToolOptionsPopup
- selection mode, ctrl+shift+rmb;
dagMenuProc - selection mode, rmb;
translateMarkingMenuImpl -
move mode, ctrl+shift+rmb;
polyConvertMM
-
mode to, ctrl + rmb;
/// modeling, UV
texturePanelMenus - UV editor, all MM
textureWindowCreateToolBar - UV editor, toolBar
contextPolyToolsDefaultMM - nothing is selected, shift+rmb;
contextPolyToolsObjectMM - selection mode, shift+rmb;
contextPolyToolsEdgeMM - mode edge, shift+rmb;
contextPolyToolsFaceMM - mode face, shift+rmb;
contextPolyToolsVertexMM - moder vertex, shift+rmb;
// Examples
and some thougts
In the end i`d like to say that i wanted to make some order, save time and make it easy to use. Just think, if you do merge vertices 20 000 time in one year and now you save 1 sec per action! ( But of course.. it doesn`t cancel cases when you get stuck.
Some my examples:

I think it was worth it only if i`d change the UV MM.
Or this:

My own window where you shouldn`t type -1 or 1 and another. After pressing – window closes by itself
Assigning checker in one press. If your checker already exists – assigns specific shader
Opening UV in the PS at once! You haven`t to spend a lot of time to open UV editor – find the button, type resolution, find location for UV. One UV for all projects

Bragged. MEL makes your life easer, use it!
Before the end - small video.. but with bad quality.. sorry, i love my very old home notebook
https://www.youtube.com/watch?edit=vd&v=zP-1n_v4TTs
So, you can put much closer the commands wich you use very often. Just copy commands to the right places and delete the garbage
Thank you all!

Replies
Luckly found this through google.
Thanks so much for this! Worked for me