[UE4] Hair Tutorial using Fibermesh and 3DS Max
Does the world need another real-time hair tutorial?
Maby, I don't know, I built this one a while back and thought it would be time wasted if I don't share it at all.
So there might be some stuff in there you have seen somewhere else, after all we are all using the same tools.
This one is mostly focused on the technical side of things, it includes a lot of stuff I wished someone told me when I created my hair, and it took me a while to figure all this stuff out.
If nothing else I recommend checking out the references mentioned, if you havn't already.

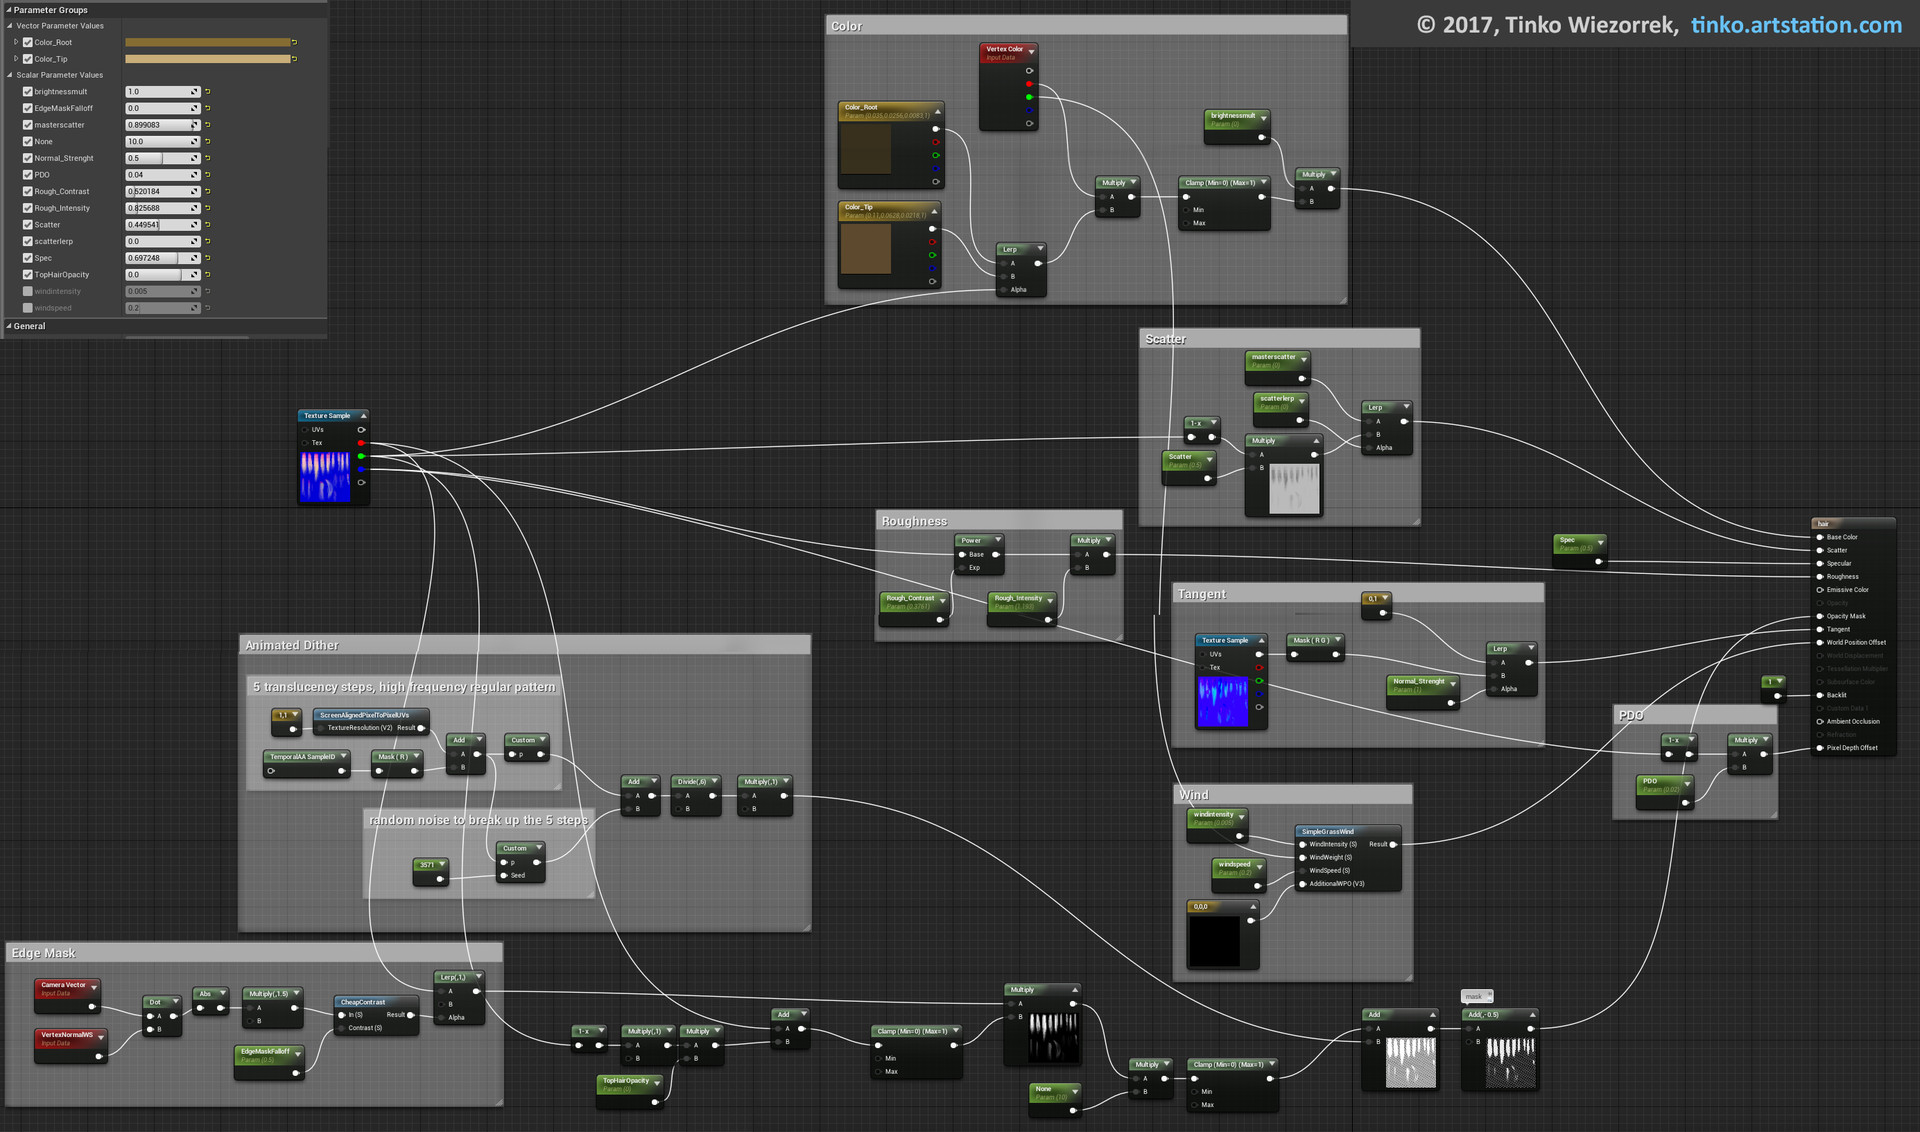
Following is the complete graph of my Hairshader:

To review what I was able to achieve using this workflow you can check out this character:

Please guys let me know if this is helpfull or if you have any questions regarding the workflow.
Cheers.
Maby, I don't know, I built this one a while back and thought it would be time wasted if I don't share it at all.
So there might be some stuff in there you have seen somewhere else, after all we are all using the same tools.
This one is mostly focused on the technical side of things, it includes a lot of stuff I wished someone told me when I created my hair, and it took me a while to figure all this stuff out.
If nothing else I recommend checking out the references mentioned, if you havn't already.

Following is the complete graph of my Hairshader:

To review what I was able to achieve using this workflow you can check out this character:

IMM_Hair_JNasconeArt_01 by Jonathan Nascone
I also have all the scirpts etc bundled here for convenience:
https://drive.google.com/file/d/0BzuzUFHnI8Jha2pmQzRqNFlYLVE/view?usp=sharing
I don't own any of theese scripts and brushes all credit goes to the original creators.
I also have all the scirpts etc bundled here for convenience:
https://drive.google.com/file/d/0BzuzUFHnI8Jha2pmQzRqNFlYLVE/view?usp=sharing
I don't own any of theese scripts and brushes all credit goes to the original creators.
Please guys let me know if this is helpfull or if you have any questions regarding the workflow.
Cheers.

Replies
I was wondering if you have tried to bake a flow/tangent map instead of using the normal map? if so, how?
there are different methods to derive your tangent map though. something i tried for my next project is assigning a random color to every hair to get a hair ID map. I am going to use this ID map for the flow map so that every hair has a slightly different specular highlight direction.
I'm not sure if its going to look any better then using the normal map but I will post the resulsts here once I have something decent.
there are some hair simulation plugins for maya that generate hair using splines, they might be able to produce correct flowmaps, but i personally havn't tried any of theese since i dont think there are any good free ones (have not looked too hard admittedly)
This is the flow map from the UE4 photo-realistic bust project. Seems like it has been crudely painted and the dimensions are only 64x64. Not really sure.
I've completed the next project using this workflow, this time i gave all the hairs a random brightness.
The Result was convincing, but too noisy and monotone distributed across a whole haircut, so i anded up touching it up a bit in photoshop to increase contrast and create bigger strands of similar brightness to create a less random and more readable feeling of depth.
I think I also managed to keep the overdraw and polycount to feasable levels this time, so this head could actually be used in a game.
BTW amazing tutorial it has helped loads to understand the procedure of how to even approach the subject of in game hair better than any others I've come across!
I've tried baking a normal map with XNormal, but couldn't make it work
One key point for extracting the maps from ZBrush I forgot to mention is that you need to render your Hair Using BPR to get rid of the stepping.
this will also create certain buffer maps that can be exported without the need to use the MRGBZ grabber.
another option is to subdivide and export the actual fibermeshes and bake those in XNormal.
I didn't go into detail on this step since there are a lot of different ways to do this, all with their own annoyances, quirks, benefits and drawbacks, so I figured people will use whatever existing workflow they already have for baking.
Cheers