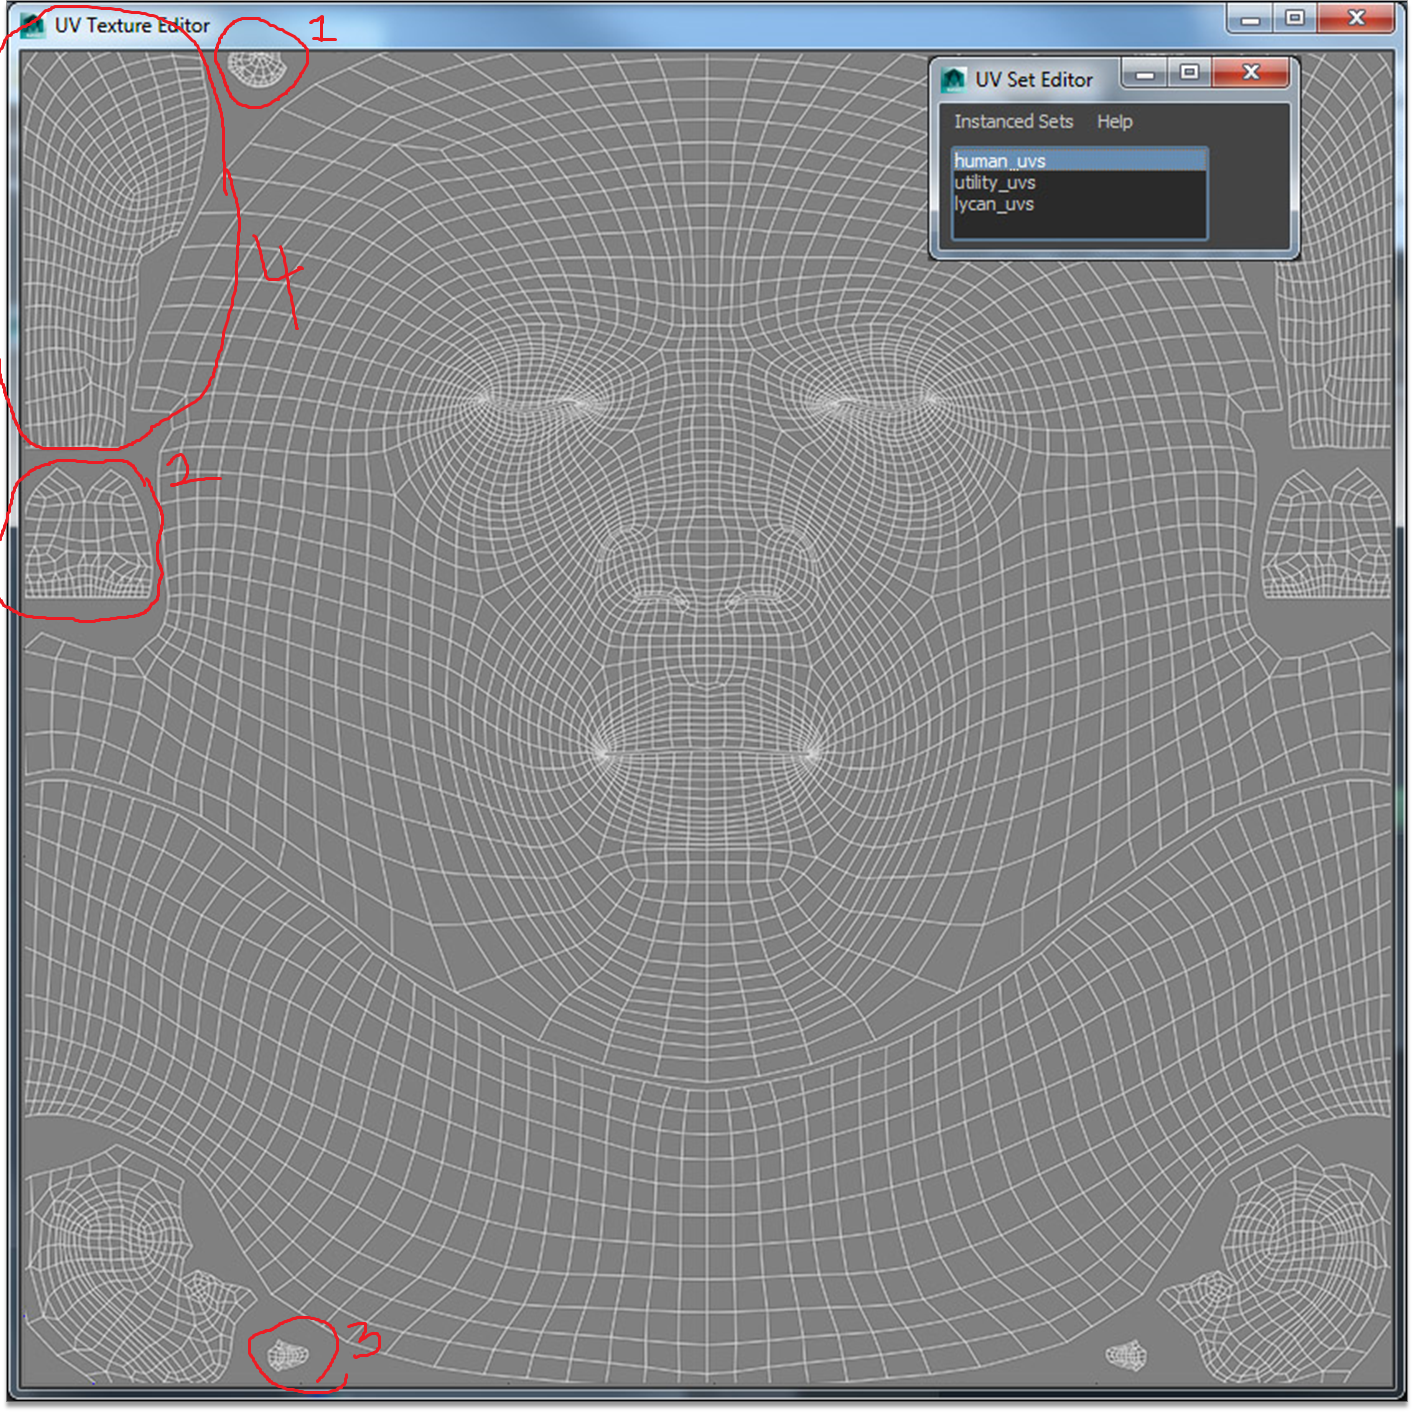
Order1886 UV Cuts
Hey guys!
I was looking at Order 1886 and was wondering if you guys knew what these UV shells they cut out 1-4
are supposed to be?
________________
BTW is there a way to place UV anchor points and UV Cut edges mirrored?
Like If I make a UV anchor point or UV Cut, it will automatically choose the anchor point on the opposite end.
I was looking at Order 1886 and was wondering if you guys knew what these UV shells they cut out 1-4
are supposed to be?

________________
BTW is there a way to place UV anchor points and UV Cut edges mirrored?
Like If I make a UV anchor point or UV Cut, it will automatically choose the anchor point on the opposite end.
Replies
They showed all the BTS work in Maya and other programs.
So if number 4 is the behind the head,
Then where would the mouth bag be? (Number 2 seems to small)
Maybe Number 1 is an eyebag
Number 2 is an nostril?
2 inside of mouth
3 caruncle
4 back of head
In order for me to do the UV with the eyes closed would I have to rig and close my models eyes first then make the planar projection?
Or can I just somehow smooth it out when its projected with eyes open?
That said, I wouldn't worry about it unless you are doing some highres closeups of your characters eyelids animated.
And it brings other problems with it instead,
What do you mean it brings other problems with it instead?
----------------------
For me the only workflow problem I encountered was sculpting the model with eyes wide open= not enough edge loops to close it.
So Im always interested in workflow problems
-------------------------
Would it be better then to project while half closed/half open?
This "only problem" is precisely why characters eyelids often look terrible in modern games. Sculptor wants to sculpt the eyes wide open for the zbrush renders to look "cool" > lowpoly eyelid loops end up being crammed in a very tiny space > UV relax algorithms allocate a very low pixel density to these tiny loops > when a character blinks, an ugly smear of black stretches along with the eyelid, and eyes end up being particularly hard to emote well because the default pose (wide open) is too extreme.
A good approach is to create the model with a "bored and sleepy" look (eyes half opened, mouth half open) but then that means that all wip screenshots will look dumb, and people on the team are probably going to think the model looks bad. So to go around that, the best is to provide a solid, temporary game res model (even without a bake) to the animators and tech artists so that they can import it to the game as early as possible. That way the feedback loop will be tight. But if the modeler insists on spending weeks in Zbrush first, this temporary model never gets done and the whole thing stagnates.
You can also work on the lowpoly with eyes and mouth blendshapes right from the beginning. That way you'll be always able to switch from the bored face look to a more natural expression. Unfortunately these are all rather technical aspects to get right, and a lot of people don't want to bother learning how to do it cleanly. It takes quite a bit of trial and error to get it to look good, and it's a bit of a non-linear process.
The added trouble of getting art director/leadership approval, as they are unable to see beyond the technical pose vs what it will look like when fully set up,
Beyond that the added workflow steps/trouble of ensuring the eyelids open and fold in accurately, be it blendshaped, or rigged,
Unless your going to see your characters face/eyes up-close, i find it overkill to create the eyelids like this.
so i just do it all with eyes open, mouth closed (but all stretched out on the UV map) and rather do separate cutout models for these areas that then get baked down onto and blended with the texture map of the main head.
http://i.imgur.com/kz5dmfy.jpg
At the moment, the topology on these are bad for any blendshaping yet, but I'm going to retopo them and project that new and final animation friendly topo back with all the sub-d levels. Then the first blendshapes will be eyes wide opened and mouth closed to make them look "cool" as you said.
Another problem is when and how to get eyelashes, eyebrows and possible beard cards to follow these initial sculpted facial expression blendshapes...
http://forums.cgsociety.org/showthread.php?t=754084
Eyes r hardly the only compression area of concern...
I sculpt for inspiration/charming volume ( interest = talent )
With compression complexity/real estate concerns in mind ( in addition to the mountain of other concerns for an artist of geometry whose final output is defined by the range of it's deformable motion/animation )
Which becomes a lot easier to control if u subscribe to...
or demand that;
"the skinned range of animated output defines a sculpt's success as much as the static topology".
Which is why I like to begin boning as I sculpt so I can test placement and skinning effect interactively!
( instead of as an afterthought ).
In other words...
In an Ideal world you would do the eyelids open and closed at the same time. Interactively ( representative of yer primarily dynamic rather than static concern )
Because modeling sleepy eyes without reference to open/closed extremes as well...
presents a similar problem!
( untested assumptions! Namely landing the open or closed position predictably! Not just rotation arc but where the topology shape quality of the lid edge at extreme's was mistakenly predicted )
Every arc range ( joint range ) describes topology. ( why bent limb poses and sleepy eyes are desirable compared to extreme's in the first place as a middle ground. Being a best case scenario for a one off solution )
Was easy in Mirai ( in fact I began learning polygon sculpting in Mirai with as much as a discipline after the Bay Raitt's argument and example of as much in his CGW article in 1998/99-ish. Think u can still see as much; [ joint deformation effect creation/testing at once with volume building ] in his "Saturday afternoon timelapse"? )
To do so in Maya without headaches however;( deform/undo double transformations, vert order hell )
Like the problem ( ignoring their solution ) seen here:
Requires a custom skinCluster hack with a "-split" dependency graph branch order; ( ( there is no tweak node created and deformers are branched off to a new chain in the dependency graph ) )
And workarounds that don't require ugly destructive edits that wont; Delete by Type > Non-Deformer History... like combine:
History like; polyUnite, or polySeperate!
Otherwise a scriptJob safety net easily allows for a duplicate proxy that can transfer original states back on request! UVs, Skinning Wts, Vrt position.
Which I realize for anyone who has not slurped from the kool aid of committed initiation...
It sounds like a pain in the ass.
( which it is... considering the transfer back hack will not save me if not implemented as soon as the system broke; ie. 1 edit more. Which would require an additional fail-safe like the corrective blendShape solution in the GIF . Or perhaps a cache fail-safe. )
Honestly, With the split chain skinCluster I really do not run into any tragedy. And autosave probably would cover me either way which is comforting considering it's the only recovery from the aforementioned destructive edits.
But it's not a workflow I'd like to provide support for only to suffer a mountain of e-mail filling my inbox telling me my scripts ruined their life
hmm.. not as comprehensive as the bones as a modeling tool article from CGW. But still has a nice example discovering a balance between edited shape tweaks, rotation and joint placements of the jaw interactively instead of as an afterthought:
You can create blendshapes for all your facialhair/eyelashes/hair/etc this way so they follow your facial motion.
Alternatively there are real-time/engine-side tricks to hook this up so you don't have the added cost of facial blendshapes * facial hair/hair etc.