[Zbrush Toolset]ZGameTools: Tileable Texture, Models Baking, Illustration & App Connectivity

polycounter lvl 5
Hello Polycounters,
Let's me introduce you a new tool , that's is currently under private Beta development
If you are interested I am looking for Beta testers.


Almost exact replica of the “Document : ZappLink Properties” panel.
Store your Camera view into the 8 available slots ( front, back, right, left, top, bottom , custom 1 custom 2).
You can save/reload all the views stored as a file within the workspace directory.

Iterative , Modular, and full non destructive texturing In zbrush.


Core and Renderer module
Workspace manager :
Workspace Manager is a directory on your hard drive, that contains all the assets of your Zbrush project.

QuickSketch Master


Nicolas
Let's me introduce you a new tool , that's is currently under private Beta development
If you are interested I am looking for Beta testers.
The Toolset Description
ZGameTools is an extension plugin for Zbrush 4R7.The ZGametools is a Complete toolset, composed of Four plugins dedicated to illustration, Tileable Texture , Models baking and connectivity with external Editors (Images Editor and OBJ file Editor).


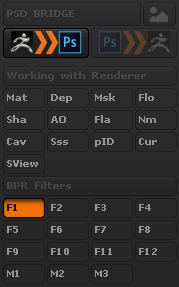
Renderer Module
Renderer Module, is dedicated to rendering/illustration work.
Rendering batch process
The Module propose a rendering batch process that can output different types of render passes using BPR.
The Rendering batch process runs a Bpr render of the subtools in accordance to their visibility options ( selected, visible,all)
During the Rendering Batch process each passes are saved on disk within the workspace, you’ve defined in workspace manager.
Output render passes :
Shaded, Depth, Mask, Ambient Occlusion, SSS,
Flat, Polygroups, Specular View, Normal map,
Cavity, Curvature, Shadows, Floor and
12 bpr filters.
Flat, Polygroups, Specular View, Normal map,
Cavity, Curvature, Shadows, Floor and
12 bpr filters.
Format output :
PSD, PNG, JPG, TIFF
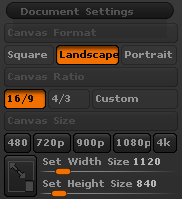
Canvas resolution manager ( 4:3 , 16:9, custom)
- Define the canvas format ( square, landscape or portrait )
- Then define the canvas Ratio ( 4:3, 16:9, custom)
- then let’s click on the desired height value, this will resize the canvas to match the format and ratio.
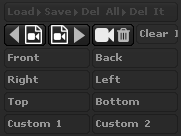
Camera Manager
Almost exact replica of the “Document : ZappLink Properties” panel.
Store your Camera view into the 8 available slots ( front, back, right, left, top, bottom , custom 1 custom 2).
You can save/reload all the views stored as a file within the workspace directory.
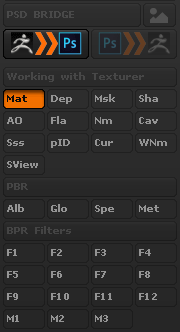
Texturer Module
Description
Texturer Module, is dedicated for Tileable Texture creation.
Iterative , Modular, and full non destructive texturing In zbrush.
 https://youtu.be/OsP0M6UGokg
- Generate Tileable alpha on fly based on masking.
- 8k support
- PBR Workflow ( no previewer)
- Rendering Batch process
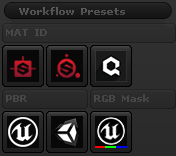
Workflow presets
Presets help to set render options to combine Zbrush and other tools like Allegoritmic or Quixel Softwares using matID workflow
or UE4 and unity using the basic PBR workflow the propose ZGametools.
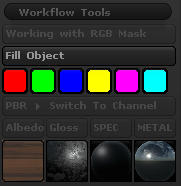
Workflow Tools
- RGBMask helpers to generate mask base on RGB channels like for UE4 layer materials
- PBR Switch Channel : Switch between Channel (albedo, gloss, spec, metal) when using preset of *Pbr Materials provides with ZGametools.
* PBR materials :
Library of Quad shaders that store Albedo, rough/gloss, Specular, metallic, RGB Values.
Texturing Tools
- Full 3d and none destructive workflow
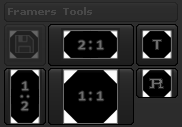
- Framers* available for resolution format : 1 by 1, 2 by 1 , 1 by 2
- Frame on tiling area for working with wrap mode
- Frame on Render area to render your texture that includes a small margin this way create perfect seams without to fix them in photoshop.
* A framer is a ZTool that is composed of key elements :
The “tile_area” and “render_area” subtools help to frame on the canvas
One Wrap plane mesh not subdivided as placeholder ( duplicate it to stack several wrap plane meshes)
One Wrap plane mesh ready for use ( but not subdivide )
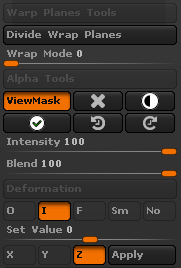
Wrap Mode Scupting
- Sculpting using Wrap Mode on plane mesh
- Alpha mask tools and deformation tools with offset, inflate, noise, smooth,flatten.
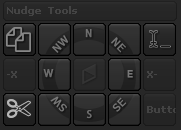
Insert Meshes
- A compass and some other function that help to duplicate and move the insert mesh on opposed side of the canvas, for perfect tiling.
- Other function help to split unmasked points,
- rename to current tools to prevent duplicated subtool name on a same Ztool.
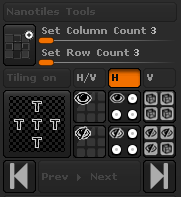
NanoTile Array
- Setup plane (row and columns), append the new mesh to the Framer of choice,
- Enable Nanomeshes tilling on Horizontal+Vertical, H only or V only.
- Fibermeshes (apply the array on H=V,H or V)
Rendering batch process
- BPR Rendering
- No 2.5D tool involved
The Module propose a rendering batch process that can output different types of render passes using BPR.
Render batch process apply in accordance to subtools visibility options ( selected, visible,all)
During the Rendering Batch process each passes are saved on disk within the workspace
you’ve defined in workspace manager.
Format output :
PSD, PNG, JPG, TIFF
Output texture maps :
Shaded, Depth, Mask, Ambient Occlusion, SSS
Flat, Polygroups, SpecularView*, normal map
World Normal map, Cavity, Curvature, Shadows
Albedo, Rough/gloss, Specular, Metallic,
12 bpr filters.
Flat, Polygroups, SpecularView*, normal map
World Normal map, Cavity, Curvature, Shadows
Albedo, Rough/gloss, Specular, Metallic,
12 bpr filters.
- fake specular onto diffuse map with none pbr texture workflow
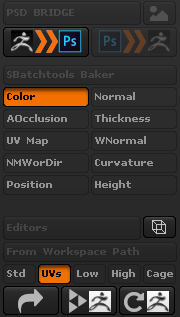
Baker Module
The Module is dedicated to model baking and suggest two workflow, baking using the Zbrush Algorithm or Using Substance Batchtools if you own a license of substance designer.
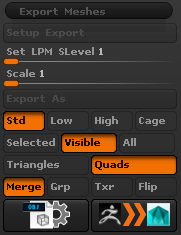
Export Meshes Batching
The toolset work with OBJ file only.
- Define the sub-directory within the workspace directory you want to export ( Standard, Low, High, Cage )
- Export in accordance to Selected, Visible or All Subtools from the Ztool.
- Common Settings to apply at export : Scaling, Tri/Quads, merge, group, flip…
- Utilize Core module to Open and Edit, the Current Subtool with the defined 3d Editor you had setup.
Send to Maya
Generate a melscript, in case you want to open all the Obj files exported within the workspace Directory.
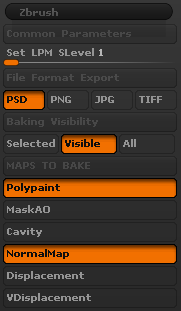
Baking With The Zbrush algorithm
- Baking based on selected, visible or all Subtools
- Export format file : PSD , PNG, JPG or TIFF
- Utilize the Core module to open rendered map in your Image Editor.
Output maps :
- Polypaint
- AO (maskAO)
- Cavity (cavity mask)
- Tangent Normal map
- Displacement
- Vdisplacement
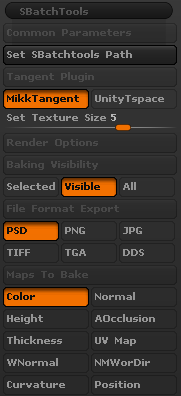
Baking with Substance Batchtools ( in progress)
- Set MikkTangent and UnityTSpace plugin
- Set Texture size
- Export format file : PSD , PNG, JPG or TIFF, TGA and DDS.
- Baking based on subtools visibility /selected /all
- Utilize the Core module to open rendered map in your Image Editor.
Output maps :
- Vertexcolor
- UV Map
- AO
- Tangent Normal map
- World Normal map
- Normal World Direction
- Height
- Thickness(sss)
- Position
- Curvature
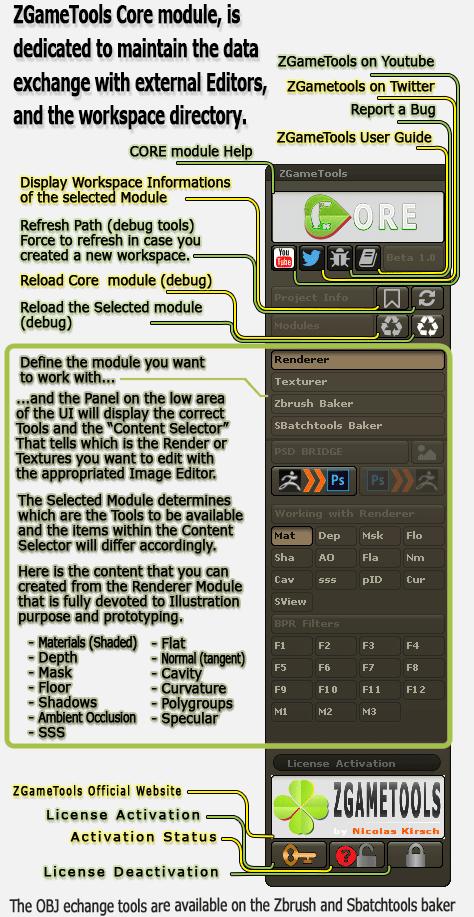
Core Modules
Description
Core module, is the module that resolve paths of all rendered passes, all baked Textures, and all Meshes exported from the Baker Module.
To start you must to select the module you want to working with. This include Renderer, Texturer or Baker + zbrush baking algorithm, or Baker + Substance Batchtools algorithm to bake the textures.
The image below shows the Panel UI when you work with the Renderer module..
Core and Model Exchange with obj Editor
Core and Renderer module
All Rendered passes types displays into a file selector, open the desire file with the Image Editor.
Core and Texturer module
Similar to Renderer , all Rendered passes types displays into a file selector, to open the desire rendered pass with an Image Editor.
Core and Baker with Zbrush Algorithm
All Baked Textures types displays into a file selector, then open for edit with the Image Editor, the pass that match with the active subtool.
If you have batch exported your subtools, then you can edit the Obj file with the user defined Software, in accordance to the Sub directory within the workspace that is active.
Note : The File that will open into the application is the Active subtools ( alt click to select the proper subtool to edit is the rule).
Core and Baker with Substance BatchTools algorithm
Similar to Zbrush baker.
You can edit the baked textures type of your choice that correspond to the current subtool.
You can open for edit obj files, if your have already batch exported yoru subtools from the baker module.
Reimport Model in Zbrush
Re-import the current Subtool in Zbrush, in accordance to the subdirectory within the workspace directory.
You can Reimport from UVs Directory, if you create that Directory , it
should reimport the subtools, and let you choose if you want to re-project the details onto the new mesh.
Common Features
Note : Common Features are includes with Renderer, Texturer and Baker modules
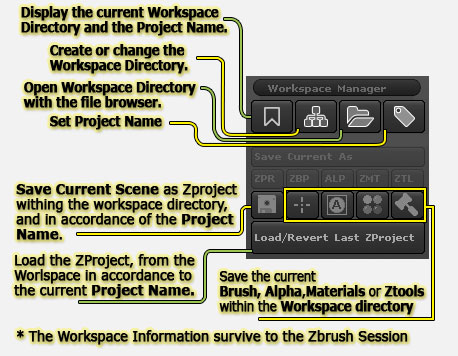
Workspace manager :
Workspace Manager is a directory on your hard drive, that contains all the assets of your Zbrush project.
It’s a pre-defined organization to improve your workflow and you don’t have to worry about where you should save your assets, it will guide you.
The workspace manager reinforces the Zbrush project It’s a safe place to recover after a possible ZProject file that could be corrupted and could refuse to load in Zbrush.
One click to save the current assets : Ztool, alpha, materials, or Brushes
Startup Zbrush, and reload the last Zproject in one click.
Change the Project name to save the zproject with different Name and backup past iterations of your work.
All the settings and panels Ui state are restored after a possible application crash of Zbrush.
The Workspace is the central place, to bridge and connect with external editors and edit the files you generated with Zbrush, into the Image editor or your favorite 3D editors.
The workspace directory is easy to backup and to commit on any versioning software like Perforce.
The workspace is portable and can be shared to make collaborative work.
Create Workspace

Preferences manager:
Plugin preferences can be store as file on disk within the workspace manager,
but you can also use the Slot System for quick store and restore of your settings.

Ztemplates :
The Ztemplates are blank ZProject files that are stored into
ZGametool plugindata, then you can call back later for next use with a
different project. You can Store 4 Ztemplates ( one per slot).
Particularly useful to store canvas size, ztool to load at start up, materials, etc.
Texturer is default provides some presets of Ztemplates, but you can store your own ZTemplates.
An example of what you can do :
Load from slot 1 : ( in order: canvas ratio, canvas size, type of framers for tileable texture)
1:1, 1024*1024, 1 by 1 framer ediable
load from slot 2 :
2:1, 2048*1024, 2 by 1 framer editable
load from slot 3:
2:1, 4096*2048, 1 by 2 framer editable
1:1, 1024*1024, 1 by 1 framer ediable
load from slot 2 :
2:1, 2048*1024, 2 by 1 framer editable
load from slot 3:
2:1, 4096*2048, 1 by 2 framer editable
Note: ZTemplates are only available with Renderer and Texturer Modules.
QuickSketch Master
BPR to QSM :
Render the canvas using BPR , then create a
Plane mesh on the one the BPR pass is applied as polypaint
data.
PenA Brush is preferred to pen shadows, and symmetry is turned off on all axis.
PenA Brush is preferred to pen shadows, and symmetry is turned off on all axis.
Texture to QSM :
Create a Plane mesh with the same resolution ratio
than the texture image that is currently selected from the picker. And
apply the texture as paintable polypaint data. PenA Brush is preferred
to pen shadows, and symmetry is turned off on all axis.

Send to photoshop and reload in Zbrush

QuickSketch Classic :
Same as the original Quicksketch feature of Pixologic, but this time,
PenA Brush is preferred to Pen shadows, The Symmetry is turned off on
all axis.
Misc features:
- The Ui state is properly save on disk to prevent when you switch to a different plugin to reset of the Switches that compose the module you are working with.
- At next startup all modules remember the workspace that were set at last Zbrush session.
- Fully compatible with Custom layouts and custom interface colors.
Nicolas
edited : 9/7/2016
Replies
So much progress since the last post here, It's finally time for an some kind of announcement, but just a little one.
The phase for the Beta tests of the ZGametools has started, unfortunately i can't to manage a public Beta program, I'd liked to make different mean a public beta, but i am just alone and i don't think i can manage that
I 'm looking for some pure Zbrushers !
ZGametools is somehow reductive because the toolset apply for all kind of work.
Illustrators, Texturer, Modeler, Game artists and who like to achieve most of his work directly within Zbrush.
My documentation is not complete but I can to start to share a little with you here
Let's say someone has 5 minutes for some beta testing at the end of a busy day. You have to be able to tell that tester which tool/button would be worth testing, and for what purpose ...
I'm sorry it was hard for me to juggle with the documentation during the development, i wanted to be focus only on the toolset and R&D and don't break the love i pushed into that project.
I trust you guys, don't know what happened when i thought i could simply post like that without to edit the top topic.
unfortunately i will not update the top post right now, I' am done for the day it's 8:30am here in france need some rest!
but but it was cause i worked on what you had requested all the day and night ^^
Have a good reading guys.
https://puppet-master.net/plugins/zgametools/
I come back few hour lately to update the top topic and to give you some more information on the process to join the beta.
Nicolas
It not visible like that, but i also took a lot of time for the R&D, i wanted to propose the best solution as possible at all levels.
Just hope people will like the toolset.
So what guys ? sorry i stil had no time to fix the first post, tell me what you think, id like to know more about what you think of such of tool.
Finally the main concept behind it is to save a lot of time when using Zbrush.
So , is there any Moderator to move that topic from technical Talk to General Discussion
For instance the first feature you list (after a whole page of technical details that would belong to your help file but not to a presentation post) is :
"BPR to QSM :
Render the canvas then create a quicksketch mesh onto the one the BPR renders is applied as polypaint data, and setup the brush for immediat drawing/painting."
Despite about a decade of Zbrush experience I have no idea what this means and more importantly, how this would be useful. Maybe this is an awesome feature but there is no way to know since you are not taking the time to make a simple picture or GIF showing how useful it is (and this picture should NOT just be about which button to press but rather should show the process and result). What about making a 5 seconds GIF showing what it does.
For example if i just mention 1:1, 2:1 and 1:2 for the texture format and the framers,
or i am cryptic because i don't explain more about what is this mean exactly, or it becomes lengthy because i explain what is a framer for those
who could not know what is it.
About Quicksketch master, to be honest QSM is a exotic features.
In order BPR to QSM :
then it generates a plane that got the aspect proportion of the canvas.
It loads the Shaded render pass on the uv, and then convert it to polypaint data.
The Pen A brush is selected, and the symmetry is turned off.
It's some kind of snapshot of what is on the canvas, you can paint or do what ever you want with it, or even ignore that feature.
But i might be nice to use a grease pencil tool to think about the texture you want to create, and change your mind at any moment lately
The plane is aligned with the framers. Can be really useful for conception, you can deform the plane , and make a new snapshot, so it removes the
distortion.
I will found a way to illustrate visually what Quicksketch Master does, but as an extra tool, i must to stay focus on the main role of each modules of the toolset.
I try to save me that at the moment , i don't want to hurry too much and to have to remake several times
the documentation, illustration etc..
so Pior, you mean you feel deceived so you jumped off your reading because of this common feature ?
or did you had a look at the toolset in general ? Excepted Quicksketch master, did it helped to understand globally what the tools does ?
Like QSM appears on the image above, it makes sense to let it into the description. Well, sure it's a point that must be improved, just an early stage.
- First, I scrolled through everything to see if anything caught my eyes, but only saw lengthy text.
- Then, I scrolled back up to try to find the first feature (which was actually not listed first, but only explained after an irrelevant introduction about the settings system).
- I finally found the first feature (the quick sketch thing), but failed to see how it could be useful to my workflow.
By that time I had no time left for internet browsing and had to go back to work.
Now compare your presentation to this :
https://blenderartists.org/forum/showthread.php?405035-Addon-SpeedSculpt&p=3088129&viewfull=1#post3088129
I hope this makes sense.
Oh thank you Pior, I really appreciate really you describe me the experience you had when reading my description of the toolset.
I think I understand properly now, what is good what is not good with my approach.
I just want to say that on future website, the presentation might be very different , here i can only list the features.
So finally the bad choice i did, is to keep the common feature on top of the modules, that surely are momre exciting to read and discover.
The Workspace Manager is more than a simple features, it makes all the functioning of the toolset, it organizes and guide you in
the creation process. By this way it help to organize the travel with other application.
I wanted to stop to think where are the last low polygonal model i fixed in maya or the last retopo mesh that should be at a different location
on my hard drive, i organize my work by application.
so when i finish in Zbrush, or you save the last files in Zbrush or sometime you save to the directory dedicated to the application destination
like maya.
But when you get back , i ask where are the latest files, so i d like to have everything that can stand into that workspace directory just methodically organize that process.
There is dozen of other functionnalties i could add on the toolset, the updated will also be reach of new tools :
Connectivity with Substance painter :
It's possible to run SP2 with a command line, or it create a new project (spp file) and load the low poly model with th path i define
or i can even update the existent SPainter project.
Lately i will also make the script that load the maps you can bake from Zbrush but using Substance batchtools, if you own it.
I'd like to make something to help with perforce and also workspace backups.
Connectivity with other model/animation software :
The current Send to maya, generate a Mel Script, but lately i will make more app support, like python script to run Blender and load
all the obj from a directory or just the selected one in Zbrush.
It will create python file and i could also make some variants to work with 3dsmax, modo, cinema4d.
Connectivity with UE4 :
I'd like to create a plugin that will use the directories structure of the workspace to bridge Zbrush and UE4.
for example:
The Module dedicated to Tileable Texturing is perfect candidate to preview for that,
You set the workspace directory path in UE4 plugin, then select the project name, and it import all assets ( textures )
then maybe i can collect more information from Zbrush, like a Shader in UE4 you want to apply.
It would create an instance of the master shader in UE4 and setup everything for you.
But this could apply to models too, I am not yet at this point of the development
Next time Pior, just jump below Quicksketch Master and check all about the modules that the most important.
French tech huhu ;p
Sympa le tool de ptitwazou.
It's not complete yet, but hope it removes all doubts about what to toolset is exactly.
cannot apply to people who discover the toolset.
The problem is that here, the information is linear, and that would probably be more adapted if there were only one module that is treated at once.
Possibly it also apply to all the icons that I had to create, some icons might not really give the best feedback of their respective actions.
( but i got more then 100 icons, and the twice if i count the one i had already recreated ^^)
I just suppose more the tool will get maturity more the UX/UI will match and make sense with their respective actions.I also must to deal with priority.
But from what Zbrush UI let me do at UI level,sure the UI can be improved, but on the other hand, the UX is wonderful.
About Ui customization in Zbrush it's really really limited you know, i did my best, i wanted to have the smart function, so the UX is really good.
It was important for me to propose the best methods and the simpler ones. Either It doesn't means the ui will not evolve along the future development, but for the UX, there is not much more to do but only some small edit. like for example the camera manager of the Renderer module, should have his own subpalette.
@radiancef0rge If you like to join the private beta, shot me with a Private Message, there is a google form to fill with useful information just for development purpose.After that, I sent you a link so you can redeem your copy and your license key from Gumroad and activate the toolset in Zbrush. And If you have some colleagues that might be interested too tell me
Now If some more people are also interested, the places are limited, so post me a private message with your portfolio link and the module your are interested
to test out, or even to test every module eheh. But I will sort out people request based on their work, just to increase the chance to receive concrete feedbacks of that beta program.
Nicolas
so when you export back and open it with 3Dsmax for example, the scale will match seamlessly.
Everything will be managed at the import process, that will store the scale and offset values, and restore them when you export again from Zbrush.
It means you can use the unify button, dynamesh do what you need, and then come back to the original Scale of the model only when you export.
I plan to code some functions to output python script to paste directly in 3ds, maya, c4d, modo etc...
I took all the time to develop directly with Zbrush, so I didn't get any issues but for those who like to make the blockout and the scaling before to send the meshes to Zbrush, that will be totally transparent.
Just a detail that is terrible with zbrush scripting, all scripting reference suggest to use [Mesh3dGet,,,2,bounds]
to access the XYZ bounds values, but it 's impossible to bring it to works.
Finally i found a topic on ZBcentral posted in 2008, and this function has not been implemented.
Sad because the only way within Zbrush to reverse the equation of the scaling system, require to get the biggest value from the boundary box. the second way, is to build a program that read into the obj file and determine the boundary box.
Mine, is just grabbing the scale multiplier + offset on XYZ, that Zbrush establishes during the import process.
Store it, and restore it if you don't want to use the global Scale value of the batch export process.
I have no idea how Styx plugin handles the scale to resolve a value that it can't to recover, but I can do without ;p
Zbrush canvas export with a black line all around the texture that screw up the tilling. and they use a 2.5D workflow.
my best selling point ( for the Texturer module) is that all is full 3D workflow
with a 100% none destructive workflow, (in comparison to the 2.5d)
for example, like if you proceed by using the layer sculpt , you can edit the opacity of the layer.
another best selling point :
And At some point the workflow suggests you to reuse what has been done already to make modular texturing, using the subtool stack.
now let me show you this :
here the framer (render_area) create a margin,and the cropping is done in Photoshop by the user, so it preserves the tiling. Zbrush create a Black line all around that screw up the tilling, so i come with a technique that preserve the tiling.
The tweak happens when you setup the canvas Size, the ui tell you it 1024 or 2048
but in fact 1024 is 1036, ( there is 6 pixels on all side that is used as a margin )
In photoshop you simple do Edit > canvas size, and you change the values, from 1036*1036 to 1024*1024.
another best selling point !
you can create continued texture, ( not sure of the name), SD can't to achieve such of possibility.
Train rails, roads, walls, it has a lot of more possibilities using that workflow, and nothing stop you from exporting to SD,quixel to combine with another workflow.
another best selling point !
You can use nanomeshes to add detail from another axis and make it tile too.
Here i added some grass using fiber meshes and the proper array :
so to resume, the tools do everything but not the cropping ;p
i planed to make a UE4 plugin, and UE4 editor got a function for crop and rescale, so that could be fixed easily. It could be done also using SBSRender.exe, so i can make a Sbs file that make the crop and output all maps.
What i don't want to provide with the Toolset, are script you install into your modeling/animation software
i will not create a script for each application, but i want to possibility to output the script directly from Zbrush.
The workspace directory, is a central point from the one , everything is possible.
And we are just talking about the Texturer..
I understand you could have already setup your own framer, and that you know how to setup everything by yourself to acheive such of work.
But it takes long time to organized the scene, the tools and everything to keep focused on the texturing work (creative aspect), or you do prefer to hit the pass one by one and lloking for the place you want to export them on the disk, etc.. really if you like to waste a lot of time doing this.
(for information this texture took me around 40 minutes of experimenting). There is no boring task like traveling from tools, to the texturer module etc..
oh and sometime you like to found the resource you use onto a different project, as many of you dislike to save the ZPR file, the workspace manager is an alternative to never lost any resource.
and for those who never used Zbrush to make tileable texturing, this guide them a lot and simply the workflow.
Currently if you like to make a texture of 8192*8192 you must to use the current framers, which defines the margin like this :
259 (3px) > 518(6) > 1036(12) > 2072(24) > 4144(48) > 8192(96)*
For 8k it makes you crop in PS to 8096*8096 and rescale the texture to 8192*8192, i have no other solution at the moment , but i can to create a framer and use it only if the width of height are set to 8192 and reduce the margin directly.
Note also that 128 pixels are not supported too, because 3px can't to be divided by 2 ^^
just made that short video to show you :
About Me :
I have 17 years of experience in game development, as modeler/ texturer, then as ai programmer
and now as pipeline tool creator.
My project has been featured by IGN :
The team i directed and myself, we had been interviewed by ign
http://www.ign.com/articles/2013/01/11/inside-the-jurassic-life-project
we had been watched like a million times on youtube
here the trailer of my project :
another interview of me for GAMES TM (issue 132) with other passionate as Gary Newman ( garry's mod + rust), or David Wreden maker of "The Stanley Parable"
To speedup the process of asset creation with the source engine i had revamped completely the script made by valve for maya 2004, Its name is MESA (Maya Exporter for Source Assets), and i had the exact same concept as base of functioning for the toolset.
it has not really being understood by those who wanted to use it with the workshop, but i know from the inside that valve used my Toolset for maya for Dota, okay it was three year ago ^^
but the tool has been download more than 10 k and is still downloaded several tme by day from my gumroad shop( its free).
So you think i gave 10 month of my life to develop this Zbrush toolset, if what i am proposing is pure bullshit ?
You don' t let me other choice then argument comparatively, so
Let me show you what kind of the solution are currently proposed using Zbrush for Tileable Textures creation
Youtube tutorials will help to list and highlight all the limitations and constraints.
Eat3d : Creating Tileable Textures in ZBrush (2.5d full destructive workflow)
Description :
you see all rendered passes that all had to be fixed using spot healing brush, because of the use of Grabdoc
NickZukk : tile tutorial using Wrap mode :
description :
what you see is again the result of using Grab doc it give that black border all around the document
technically wrong, 1024*4 pixels become full black !
again Spot healing brush + content aware is applied to fix the tiling.
3d tutorials AM : how to create Tileable brick floor in pixologic zbrush
description :
all subtools positionning is done using deformation from tool panel :
this is exaclty what the compass( nudge tools ) does in Zgametool texturer
then he use Zapplink to send the canvas to Photoshop...
tindin, the tiling is also broken when you have the use of Zapplink !
Tilling fix consists to use healing brush with aware content again
3D Tutorial AM : How to create seamless textures in Pixologic ZBrush + Adobe Photoshop
Description :
Agin it's Zapplink, and again the seams are wrong when he apply the offset
the solution : spot healing tool + content aware
Bradford Smith : Zbrush tileable texture serie :
description :
again Zappplink is use so the result is technically wrong :
even the method that consist to drop the mesh into a layer, and apply an -64 on displace V to fix the shadows,
doesn't stop Bradford that involves the spot healing brush.
Astroukoff : Rock Workflow - Tileable texture
Description :
Here, he utilize the grab doc, and don't use bpr rendering at all
then when he export to PS the seams are broken too
Campi3d : Tiling Textures with Array and Nanomesh
Same with grab doc the seams get screwed
again some bull shit tools are involved to fixed the seams issue..
Tate Mosesian : from Zclassroom tile-able Environment Serie
Description :
Tate utilize an image on a plane as grid to make to positioning of the insert mesh brushes,.
This method take long time to execute nanotiling in Zgametools make this process very quickly.
Zapplink again and Fill with content aware to fix the seams
Anthony Vitale Zbrush Tiling Texture Overlap Sculpt Workflow
Description:
Wrap mode tilling is perfect, hmm that wrong, zappllink, grabdoc,mrgbZgraber or bpr rendering, will also give the same result
a 1px black border or the shadow that can't to be compute on border, (in fact it not only shadows, but all map you save and export using one of the list methods)
finally it's Zapplink :
Anthony Vitale, explain how to create a framer to use with wrap mode:
this is exactly what i did to all my Framers ( 1:1, 2:1 & 1:2)
but there is another anotehr that handle a margin.
All you can see from piggyson joseph drust(piggyson) video with the nanotile plugin,
Its a cool plugin, but not complete as Zgametools Texturer is.
It doesn't support texture ratio for 1:2 and 2:1
the tiling only apply on both horizontal+vertical
Zgametools texturer, proposes you to use nanotile and let you setup the array so it repeats on both H+V ,or horizontal only, or vertical only.
I really thank all these guys for giving me the path to follow to make a tool that technically make the tiling to be perfect.
I never had the use the Spot Healing Brush and content aware in photoshop to fix the seams generated using ZGametool texturer.
The process of exporte passes are all automated, i planned at some point to let you define the material you had like to use for the batch rendering process.
the matcap material, for Tangent normal map computing is an improved version of the matcap that pixologic provides.
https://puppet-master.net/plugins/reds-normalrgbmat-for-zbrush/
same to compute world normal map :
https://puppet-master.net/plugins/reds-world-normal-map-for-zbrush/
Another point: is it me only or i never found any video that show how to work with 2:1 or 1:2 canvas resolution ?
ZGametools texturer can handles all this :
1:1, 2:1 and 1:2 ( 512*512, or 2048*1024 or 4096*8192 for exmaple)
It works with Wrap mode for brush to sculpt.
and it also work when you apply and arraymesh, on the axis of your choice horizontal +vertical or horizontal only, or vertical only this apply too when using with wrap mode.
I started to post here to collect user wish list, but only one guy asked me if texture ratio will being support
i responded not at the moment but i planed to do it, and i came back with some tools that matched the user request.
i ask for beta testers, and none are interested, i see polycount home page with art post that are even not yet complete posted like it was finished work, when it's not.
so really i ask me what i am doing here, you are requesting for more information, i did my best to realize you wishes again and it 'slike i must to convince people who don't read the feature list entirely,
or people who are too lazy to watch more than 13 seconds of video. (mean they dont watch when the Zbrush ui is displayed in to my video oO)
For lazy people who don't take much that few second on a video, if you are really lazy, my F****** Zbrush Toolset is for you !
PS : the renderer module used properly is a serious keyshot alternative !
Quicksketch, GOz(partially), Zapplink, multimap exporter, nanotile texture, matcap baker, positionner, ZStartup manager, Subtool Master (partially), then next it will store Scaling at import like Styx.
Hey,
please consider that not everyone is a ZBrush expert.
It took me two hours to read and partly understand this and to watch some of your videos. I think I understand the benefits of your Toolset regarding tileable textures and nanomesh now.
Since you are looking for beta testers now, it would be a good idea to make a clean fresh post for each module. Each module should be explained in no more than 60 seconds video trailer. You should plan, script and edit these videos carefully.
chronology of explanation:
1.) use first 20 seconds to show how tileable textures are sculpted without your toolset and highlight the obvious issues.
2.) use next 10 seconds to show your final result using your toolset (perfect tileable game texture). Dont go into any detail or UI at this point. Only show final output and state how the obvious issues are gone!
3.) use last 30 seconds to explain how you used the toolset to achieve this result. This is not an in depth tutorial! Keep in mind that its just a teaser!!
People will see the benefit! People will start asking questions about it. People will eventually start using it.
"PS : the renderer module used properly is a serious keyshot alternative !"
Demonstrate it with some renderings!!
That said, I last used ZB about 4 months ago to make a tiling texture, and your tool would have saved me some big headaches. So even if I don't need your tools now, it's good to know they're out there for the future.
Anguished, all my energy moves away at the minutes i come in here.
Encouragement are very rare, and a thank you a lot for that, but it comes to late. This is going to kill me.
@throttlekitty , yes that not the best place, it at first it was for development purpose i posted in technical, i asked for any mod to moves the post from here to general, but no one read my messages.
@defragger you absolutely right , not everyone here is a Zbrush Expert, I could have taken this axis to describes the toolset.
But actually the plugin is just a beta for now, not anymore, and it means the documentation is also in beta.
I am not doing some kind of promotion of the toolset at the moment, i am looking for making one of the best plugin for zbrush, and fill all the shit that poisoning the workflow of every users. I try to extend the potential when you do all the work within Zbrush instead of starting you mesh in maya,or any other 3d editors.
I want to make Zbrush easier for new incomers, because of all the workflow i had created around the workspace manager, it completely change your life.
Those who dislike to save as Zproject file, can use the workspace, to store everything and it easy to only save with ZTools, and restore everything that usually is stored withing the ZPR file.
To complete the tools i need to address to Zbrush Experts particularly, but they don't seems to want to help.
So i should simply Stop my beta program, people i d recruited are maybe too popular and had no time to take a look, they all received a special link on gumroad to redeem for a license key, but almost none has at least clicked on the link to grab the toolset.
So what Zbrush experts can't to read between the line, here is a description of the features, not the complete documentation.
now i am just so much disappointed, not sure what to do...
I dont consider my workflow poisoned with shit like you say. I also never felt the need to do all the work within Zbrush. Whats the point of a swiss army knife tool that can do everything but nothing really well? I would rather use a set of specific tools.
Lastly : editing oneself and doing good presentations IS hard, and a skill in itself. You'll get there eventually - as mentioned above by defrager it's just a matter of preparing a script beforehand rather than winging it. There are probably a ton of books available on the subject.
i did a long video to explain what had been done with the new build, i don't think it would interest any of you
but just in case : click here to read the changelog and view the video.
I had posted that video that show: how the Baker Module resolves scaling and positioning issue when you export your model back to the application you used to create the model. In that tutorial i used 3Ds Max, but it will work with any other applications (maya, blender, etc..)
I am not using Core intentionally to reimport into the existent scene and compare.
i d like to know what @musashidan will think about that method, i know he like to reimport on the fly, but it not really the purpose of this tutorial
Give it a try it's an amazing feature.
Workspace manager :
Workspace Manager is a directory on your hard drive, that contains all the assets of your Zbrush project.It’s a pre-defined organization to improve your workflow and you don’t have to worry about where you should save your assets, it will guide you.
The workspace manager reinforces the Zbrush project It’s a safe place to recover after a possible ZProject file that could be corrupted and could refuse to load in Zbrush.
One click to save the current assets : Ztool, alpha, materials, or Brushes
Startup Zbrush, and reload the last Zproject in one click.
Change the Project name to save the zproject with different Name and backup past iterations of your work.
All the settings and panels Ui state are restored after a possible application crash of Zbrush.
The Workspace is the central place, to bridge and connect with external editors and edit the files you generated with Zbrush, into the Image editor or your favorite 3D editors.
The workspace directory is easy to backup and to commit on any versioning software like Perforce.
The workspace is portable and can be shared to make collaborative work.
make iterative Zbrush Sculpting for your tileable textures
Re-apply all you masks to a new clean Framer tools to reproduce the same Effect with no lost.
Hey, I hope you will like that feature !
Eric delete my shit if you think it's pill of shit...
first i like to thank you personally Pior, because you had supported and helped me form the beginning, giving
the best and appropriated answer and feedback. I 'd just wanted you to know this.
Your last feedback is full of good senses, i understand that, just that it was easier for me the clusterize.
so it's was my intention to stay vague and just show up that little part of the workflow when working on tileable textures.
What this feature is resolving, hmm it's quiet a hard question to answer.
What this feature is bringing in zbrush workflow, should be the true question
Sculpting ans texturing, only via mask.
all steps can be repeated or reverted ( if you remember what deformation and value you had applied it ).
make me think i can do a lot vof texturing via scripting. ( Macronize ) it something possible.
with a library of alpha, i should create macros/scripts with interface you shchoose the value for this effect, or that another effect.
it can be iterative, and editable after withing zbrush. maybe some kind of Sbsar file, that give you a final texture in zbrush, you can tweak the value like you want.
The subtool stack is really nice to exploit for modular texturing.
You can change the canvas size when you want to bake various resolution without losing any details of your work) .
you could create your own alpha library and automate a lots.
You don't need to use an external 3d editor to create all kind of textures (scifi, door, windows, plancks, bricks based)
I can texture using maskrectangle, maskLasso mask curve etc,or whatever i want that do not support wrap mode , with the symmetry it resolve and help a lot to make complexe textures. without using insertmesh, or tileable nanomesh features.
Did you read journey to the center of the earth from Jules Verne? it's like i discovered an inner world within Zbrush that none of you as ever explored
it' insane all the possibilities that offer to me for next future of the toolset.
for the moment i explore and discovers many kind of workflow, its all free, the plugin is so stable, i can to work in Zbrush for 3 days without any crash or anything, with a massive and usage of zbrush.
I should focused only on that Texturer module, because it the most mature module i had produced.
baker and renderer module are great too and have new range of workflow possible , thank to the workspace manager that make a real strong difference when working with Zbrush.
Some Features :
Bake incredible normal maps and target the engine of your choice compatible with GGX and metalness workflow.
*** Optimize GGX reflections for Marmot toolbag, or Unreal Engine 4 using engine target presets, and some more support to come for ( maya/stingray, unity, cryengine)
**** Baking time are faster that substance painter baker or any other solution on the market ! *
***** BPR rendering AA is taking no time ! better quality that what Substance Painter 2.4.1 gave me after 1 minutes of baking with no AA !
* Bridge Zbrush to Photoshop, Marmot Toolbag, and Unreal engine 4 with no effort.
Use Toolbag or Unreal Engine 4 as previewer during your sculpting session in zbrush.
Switch to normal map shader then, sculpt directly the normal map in zbrush canvas.
More Details on my blog post here :
I have updated my previous message and described some features and my new progress on the tool.
You can even read all detail on my blog here:
https://puppet-master.net/zgametools-texturer-sharing-my-progress-and-my-workflow/
Cheers
Nicolas
i had hard time to create the best matcap ever to bake normal map in Zbrush.
the normal maps shown into the last video i posted here, was technically entirely wrong, which is not the case right now
The most important for any normal map that i create from Zbrush, is to make sure the normal map will 100% compatible with any game engine.
It means that when you import your texture into Unreal engine or Cryengine, the texture will be renormalized and the blue channel will be completely recomputed from the Red and Green channel.
Another important point when baking normal maps, you want it to look similar when you import them into marmot toolbag, or UE4, or unity etc..
Senior artists would tell you to never bake a normal map without to export it to a 16bits format. To preserve from Banding that apply on materials reflections.
ZGametools normal map are generated from RGB32bit data, but are exported into RGB8bits, with no effort.
ZGametools normal maps are 100 compatible with Unreal Engine 4.14, Cryengine 5.0, Unity, Substance Painter/Designer
substance painter normal map spec :
- texture resolution :2048* 2048
- baked RGB16bits and supersampling 4x4
- exported to PSD format in RGB 8bits
- rendering time : 1 minute 36 secs
Zgametools normal map specs :Comparison of two normal maps, first is baked using Substance Painter, and the second is baked using ZGametools and imported into SP 2.4.1
Comparison in marmot Toolbag 2.0.8 of the normal map baked with SP and the one baked with ZGametools.
comparison of the reflections in marmot toolbag 2.0.8
here is the close of the texture when i apply rgb levels in photoshop to reveal the source of the banding on reflections.
Comparison in Unreal engine 4 ( not entirely 1:1)
hope you like
Smart and limitless features, you control the entire build process in Photoshop and automate all the tasks you want.
You can create your own library of functions so easily and its portable for easy reuse.
Here is a video i made few days ago to show how to use the AppendSDk function and hook the Main script process to extend, customize and automate the loading process in photoshop.
I hope you like
I stumble across this thread when I was looking for any potential solution to automate high+low poly location explosion for baking purpose.
While it took me awhile to digest what this tool is about, I soon realize I might step on a gold mine that may potentially improve my workflow in a lot of ways.
Please do not feel discourage because of lack of exposure and response from the forum. A lot of people like myself usually just come here to find a small handy script or solution to just solve 1 particular problem we encounter during work that needed to be fixed within 15 to 30 mins.
Just letting you know there's a fellow zbrush user here who, at first, just wanting to have something to read through during dinner, but ended up extremely intrigued by you tool, and finish the whole post without touching the food ( which actually tooke me slightly more than an hour) . Your hard work and passion put into this tool will not go unrecognized!
a small piece of advice for presenting your thread, like I said, a lot of us came here just looking for solution to solve 1 particular problem in a quick go. But since you are developing this mega huge plugin that comes with so many features, maybe drop a few tag lines in the very beginning of the thread for people who are just looking for keywords before they jump to another thread. for example:
This is a multi plugin toolbag that aims to improve your relationship with zbrush in the long run!
Featuring:
- Effortless Tiling Textures creation, NO MORE healing brush and edge bleed!
- ONE CLICK! Painless cross texturing/modeling platform workflow improvement!
- Better and Faster map baker in ZBRUSH! (noticeably better than substance result!)
- etc, etc,
a few of tag lines like this in the very beginning, that associate with key words and problem your plugin can solve, will keep alot of forum reader to actually wanting to spend a bit more time digging into the details of your tool. Besides that, it also helps this thread to pop up in google search engine result too.
I hope the development and documentation update is going well, looking forward for this tool to hit open beta!
I really appreciate you took the time to read all the mess I had posted here, it's huge as it has been posted time after time during the development.
yes I feel disheartened because
first, this forum isn't the best place to share with the community, and in second hand, I feel a bit like the community want from me to be a better for the marketing than at programing and developing the toolsets and workflows.
Also look at the two last video for the last big features I added in both toolsets ( photoshop export and the extendable script feature), none as ever replied, and still I have no clue about the way the feature had been perceived by the viewers.
I am sorry it not that clear that I am developing 3 distinct toolsets, and both are specifically dedicated for certain artists, like the Renderer Toolset is for illustration purpose, etc...
The very first topic is completely outdated, and a pain in the neck to edit.
I'd liked to be good at finding the best naming to describe and resume shortly a features, but the langague barrier block me a little.
About the development, I slowly improved my workflow to produce educational or demo video.
I am new in video editing and is also another pain in the neck for me. (I use OBs, ffmpeg and Shotcut , i can't to afford for camtasia)
Two weeks that i work on the Quickstart video for the Renderer Toolset.
I can share the link but its still private, because I need to create some attractive web page on my website to describe this toolset. ( check the next reply )
I made a couple of dozen of presentation files with photoshop but nothing really complete,
It take time in photoshop to prepare the official documentation and the content for the website.
I hope it will not take 6 months more because the toolsets are all done excepted the Baker toolset that still need to complete baking using substance batchtools.
Because I also have to create all arts by myself (final illustrations, final textures rendered ingame, complete scene with variety of texture created with the toolset.
There will not have any open beta, each toolset will be published on gumroad separately and there will have a full toolset pack at a lower price.
The first toolset I will published is the Renderer, and when it's done, it will be easier for me to redo the same for Texturer and then the Baker for the website and the documentation and educational tutorials.