Learning to bake
Hi guys, I have a request, I've been reading about baking and how it all
works and what are do's and don'ts and for practice, I've decided to
make a quick little asset I wanted to bake onto a low poly object. I
plan on making a ton more assets as a practice in the next few months as
soon as possible. The only time I managed to succeed is when I build a
really really low poly object that was only just covering the hipoly
but it looked so cubic and ugly I decided to make the lowpoly a bit more
detailed, rounded with rounded edges similar to hipoly. I've basically
wasted my entire weekend with a large headache. I've been always scared
of baking (except for the planar baking) because I always have trouble
with it. So if anyone would be so kind as to quickly make a low poly
version of my object and generate a normal map and explain it to me what
I need to look out for I would be mighty gratefu! I am doing this to
get a better grasp on how things works with baking if I could just nail
down baking I could start making my own stuff. I'll also provide my own
low poly object. The main trouble is these strong colors in my normals,
purple colors and also missing on the sides details, when I modify the
mesh to cover the side details better I then get a whole lot of other
baking issues.
Here are the files, I will also provide my own low poly, the hipoly is unsubdivided so that's all you need to do.
Low poly with UV's, the way I 've decided to bake it right now is with the sides detached, so all you have to do is
detach the sides, offset them a little, clone and repeat for cage and it's ready to be bake.
https://drive.google.com/file/d/0B5LkU6iWBX0XNEtnRkE3cE1rSGM/view?usp=sharing
Hipoly
https://drive.google.com/file/d/0B5LkU6iWBX0XZU44YTBiclYyZzA/view?usp=sharing
EDIT:
Okay so to make things easier for you guys since making a low poly can be time consuming at times, I've constructed a quick low poly from the hipoly. I am not baking the entire mesh, just the main part of it. This is my area of problem if I can figure out how to bake it, I shouldn't have trouble baking other parts as well.
Here is the low poly mesh, there is some minor smoothing issue on the low poly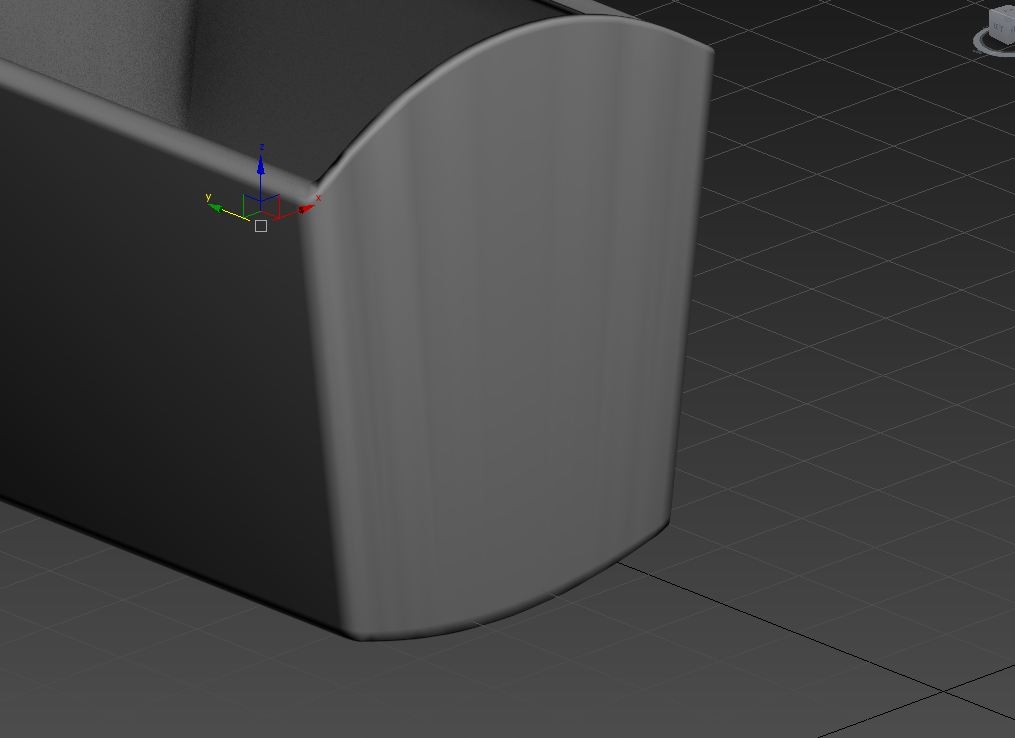
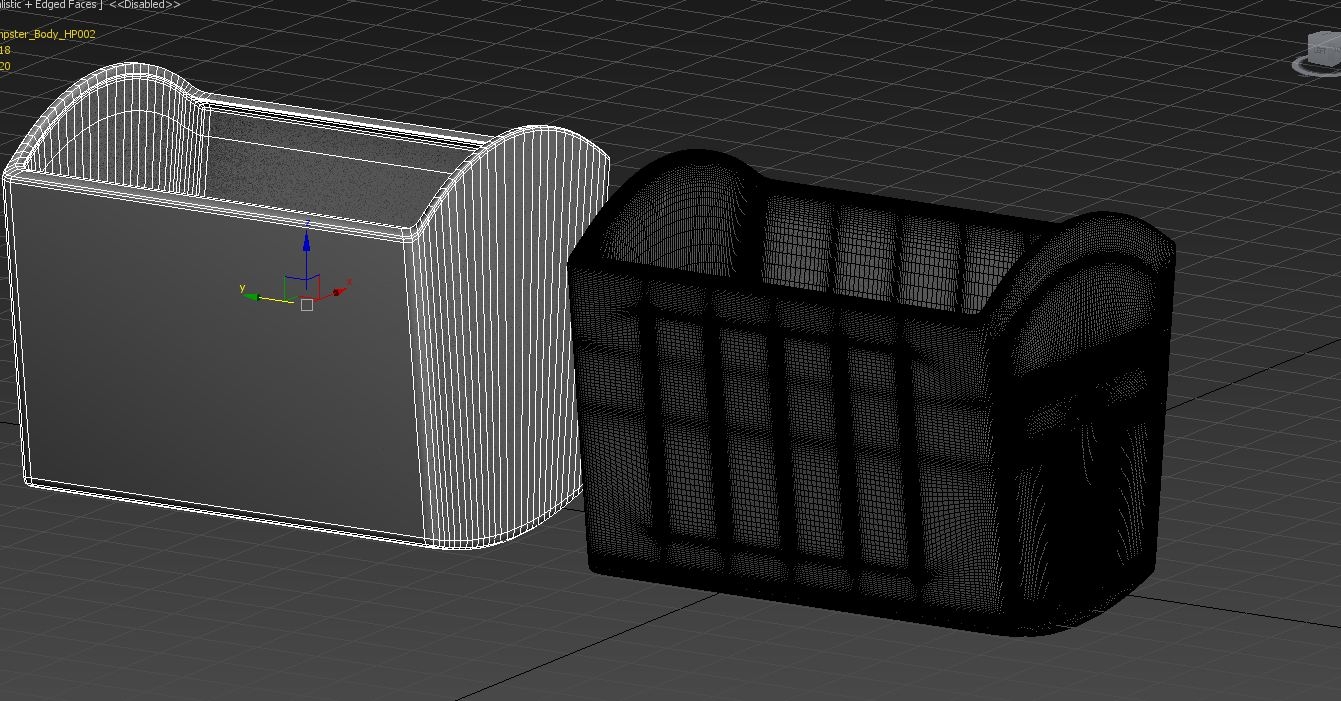
The cage is basically a push modifier applied to the mesh and another edit poly on top of it but here's the big problem:
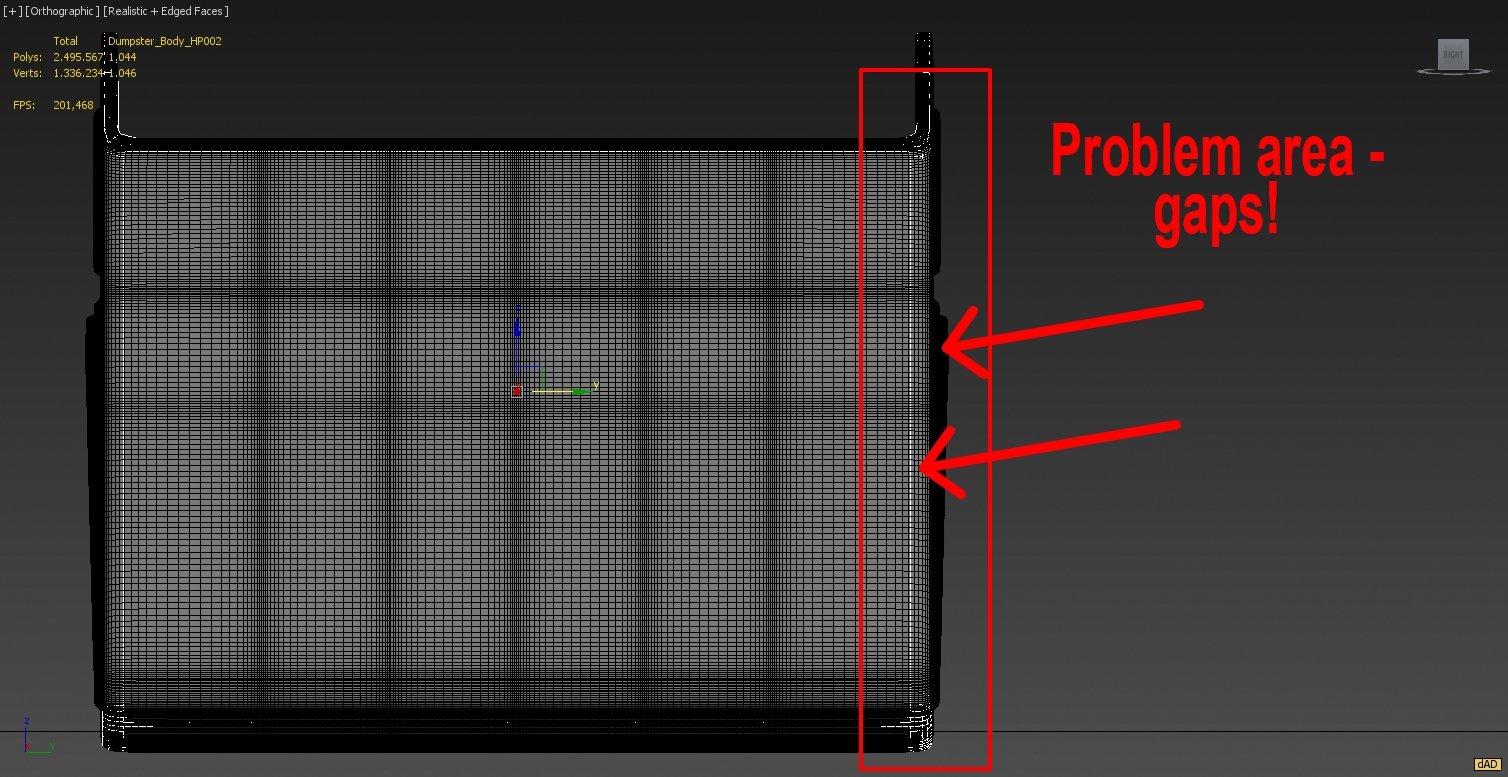
The way I plan on solving it right now is by detaching the sides of the low poly and then baking the sides seperately (doing a planar bake with the UV's already unwrapped and packed. The same thing is for the front detail, it's a bit extruded and it causes a slight small gap but not enough to give me errors in bakes. Here is my bake by detaching the side of the low poly and doing a planar bake:
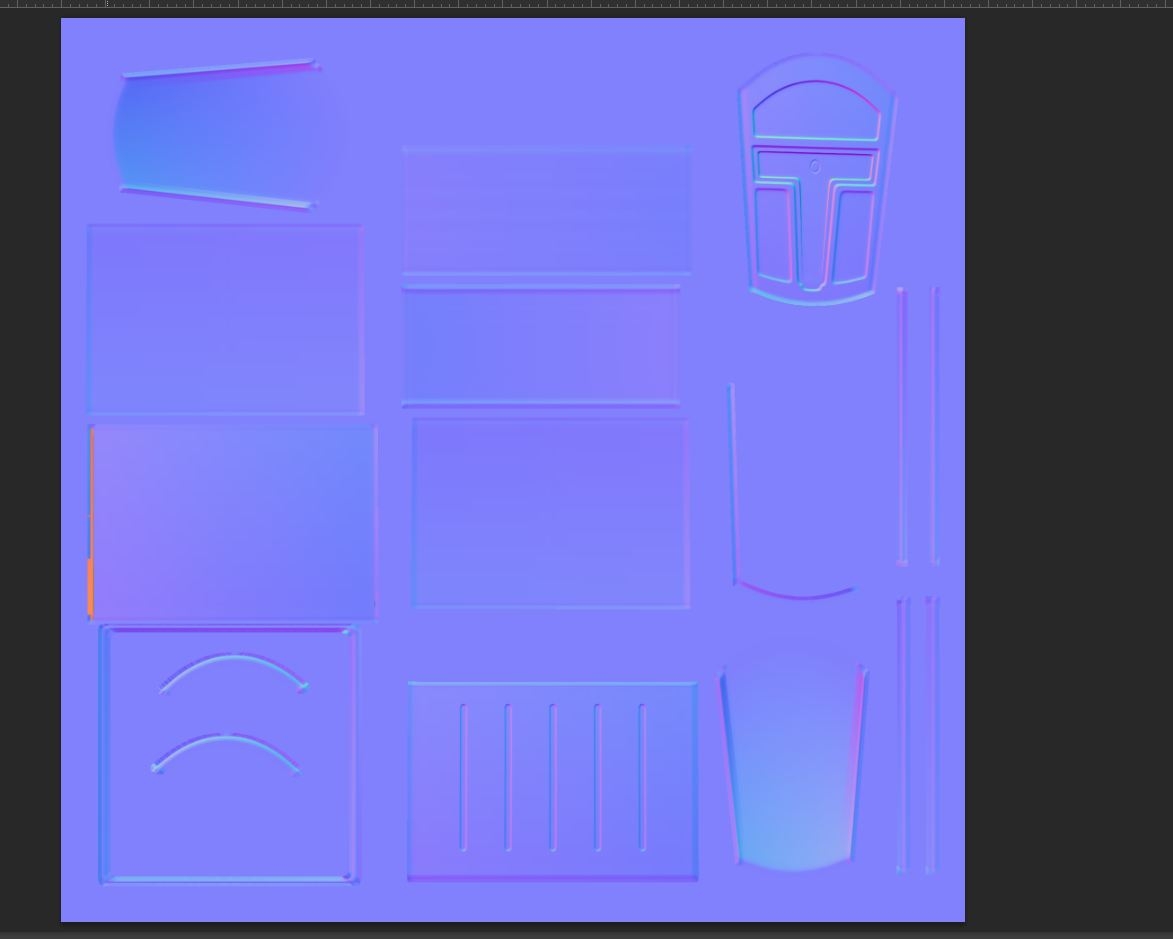
Okay so basically this idea worked and am finally getting a more proper bake, I am still getting some issues as you can see I think these I will solve more easily now but I will reupload my own new low poly (basically the sides are just detached). Am gonna go back into Max and see what's causing these smaller artifacts in the mean time you guys can have a look at my low poly and hipoly by downloading. I'd love to hear your opinion because this is my first true hipoly to lowpoly bake. Thanks a lot!
Here are the files, I will also provide my own low poly, the hipoly is unsubdivided so that's all you need to do.
Low poly with UV's, the way I 've decided to bake it right now is with the sides detached, so all you have to do is
detach the sides, offset them a little, clone and repeat for cage and it's ready to be bake.
https://drive.google.com/file/d/0B5LkU6iWBX0XNEtnRkE3cE1rSGM/view?usp=sharing
Hipoly
https://drive.google.com/file/d/0B5LkU6iWBX0XZU44YTBiclYyZzA/view?usp=sharing
EDIT:
Okay so to make things easier for you guys since making a low poly can be time consuming at times, I've constructed a quick low poly from the hipoly. I am not baking the entire mesh, just the main part of it. This is my area of problem if I can figure out how to bake it, I shouldn't have trouble baking other parts as well.
Here is the low poly mesh, there is some minor smoothing issue on the low poly


The cage is basically a push modifier applied to the mesh and another edit poly on top of it but here's the big problem:

The way I plan on solving it right now is by detaching the sides of the low poly and then baking the sides seperately (doing a planar bake with the UV's already unwrapped and packed. The same thing is for the front detail, it's a bit extruded and it causes a slight small gap but not enough to give me errors in bakes. Here is my bake by detaching the side of the low poly and doing a planar bake:

Okay so basically this idea worked and am finally getting a more proper bake, I am still getting some issues as you can see I think these I will solve more easily now but I will reupload my own new low poly (basically the sides are just detached). Am gonna go back into Max and see what's causing these smaller artifacts in the mean time you guys can have a look at my low poly and hipoly by downloading. I'd love to hear your opinion because this is my first true hipoly to lowpoly bake. Thanks a lot!
Replies
I've posted a picture. The download links are right there.
And you'd be lucky for anyone to download the files, let alone build a workable low poly for you. That takes time and effort which most people on this site can't spare. The best thing to do is make helping you as easy as possible by showing more pictures, trying to create a low poly yourself, showing the texture flat for the normal map etc. so we can steer you in the right direction at least. Making a few small props in succession sounds like a good idea. You didn't mention a cage, you are aware of how a cage factors into the baking process right? The laziest way to make one is to add a push modifier to the low poly and to export it as a separate cage file (if you were using xNormal - you'd use a projection modifier if you were baking inside max, but I don't prefer that way)
Thanks for the response, I'll be editing my original post now and yes am aware that I need a cage that needs to have it's normals averaged as well, right? I've been using a cage and I get these small rendering issues but the biggest problem that I have is with the side detail that is extruded outwards from the surface that the lowpoly cannot cover without creating a gap. I've created a new lowpoly.
People will gladly help you and you will learn quicker.
It may look like a simple dumpster but as you have found out it's not that simple.
Here is the mesh in UDK
You can see some waviness, it's not straight, distortion of some sort, although it does not appear in the bake, the other side is completely fine, I've no idea why this side is a bit distorted, I've checked the UV's, they seem to be fine and relaxed completely. Am not doing hard edge baking, everything is averaged, am using the bevels around the meshes as support loops so this might be causing it? I need proper support loops? Am going to try and do this with flat edge baking.
Am reading up about how the baking tools work exactly and this is what I've found:
Baking the normal map works by calculating the DIFFERENCE in the surface normal between a particular point on the low resolution mesh and the nearest point on the high resolution mesh. As long as they are sitting on top of each other, everything should work as expected.
Above you can see the two meshes are on top of each other (the middle image is only the wireframe of the left image, not another mesh) and the resulting normal map.
So the position of the surface is used to determine which points on the low and high resolution meshes go together, the UV of the low resolution mesh is simply the target output of the bake and no UVs are used in the calculation of the normals, thus the high-res mesh doesn't need any.
Also, clean topology is also important for correct deformation in rigged models. As long as there are no overlaps and the islands aren't too close together (3-5 pixels is usually fine) the quality of the UV map isn't too important.
Ergo: This difference is what's causing the gradients, the difference is used to be added to the lowpoly normals to make the hipoly normals, right? I just don't get why am getting these seams all over my mesh, there is no uv shell bleeding, the normals aren't bleeding into each other I've left more than enough space between each shell. Am slowly beginning to understand baking by baking and doing a bit of research but it would be much much quicker if someone actually stepped in, saw my lowpoly and told me exactly what am doing wrong and why it is wrong.
Here is a problem with smoothing I have, there's a seam right where the smoothing group is but am guessing this is normal and there's nothing that can be done about it, it's just the way the smoothing is. If anyone has any suggestions on how to fix this I 'd love to hear their feedback. In any case, thanks for the help and response guys. I 'll post the final pic of the dumpster, when am all done.
Using Glen's tutorial I was able to use your hi res mesh to create the low (exported from ZBrush as an fbx) and high mesh (Exported as a hires obj) to bake some 2048x2048 maps.
Using your "high res" mesh as a low res mesh starting point in ZBrush, I broke up and consolidated the parts of the main dumpster bin into the polygroups ZBrush needs to create UVs. Then I vertically aligned the UVs in ZB and then after about an hour I was done creasing the edges needed to maintain the mesh's final form after it is subdivided (the final high res had about 4mil quads). After a bit of bashing and denting the high res mesh I exported it from ZB as a high res obj. I then exported the low res mesh from ZB (with UVs assigned) as an fbx file, again using Glen's tutorials.
Using the resulting baked maps I created using Glen's tutorial I then used Curious Engine's excellent Substance Painter tutorials at https://vimeo.com/user12201680 I was able to texture and export the maps needed for a quick render in Marmoset. I only worked the basic body of your dumpster, the same steps would be pretty easy to do with the rest of the model's parts.
Like the others have said, the key is to use the resources that are "out there on the 'Net" and pay your dues to learn the apps you are learning.
Good luck and don't ever give up learning.
P.S. Merry Christmas and happy holidays to everyone, I know it's 2 days late but it's the thought that counts!
The normals are doing a great job, but there are still a few issues that I know how to fix easily, still some quick texture editing to do, to hide away the seams. I did notice strange something yesterday morning when I proceeded to check the mesh for any possible problems and I've tried fixing it to no avail, here is the problem:
There are strang artifacts on my normals, at first I thought it was compression. So I went through the settings of the normal map, switched the U and V adressing to clamp instead of wrap to avoid any issues, I've tried turning off compression completely, reimporting, setting it to no compression mode and nothing, It's still there. The normal map is quite good, there are some gradients but it's not all bad, it worked fine before!
Here's the normal map of the lid:
I then looked at 3ds max and thought there might be a problem there (P.S. I didn't use hard edges, I've relied on supporting loops, yesterday I've tried
using hard edges and am getting a bit better but still same result and now there's skewing along the handles, I guess it needs more edges around the
handles for them to bake in nicely. So no change basically. What I did notice is that the artifacts in the engine looked similar to the overlaps of the lowpoly and the hipoly
It's not looking the same as the artifacts on the normal map now but this is a different mesh right now, I'd have to retrace my files to find the original mesh, basically you can see the overlaps between hipoly and lowpoly being similar to that of the artifacts on the normal map. I've tried pushing out the lowpoly but it didnt' help the bake. Am still getting them. Using magic wand on the normal map with 0 tolerance I've found that the artifacts are in fact, there they 're just hard to spot. By overlaying the normal map a couple of times on top of itself, I was able to see this:
How do I fix this? Am gonna try and render out a better normal map with hard edges again, I'll try to fix some of those issues but if anyone could help me figure out whats going on I'd be mighty grateful. If you guys need anything please let me know. I was planning on sharing the mesh and the textures once I was finished but if needed, I will post the files now, in this state, if it helps you guys to figure out what's going on. Once again, thanks a lot guys for taking the time to help me out, I've been through hell these last few days, the time I spent most was baking and reiterating trying to figure out what's wrong. I greatly appreciate all the help so far and hope to get some more feedback from you guys.
The artifacts are probably due to to compression. If you bake in xNormal you can try saving a 16-bit TIFF, then in Photoshop set Image mode to 8-bit and save (don't use .jpg, .tga should be good), this will get rid of those artifacts but will introduce dithering to create the gradient, it might be less noticeable, also make sure there are no small gradients or weird shading on your high poly. If you bake in 3dsmax, the baker uses dithering by default.
The gradients in my normal map are not extreme if you look at them you 're definitely right, they are supposed to be there, they still come out same. Some of these gradients are there because my lowpoly parts are lying flat where there's a smooth bevel/corner and that gradient is representing that smooth corner I guess.
EDIT: Should I use any special settings when saving to 8 bit TIFF? Also, any special reason why TIFF is better than TGA? I'm using UDK and UDK does not support tiff files but I will bake to tiff then save it as tga.
The artifacts are a lot less visible now that I am using 16 bit converted to 8/bit per channel TGA but they are still present. Am starting to think I should add more edge loops around the area where the artifacts are, when I bake.
Ooops.... got it wrong, it isn't fixed. Been scratching my head because the mesh got the artifacts again, so I recreated the mesh thinking some corruption must have happened and rebaked it a couple of times and then I noticed something... when I clicked defer compression, I would get a result like in the image above. So basically whenever I compress to TC_NormalMap the artifacts happens, when I use 16 bit tiff it seems to help lessen the artifacts but they 're still there. I 've no clue how to fix this issue at this point on how to fix this. The only thing that comes to mind is to try and edit this in PS and try to match all the colors together.
Here is the pic:
All in all this was a great learning experience, I've actually learned a lot, from you guys, from researching and really focusing on nailing that one thing that's crucial in getting perfect bakes. I'd like to thank ZacD, The Rizler, a whole lot of thanks to SodakZbrusher, who even took the time to make a bake and texturing pass of his own and most of all - Huffer, his tip is something I am definitely not going to forget soon! xDDD Thanks guys, much appreciated for your time! And also to the community in general for those awesome sticky threads that were mighty useful in figuring out how it all works, what are do's and dont's and etc.
You can download and view the mesh in sketchfab, the textures are downscaled but they look a lot more worse than in UDK. Wish I spent more time texturing this though and setting up the UV's than baking.
https://skfb.ly/JM9K
Also think of this - I remember reading that with idtech engines they used all soft edges on small props, I believe even the new Wolfenstein used this..so the normal maps were full of gradients, and it's not a bad thing, it means you don't have to split every hard edge on the UV's, you can avoid seams, and you save on the vertex count (since hard edges count as vertex splits), it saves time, etc.
The only reason to save to TIFF (16-bit) in xNormal is so you get the full 16-bit baked map (if I remember correctly .tga doesn't support this) - once you set image mode to 8-bit and the gradients get dithered, there's no reason to save anything other than .tga.
It's very good that you figured out how to fix these, but remember that artifacts like these will not be so visible once you add textures, and generally they will be accepted (sometimes the baked map will be downscaled in-engine), they're mostly visible if you use a very reflective material, like a mirror, but in that case, if you want crystal clear reflections, it might be better to not bake, and use chamfers to make the low poly.