Home Technical Talk

Maya face normals look edgy even when softened. (pics included)

JamieRain
vertex
Offline / Send Message
JamieRain vertex
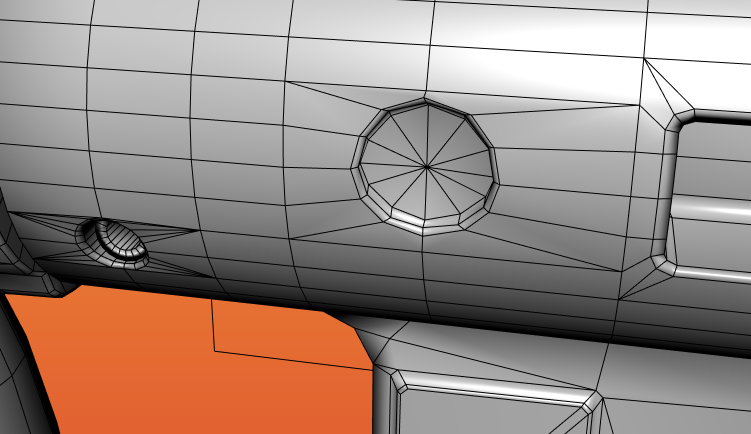
The 'pinching' and second image with wireframe.
33179b4471038e6a01329850f2f5b4a4.png
0d1300a7fbab772d492413dbeb2ea271.png

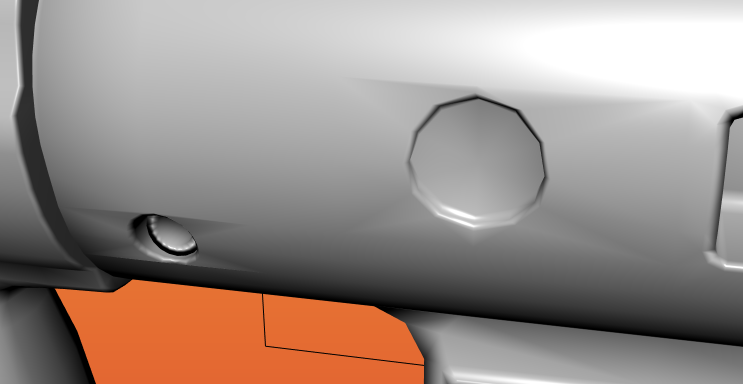
I used soften normals within Maya and got this result. I unlocked normals, set to face tried every option up there. Got nothing from it. This isnt the only location I got this artifact from on my model.

Replies

  • m4dcow
    Offline / Send Message
    m4dcow interpolator
    That looks as expected with the differences of continuity with the insert. You can sort of hack around this by transferring normals from a continuous cylinder and doing some hand edits.
  • JamieRain
    Offline / Send Message
    JamieRain vertex
    m4dcow wrote: »
    That looks as expected with the differences of continuity with the insert. You can sort of hack around this by transferring normals from a continuous cylinder and doing some hand edits.


    I used clean up. It selected all the problem faces but the clean up effect had no effect on the area other than adding more tessellation.

    As for your reply can you give me a reference or minor explanation to how to transfer normals? Also is my problem something 'common' to address or did I do something terribly wrong while in the process of modeling the weapon?
  • DireWolf
    The surface continuity got broken too much, hence you see those artifacts. The only way you'll get cleaner smoothed mesh is by adding more supporting edges to help hold its form.

    I recommend you make circle with 8 or 16 sides. The edges would be spaced out more evenly and it's easier to connect to rectangular outlines as well.

    You'll need 1 more loop around your circle and probably 2 loops to the side of each circle to help the tube.

    Sorry for the horrible hand-drawn example. Just realized just now that I should have demo'd you an actual model :o

    HEk8XyI.png
  • JamieRain
    Offline / Send Message
    JamieRain vertex
    DireWolf wrote: »
    The surface continuity got broken too much, hence you see those artifacts. The only way you'll get cleaner smoothed mesh is by adding more supporting edges to help hold its form.

    I recommend you make circle with 8 or 16 sides. The edges would be spaced out more evenly and it's easier to connect to rectangular outlines as well.

    You'll need 1 more loop around your circle and probably 2 loops to the side of each circle to help the tube.

    Sorry for the horrible hand-drawn example. Just realized just now that I should have demo'd you an actual model :o

    HEk8XyI.png


    That helps a lot! I'll give it a try in the morning. I supposed I went full tri-hard (lol) on perserving more polys. :x
  • Obscura
    Offline / Send Message
    Obscura grand marshal polycounter
    Custom normals

    Check this. It will solve all of your issues.
  • m4dcow
    Offline / Send Message
    m4dcow interpolator
    JamieRain wrote: »
    I used clean up. It selected all the problem faces but the clean up effect had no effect on the area other than adding more tessellation.

    As for your reply can you give me a reference or minor explanation to how to transfer normals? Also is my problem something 'common' to address or did I do something terribly wrong while in the process of modeling the weapon?

    I wasn't really talking about cleaning up the mesh, I was alluding to something like the thread Obscura linked.

    Incoming crappy demonstration
    Z8fpL6G.png
  • JamieRain
    Offline / Send Message
    JamieRain vertex
    Obscura wrote: »
    Custom normals

    Check this. It will solve all of your issues.

    This is awesome but do I have to edit every vertex one by one with the pivot tool? I think I seen an image in your thread and in 3ds Max someone just pressed three buttons and all of them switched.

    SolidRichIndianrockpython.gif
  • JamieRain
    Offline / Send Message
    JamieRain vertex
    m4dcow wrote: »
    I wasn't really talking about cleaning up the mesh, I was alluding to something like the thread Obscura linked.

    Incoming crappy demonstration

    I want to try this but Im not finding a convert to vert option. Im in Maya2016.
  • m4dcow
    Offline / Send Message
    m4dcow interpolator
    Ctrl + f8, you can't "unlock normal" on an edge selection is the only reason you need to do it.
  • Bartalon
    Offline / Send Message
    Bartalon polycounter lvl 12
    m4dcow wrote: »
    Ctrl + f8

    To clarify, Ctrl + F9 will convert to vertices.

    In case you didn't know JamieRain, here are some useful Maya hotkeys to speed up your selection process:

    F8: Object Mode
    F9: Vertex Mode
    F10: Edge Mode
    F11: Face Mode
    F12: UV Mode

    Pressing CTRL then one of the buttons above (other than F8 ) will convert your selection to the respective component type.

    Alternatively you can use the marking menu by holding RMB to access component selection modes, and Ctrl + RMB to access component conversion options.
  • m4dcow
    Offline / Send Message
    m4dcow interpolator
    Bartalon wrote: »
    To clarify, Ctrl + F9 will convert to vertices.

    In case you didn't know JamieRain, here are some useful Maya hotkeys to speed up your selection process:

    F8: Object Mode
    F9: Vertex Mode
    F10: Edge Mode
    F11: Face Mode
    F12: UV Mode

    Pressing CTRL then one of the buttons above (other than F8 ) will convert your selection to the respective component type.

    Alternatively you can use the marking menu by holding RMB to access component selection modes, and Ctrl + RMB to access component conversion options.

    Ha-ha, whoops I meant ctrl+f9 of course.
Sign In or Register to comment.