Texture manager V1.0
Hello everybody!
In my years of game development I got really tired of saving tga files from your PSD file.
I have checked the internet several times for a program that can split my PSD file into tga files, but all I could find were slow scripts or not easy to use.
So I figured it would be time to write one myself.
The goal was to speed up exporting tga files and it should be very stable as well.
I recently finished version 1.0 and after some testing I think it's time to spread this thing into the world, because I believe everybody should experience this simple tool.
In short it works as follows:
Your PSD contains several folders with all the different export types.
For example, Diffuse, Alpha, Normal map, Gloss, Spec, etc etc.
Here is an example of a PSD folder setup:
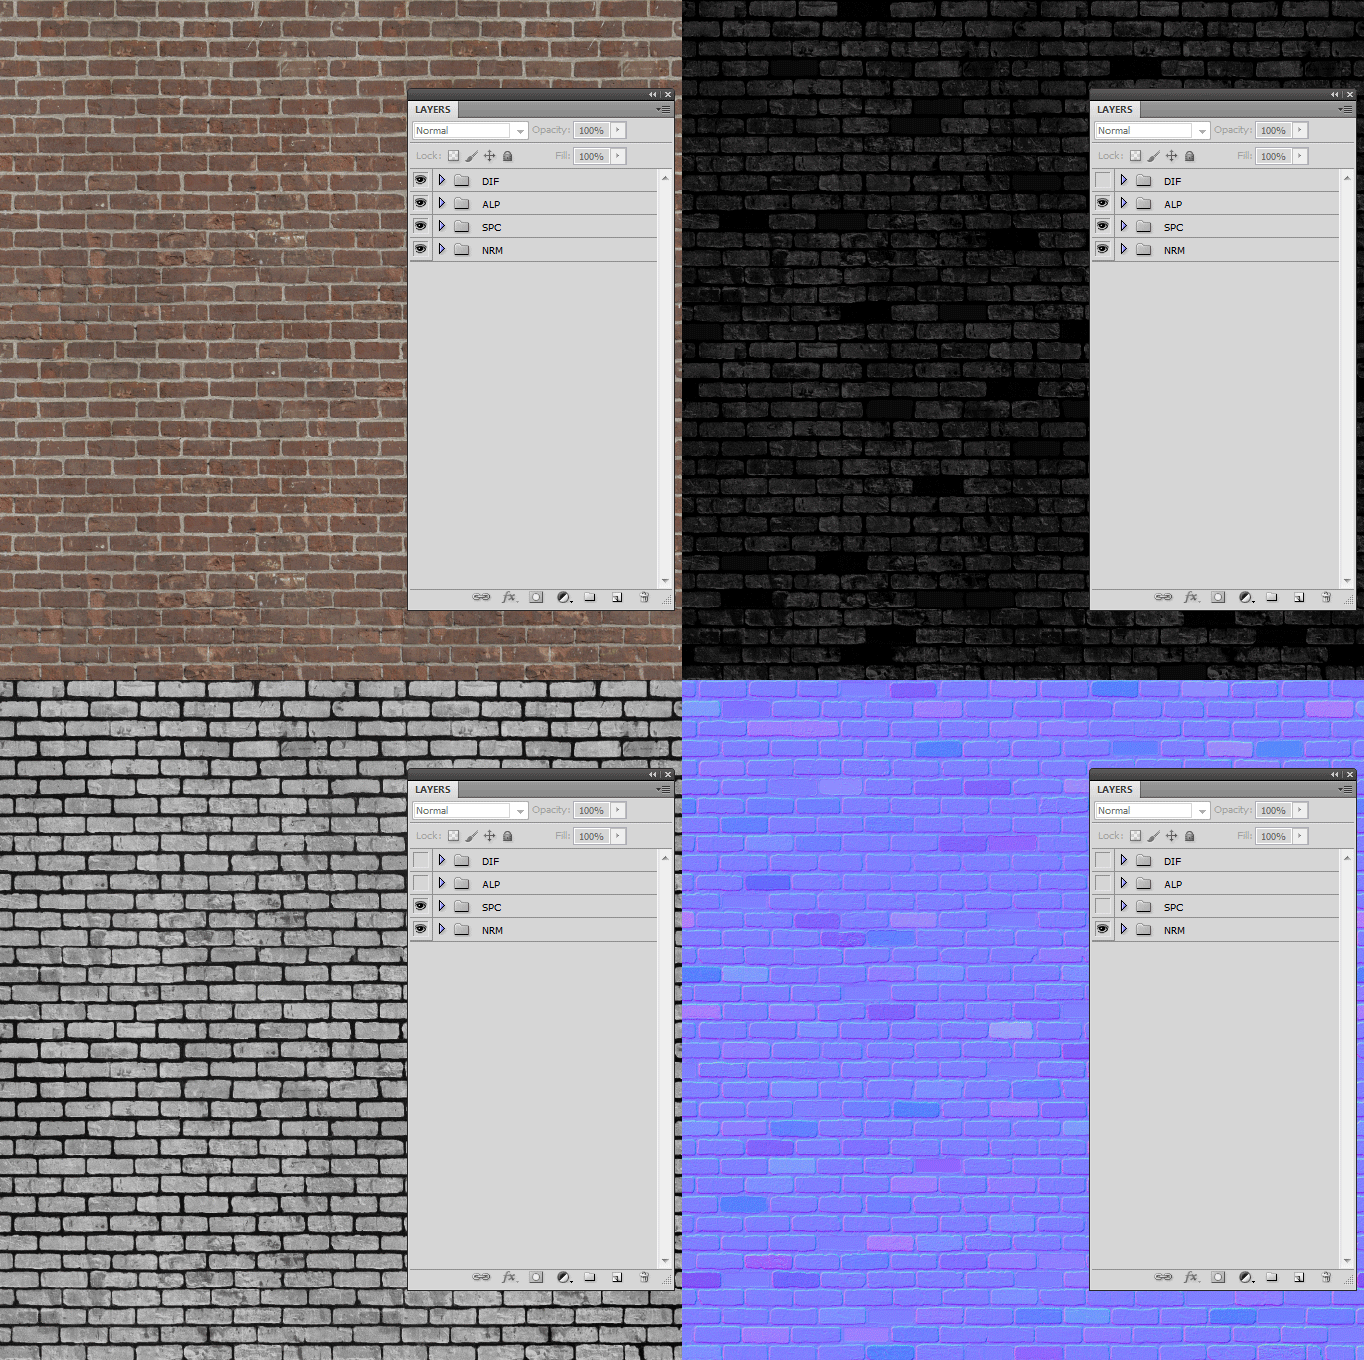
In the past, you kept copying your diffuse to your TGA, and your alpha in your alpha slot. Doing this all day long, you are loosing valuable time very easily.
Texture manager will help you export these files very quickly.
It has the option to set a source root folder and a destination root folder.
This way, you only have to set this once per project.
For example, if you have a project and you have a folder structure like this:
- Unity/Source/Textures/Structures
- Unity/Textures/Structures
You can set the source root to Unity/Source and the destination root to Unity. The texture manager will then export your files to the right folder.
Lets have a look at the options of Texture Manager:
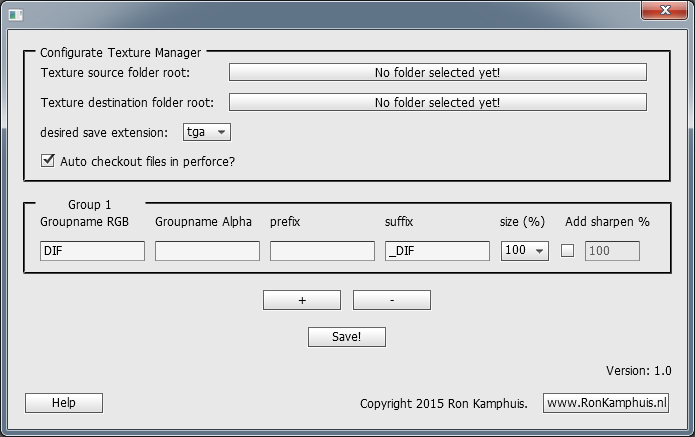
Texture manager has a build in perforce checkout to quickly checkout or add (new) files in perforce.
You can export in tga, bmp, png or jpg format. Only tga supports alpha channels.
In the Group menu you can define the different types of folder names in your psd.
In this example, a folder with the name DIF will be placed in the RGB channel.
Alpha is empty, but if you want to export something in the alpha channel, you can add the folder name here. (ALP for example).
You have the option to include prefix or suffix to your texture name. This could be very useful if you have multiple types of the same texture (Normal, Spec, Gloss, Emissive etc).
Also, you can resize the output if you want.
The last option is to sharpen your output. You can define the opacity of the sharpen layer by the last option box.
You can add a total of 8 different group types.
In my research, my main goal was to make this script very fast and easy to use. That's why it comes with 8 Group Export scripts. Each group has it's own script that can be bound to a hotkey in photoshop via Actions.
This way, I can save the different groups with my F buttons on my keyboard.
I already created the actions and they are included in the file.
They keys F5 - F12 now represent the different groups of the script.
So, how fast is this script? It can save your exported file including alpha in +- 2 seconds.
This drastically decrease iteration times.
DOWNLOAD TEXTURE MANAGER V1.0
Here is a movie of the Texture Manager in action:
[ame="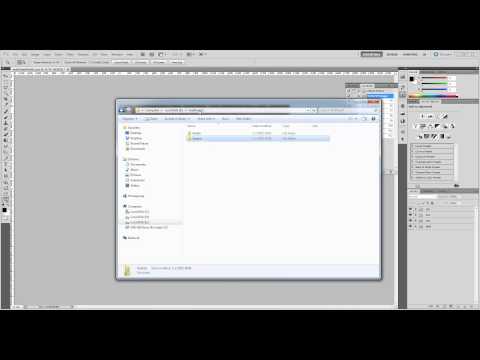 https://www.youtube.com/watch?v=gYOq-IbzeiM"]Youtube[/ame]
In my years of game development I got really tired of saving tga files from your PSD file.
I have checked the internet several times for a program that can split my PSD file into tga files, but all I could find were slow scripts or not easy to use.
So I figured it would be time to write one myself.
The goal was to speed up exporting tga files and it should be very stable as well.
I recently finished version 1.0 and after some testing I think it's time to spread this thing into the world, because I believe everybody should experience this simple tool.
In short it works as follows:
Your PSD contains several folders with all the different export types.
For example, Diffuse, Alpha, Normal map, Gloss, Spec, etc etc.
Here is an example of a PSD folder setup:

In the past, you kept copying your diffuse to your TGA, and your alpha in your alpha slot. Doing this all day long, you are loosing valuable time very easily.
Texture manager will help you export these files very quickly.
It has the option to set a source root folder and a destination root folder.
This way, you only have to set this once per project.
For example, if you have a project and you have a folder structure like this:
- Unity/Source/Textures/Structures
- Unity/Textures/Structures
You can set the source root to Unity/Source and the destination root to Unity. The texture manager will then export your files to the right folder.
Lets have a look at the options of Texture Manager:

Texture manager has a build in perforce checkout to quickly checkout or add (new) files in perforce.
You can export in tga, bmp, png or jpg format. Only tga supports alpha channels.
In the Group menu you can define the different types of folder names in your psd.
In this example, a folder with the name DIF will be placed in the RGB channel.
Alpha is empty, but if you want to export something in the alpha channel, you can add the folder name here. (ALP for example).
You have the option to include prefix or suffix to your texture name. This could be very useful if you have multiple types of the same texture (Normal, Spec, Gloss, Emissive etc).
Also, you can resize the output if you want.
The last option is to sharpen your output. You can define the opacity of the sharpen layer by the last option box.
You can add a total of 8 different group types.
In my research, my main goal was to make this script very fast and easy to use. That's why it comes with 8 Group Export scripts. Each group has it's own script that can be bound to a hotkey in photoshop via Actions.
This way, I can save the different groups with my F buttons on my keyboard.
I already created the actions and they are included in the file.
They keys F5 - F12 now represent the different groups of the script.
So, how fast is this script? It can save your exported file including alpha in +- 2 seconds.
This drastically decrease iteration times.
DOWNLOAD TEXTURE MANAGER V1.0
Here is a movie of the Texture Manager in action:
[ame="
 https://www.youtube.com/watch?v=gYOq-IbzeiM"]Youtube[/ame]
Replies
Extract them to Program Files/Adobe/Your Photoshop version/Presets/Scripts.
Reboot Photoshop if you had it already opened.
http://wiki.polycount.com/wiki/PhotoshopTools#Export_Tools
Thank you very much!
I included an installation guide on my website and added a readme to the download file. This should make it easier to install the script
Let me know if this works or not.
But I'm wondering how you guys see this working.
What if you have a diffuse with alpha. Would you then have 2 layer Comps? 1 named DIF and 1 named DIFALP (Or something like that)
And what if you not only have a diffuse with alpha, but also for example specular? Would you then have 2 layer comps named SPC and SPCALP?
You clearly can't have only 1 layer Comp named ALP because that could overlap between textures.
I'm curious how you guys feel about this. I would personally say DIF and DIFALP. The names can be altered to your liking in the configuration of course.
Could you please check if this is what you are looking for?
There is an extra option in the configuration window, called "Use Layer Comps as groups"
If you enable this option, you will be able to use layer comps in stead of folders.
Disclaimer: It's a first version. Sharpening doesn't work yet. I will update this later with a better, properly tested, version.
Download (Extract both files to Program Files/Adobe/Your Photoshop version/Presets/Scripts):
http://www.ronkamphuis.nl/TextureManagerLayerCompsV10.zip
So far it works really well, thank you!
The only problem I see is that I can't define a custom name for the exports. Say I've got a PSD called Test_Base_4096.PSD. I'd like each Layer Comp to be saved to a new name based on the comp name instead of adding a suffix or prefix to Test_Base_4096.PSD. If I have two groups called Red and Blue for color variants, I'd want Test_Blue_4096.PSD and Test_Red_4096.PSD.
Right now it seems to save as prefix_Test_Base_4096_suffix.PSD. Did I miss a setting or do I need to manually rename files once exported?
But let's say we take your suggestion, a few changes need to be made, and a problem rises up:
1. Instead of exporting a named group the script needs to export the selected (visible) layer comp.
2. Specific group properties as resizing and sharpening need to be written in the layer comp notes.
3. There is no way to tell if/what alpha needs to be used. I don't have a good solution for this yet, although one can think of giving another layer comp the exact same name as the exported one, but with _ALP behind it or something.
I will definitely give this approach a try, but I will probably rewrite the entire script to do this, and think carefully about it before starting. I might even start from scratch, since some things will significantly change the way the script works at the moment.
A very easy solution would be to add an override name to a certain group. But then you'll need to change the texture manager configuration each time you load a new texture, because the name is different. This can create a lot of errors because people forgot to change it, accidentally overwriting a different texture, etc etc.
I still need to so some optimizations and I want to be able to split RGB channels as well, so I need some additional work to the script to make it final.
As soon as the user checks the Use Layer Comps as groups button, the groups will disappear and new options will show.
Right now the only option is to set the alpha suffix. This is used so that the script knows what layer comp should be used as alpha for the exported group.
Below an example.
The group Wall_Red_DIF will be my export name.
The texture has an alpha. It is now named Wall_Red_DIF_ALP so that the script knows it belongs to the diffuse.
I also included the option to resize and sharpen by adding this in the layer comp notes. Simply add one of these commands:
Sharpen <nr>
Size <nr>
I will continue working on this tomorrow again, and keep you informed about the progress.
Cheers!
I finished the script. I decided not to start from scratch, but in stead, combine the scripts.
I will just quickly explain the new features available when using Layer Comps:
You can set 4 option values in the configuration screen. These are the suffixes of the layer comp names.
This can be used to store alpha channels, or store 3 textures in 1 RGB texture (1 channel per texture)
By default, these are set to _ALP, _RED, _GREEN, and _BLUE.
Let's say you have a texture named Wall_Red_2048.psd
In this PSD you have a layer comp defined, named Wall_Red_1024
The wall has an alpha channel. This alpha channel is defined in another layer comp, named Wall_Red_1024_ALP.
If you now hit the export button (I kept the group export buttons, but for layer comps they will all do the same, since you have to select the layer comp you want to export), a new file will be saved named Wall_Red_1024.tga (Or whatever extension you selected in the options)
It is now named 1024, but it has not been resized.
In order to resize exported textures, I included some arguments that you could enter in the comments section of a layer comp.
These arguments are:
size x
sharpen x
x stands for a percentage value, usually between 1 and 100.
So, to export the wall in 1024 you'll need to add the following in the comments section of the layer comp:
size 50 (Means 50%)
The last thing that's possible is to split RGB channels.
You can make 3 layer comps, all named the same, but with different suffixes corresponding with the suffixes stored in the configuration script.
Keep in mind that these layers will be stored in 1 channel, so only grey values will be stored. You can use colors of course, but it will flatten it to greyscale.
example of layer comp setup:
Output would be a texture named Wall_Red_DIF.tga
The 3 layer comps RED GREEN and BLUE will be stored in the channels RGB.
Wall_Red_DIF_ALP will be used as alpha.
Okey, enough talking, I think you can figure it out.
Here's the download link:
www.ronkamphuis.nl/TextureManagerV12.zip
Let me know if you run into any problems.
Cheers!
And another wish is a 1,277 gamma in Image/adjustments/exposure applied when converting from rgb layer comp , like _RED, _GREEN, _BLUE to greyscale values in resulting tga file
Thank you for taking the time to try the new version of the script.
I'll answer your second question first. This is something I can add fairly easy. I will add a checkbox in the configuration to enable or disable it.
Your first question however, is a bit more complicated.
Before I started on this script, I checked the internet for export scripts like this one.
There were a lot of them, but they all had something I disliked. External plugins, buttons, but a very common mistake: slow.
I was looking for something fast to use, and usable with a hotkey.
The script must also run as fast as possible. (+- 3 sec max)
In order to achieve this, I had to make some compromises.
The user had to setup all the layers him/herself so the script could make some assumptions.
This rule also applies for alpha.
What you are requestion is something you can also do in the psd file. Just create an alpha layer comp with the requested alpha and put an extra layer under your diffuse texture using the solidify plugin to cover up the blank space. It's a different workflow.
Compromises such as these make the script fast, so I won't implement this suggestion (Not even taking the technical challenges into account yet, because it also requires some heavy rewriting of parts of the script).
I'll let you know as soon as the exposure adjustment is in.
ps. Photoshop7 didn't need Solidify at all. It just did basically same for transparent pixels. In fact it was even better than Solidify since it did better/smaller compressed textures. Then Adobe issued a "bugfix" and killed the feature. Years after I am still puzzled why.
Right now it will just copy the contents from the _ALP layer comp into the alpha channel of the newly created texture.
I don't duplicate the entire PSD (or only merged layers) and save that as a new file. For big PSD files this will take too much time.
Like I said I want to keep the script very fast.
I'll definitely have another thought about this, but I don't want to spend another 5 hours on the script, just for this feature only, cause for me it still sounds like a a difference in workflow.
I've always used the extra manual step to create an alpha channel. I usually create a mask for my diffuse layer, and copy this mask to the alpha channel.
This has always worked perfect for me, and once you're used to it, it's pretty fast as well.
One more thing. The script works ok only if I set an exact path to a folder where .psd file is in "Texture source folder root" . It's not very convenient to keep all textures in same folder . I am accustomed to make sub-folders for different asset subjects . Have no idea if it's hard to fix either and could it find the file at least one level deeper for example.
Nevertheless , your script is still the best Photoshop thing I had ever found . Better than all the recent Adobe updates. Thanks a lot. It worth to be bought by Adobe and incorporated to Photoshop permanently.
This script looks really promising! Unfortunately I'm stuck with Photoshop CC 2017 and it seems to not work very well anymore. V.1 of your script works, but it changes the visibility of the groups after it saves the texture. So I can use it, I only have to run every script twice for it to save the correct group.
V2. won't run at all on CC 2017.
I'm really loathing CC 2017 btw.. seems to just be a huge bugfest all around
Let's say your texture PSD is located in C :/Textures/Source/Props/Lamps
You can now set your Texture Source folder Root to: C :/Textures/Source.
Now you set set your Destination folder Root. Let's assume it is: D :/Textures
The script will now export your texture to D :/Textures/Props/Lamps.
In our studio we have an AssetsSource/Textures folder, and an Assets/Textures folder. All the sub-folders are automatically taken into consideration.
I don't see anything in the docs about this. Is this a Photoshop version compatibility issue, or am I doing something wrong?