[Riot Art Contest] - Pirate Caitlyn
polycounter lvl 8
Hello!
I've decided to re-create Caitlyn as a pirate.
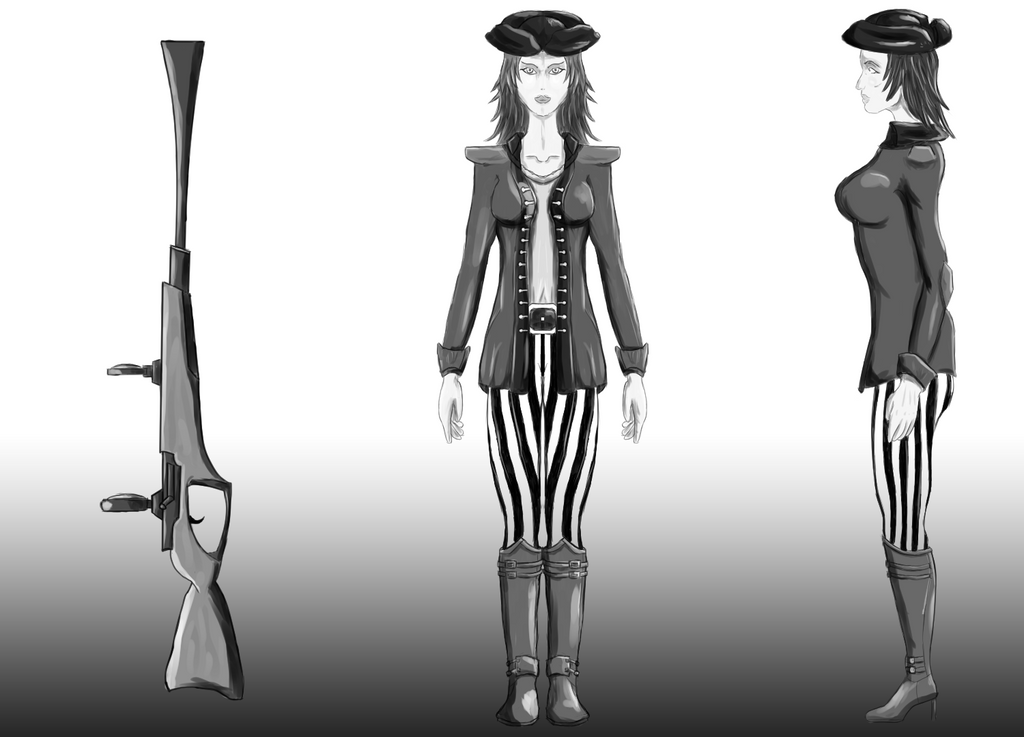
Here's my concept. I decided to give her a frock-coat, since I really think that expresses status, and gives her a sort of bossy look. I also wanted to go for some striped texture somewhere. I had a hard time deciding between pants or inner shirt. I ended up with going the pants route, since that seems more common in other pirate art.
I haven't decided on hair color yet. I think my choice is between blone and red/orange right now. Feel free to leave suggestions! Speaking of the head, I had big trouble drawing the hat. It's the typical Jack Sparrow hat, shaped like a triangle. It ended up sort of messy, but I guess it looks okay.
When it comes to the gun, I decided to not make it too over the top. The only thing that stands out is the big barrel. I think it symbolizes a cartoony gun, and I knew right from the start that I wanted it to look like that.
I've decided to re-create Caitlyn as a pirate.
Here's my concept. I decided to give her a frock-coat, since I really think that expresses status, and gives her a sort of bossy look. I also wanted to go for some striped texture somewhere. I had a hard time deciding between pants or inner shirt. I ended up with going the pants route, since that seems more common in other pirate art.
I haven't decided on hair color yet. I think my choice is between blone and red/orange right now. Feel free to leave suggestions! Speaking of the head, I had big trouble drawing the hat. It's the typical Jack Sparrow hat, shaped like a triangle. It ended up sort of messy, but I guess it looks okay.
When it comes to the gun, I decided to not make it too over the top. The only thing that stands out is the big barrel. I think it symbolizes a cartoony gun, and I knew right from the start that I wanted it to look like that.
Replies
Since this is one of my first human models, I watched a lot of tutorials on the topology of the face. To get used to the way humans toplogogy should be, I went ahead to make this model using those key edge loops around the eyes, nose and mouth, even though this is not going to be animated. The key loops were always in my mind during this entire modeling process.
I'm not going to be modeling the ear, since Caitlyn's hair is going to block them out anyway.
I started out with a sphere, placing it where my reference's eyes are placed. After that I created a plane, which I placed close to the eye, around the tear duct. Using extrude, I extruded a loop around the eye. I continued to extrude around the eye. After a couple of extrudes, the edge was at 0 in the X axis. At that point I moved my pivot point to the middle, and used Duplicate Special, with Instance checked, to make my model symmetrical.
After making my model symmetrical, I went ahead to block out the nose, down to the top lip. Using a similar process to the eye, I extruded a loop around the mouth shape. I made sure to edit every single vertex to get the shape I wanted. I extruded the edge again, to make the mouth a bit more detailed.
After the mouth shape was blocked out, I continued down to the chin. It's still very blocky, without adding many edge loops. After going down to the edge of the chin, I went to the top of the nose, to extrude the actual skull shape. That was done with maybe three extrusions. I later added definition with the handy Multi-Cut tool.
After having the full head blocked out, I went ahead and connected different parts with the Bridge tool. Eye to mouth, and chin to back of the head. After filling in pretty much the entire head, I started working on refining the nose shape. The way I created the nose was to use the hole that was left after bridging other shapes together. I was able to extrude in, and achieve a decent shape.
Now I'm pretty much done with the shape, and I can start changing the shape to something that can resemble Caitlyn. I use the Sculpt Geometry tool's Smooth to make the mesh smoother, and cleaner. Soft select is also a great tool for getting the right shape.
The next thing on the list is to make sure that the proportions are somewhat right. This is what I'm currently doing. Using a cube (Thanks to CGCookie for the tip http://cgcookie.com/blender/lessons/modeling-the-female-body-part-07/) I made different edge loops to check how eyes, mouth and nose line up. Firstly, the eyes;
Having placed the cube to outline the whole head, I divided the cube in half horizontally. The eyes are supposed to be placed in the middle of the head. The eyes needed some editing, and Soft Select made editing this very easy.
Dividing the cube vertically, with 4 edge loops, gives the correct distance between the eyes. Again, Soft Select does this process super easy.
This is where I am at at the moment. I will edit the mouth and nose too this way. Next I will create the body.
After connecting all the parts, I only have the breast left, but I'm waiting to do it just a bit.
Now I extruded the arms, and added some edge loops for definition. I also continued the rest of the torso, down to the pelvis. I also finished the breasts.
The final thing I've done today is to extrude the legs, and edit the verticies to my liking. My next task will be to model the hands and feet.
I started out with a new scene to model the hand. Using This tutorial as a starting point, I set up his reference images, and started modeling.
Using one cube, I extrude the thumb, and shape out the hand without the fingers. I also subdivide the mesh once, to get enough definition. This is my result:
After that, I created another cube, and block out one finger. I edit it a little bit, and then duplicate it three times for the rest of the fingers. After that it's time to edit the other fingers, to make sure they look sort of unique, and then connect them to the hand. That's pretty much the hand done.
Now it's time to import the hand to my other scene, and connect it to the wrist. My model was 2 edge loops short, so I had to add them using Multi-cut.
Since she's going to have boots, I'm not very interested in making an actual foot.
Next is to create the three-cornered hat. I had big problems drawing this hat, because the shape is confusing. I tried to model one myself, starting with a triangle, but it didn't work out. I ended up looking for couple of templates of how to make one, and found this:
The shape can be created from a disc shape, and that worked out much better. This was my starting point. It looks extremely silly right now, but it works.
Using soft select, I was able to scale 3 faces towards the middle. ALready here, the basic shape is achieved. I found that it requried a lot of editing, since the backsides of some polygons poked out of the faces on the opposite side of them. I ended up dividing the model in 3, and only editing one, working a lot with symmetry. Using snap to point, I could edit the hat as I wished, and be able to make it whole again.
This is all for today. Next in my to do list is to create the boots and belt.
I knew that I had to add two edge loops going through the bottom of the gun, because of the hand rest, and the chamber. My first thought was to use the Connect tool in the Toolkit. However, I got a weird issue where it wouldn't create edges all the way around, it would stop, and end in an n-gon. I turned to the Multi-cut tool once again, and used Shift to make it snap (also Ctrl to make a complete edge loop). I placed it two increments from each side.
Everything was pretty straight forward until I came to the barrel. I didn't want it to be square, but neither did I want to add more edge loops. I resorted to making it a hexagon, and added two triangles.
After some thinking though, I decided to remove the triangles, and add a symmetry line. It will reduce work needed, and make the mesh look a bit nicer.
After creating the basic shape, I went back and added some details, like the trigger and the "scopes". The trigger was just simply made by extruding and scaling, but the scope was a bit more challenging, but still exactly the same process. I just created edges close to where I placed the scopes on the reference image. Then I could just extrude the face, and follow the shape.
I used the same process for the second scope. She is supposed to have 3 scopes, but I only drew 2 in my reference. I've been thinking about where I wanted to place it, and I've decided to put it on the barrel.
I've also spent some time editing my character model, adding a couple edges to create ridges where the clothes end. I also created a belt using a couple of cubes, with some removed polygons where they aren't seen.
To create the hair, I decided to model it in Mudbox. To do that, I exported the necessary objects (Body, coat and hat) as fbx. Then I can just open the model in Mudbox, and start sculpting. I just did the very basic shape today.
Thanks for reading!
Thank you very much!
Today I've been working on the hair. I started out by working with the basic shape I created last time. The only tools I used were Grab, and Smooth (Shift). It took some time, because I'm not completely comfortable in Mudbox. I managed to achieve something I'm happy with though, so I used the Spray tool to add details to the shape, to make it look more like hair.
I changed hairstyles from my concept. I did that because I wasn't sure how I wanted to make it from the beginning.
After I was happy with the sculpting, I exported the hair as fbx, into Maya. Making the high poly hair the Live object, I can use Quad Draw to retopologize the mesh. This was the first time I've used this workflow, and I've got to say, I really enjoyed it. Quad Draw was easy to work with. My only problem is that I'm not good enough at sculpting.
I decided to split the mesh in two, because I simply wanted an edge there. After the hair was finished, I imported it into my main scene, and removed unnecessary polygons on the head.
Next on the list is to UV map all my objects.
Thank you for reading!
After that, I Combined the three meshes, and merged them into one complete object. Then I started dealing with the hair. It was much easier to unfold than the hat.
Moving onto the jacket, I had to use the Cut UVs tool to split some big parts of the object into their own separate shells. This allows me to unfold the UVs correctly. Using the Cut UVs, and thinking that you're going to make the model out of paper, helps me think where I need to cut. This exact same technique was used throughout the whole UV-mapping process.
After unfolding all of the UVs, I had to place them as well as I could in the UV space. But first I have to combine the objects into one object. I decided to delete one half of the object I UV-mapped to make the UVs symmetrical.
To create a starting point, I used the Layout option in the UV editor. Then I placed them where I thought would fit in.
I used exactly the same method to create the UVs for the weapon.
Then I combined the gun and body models, and placed the gun UVs where they fit in with the body model.
That's all for today. Next thing to do is to bake AO maps, and to start texturing!
I don't think I understand what you mean. I'm not a very experienced Maya- or any other 3D software user. If you have time, could you explain what you mean?
However, I want to bake a map from my high poly hair mesh to my low poly one. I also want to bake a map from my body- and gun meshes. They are all going to have the same texture file, and not different UV sets, if I've understood it correctly.
Thank you for your comment though, I appreciate any help you could give me!
I was going to use two techniques to do it in Maya, one to transfer details from a high poly mesh to a low poly one, and one to just bake a map for a low poly mesh.
I started out with the high to low poly one. Using Transfer Maps, I can select a target, and a source mesh. I edit the settings, like the map size to 2048x2048. Then I just let the computer do the job.
It's pretty much the same process for baking without a source mesh. Instead of Transfer Maps, I instead use Batch Bake (having mental ray turned on in the plug-in manager) Again, switch the map size to my liking. I didn't find a way to choose where to render the map to, so I find it by going into the material Maya automatically created.
However, I wasn't happy with the results from neither the hair or the body. I got many sharp triangles in places they shouldn't be. (Am I doing something wrong? Probably...)
I solved this issue by using xNormal to render the maps instead. The results were more satisfying, and I got the added benefit of getting everything other than the actual AO, transparent. The transparency makes the process of adding the different maps together into one file easier. However, using xNormal requires you to create an fbx file, which adds another step. This could be resolved by using the actual Maya plugin, (haven't used it) but I kind of forgot it existed, so I took the long route.
I wasn't happy with the hair either, but I've come to the conclusion that drawing the hair by hand will (hopefully) create a better result, so that's what I'm going to go with.
Anyways, onto texturing! I start out by creating a new Photoshop file that is the correct size. I can then drag and drop the AO maps into PS, and make sure they match the UVs. I then create a new layer above the AO, and start covering the different parts in a base color. I pick the colors from pictures, using a Chrome add-on to get the hex value. (ColorPick Eyedropper) Using different blending modes, I can achieve the desired effect from the AO. (Overlay and Soft Light are good ones to start with)
A problem I got immediately was that the face was too bright. I solved that by using the Burn tool on the AO layer to make it darker. It's still too bright, but right now I'm just keeping it simple.
Thank you for reading!
Haha! Yeah, I need to practice using Mudbox. I think it will enhance my work a lot. We don't really work well together right now
I would if I had access to it :P My school allows me to use Mudbox, not Zbrush.
I've also changed the coat's color, and added buttons to it. I'm a bit indecisive about what I'm going to do with the shoulder pads. Maybe I'm going to make them gray/silver, or keep them the way they are. If I go with silver, I'll have to change the belt buckle too, since I don't think a single gold accent will look good.
The gun's wood texture is made in Photoshop using This method. It's made using Photoshop's Filter "Fibres..." Using that filter, you get a basic tree texture. If you want some whirls and more variety, you can use Liquify to modify it. Lastly, you create a noise texture above the Fibres. To do that, you create a 50% gray layer, and Add Noise in filters. The last filter needed is Motion blur, which is set to 90 degrees. This makes the texture a bit more diverse.
I've also used the Blur tool on my AO map, just to make it a bit more subtle.
Now, during my texturing, I've run into some problems with my UVs.
Here is the first one. For some reason, I decided to but a border along the red line, when I have a belt covering it above it. It's a stupid mistake that I should've paid attention to. (The striped pants are a test for now)
My second mistake is on the weapon. Right now there is a border right in the center of the gun. It's in an obvious spot. Having the side as its own shell would just improve it a lot.
If I had time, I would change these problems. However, this project is also an assignment, and is due this week, so I have to deal with these issues in Photoshop instead. Learn from my mistakes I guess! Thank you for reading!
Today's task has been to create the hair texture. My first task was choosing an actual color. I went with a dark blue color, like many of Caitlyn's other skins have, but of course with my own take on it. I started out with a base color, a mid tone. Then I chose a darker tone, and began drawing big hair strands following the shape of the hair. After that I went ahead and chose a lighter color, and added even more strands. This is all done randomly, just adding lines where I think they should be.
With these three colors in place, I can start refining the colors and shapes. The key with hair (I think) is to create a lot of variety, lots of small differences in colors and size of hair strands. So that's exactly what I did, going through the "guidelines" with smaller brushes with differences in colors. My opacity was at around 50 %, which helped create this variety even more.
After going through the entire hair, and checking the texture on the model often, I finally achieved something I was happy with. I did some minor changes in color using Hue/Saturation (Ctrl + U), and also added another layer above the hair. This new layer is going to make some parts of the hair a bit brighter. Using a Clipping Mask, and the Overlay blending mode, I could simply paint white where I wanted the hair to be a bit brighter.
Now, the hair is pretty much done, and I'm satisfied with it!
Next is the hat. I wasn't sure what needed to be added, but it had to be something. Many of the pirate hats have this cross pulling the sides in, so I decided to add them. It was a simple process of painting and using Dodge/Burn. I also added a border where the hat folds.
This is all I have time for today. Thank you for reading!
Nopes my mistake, I didn't realise that the third screenie of the UV window was a combination of the 2 above, My bad.
P.s. you may wanna consider thicker strands to the hair,
you may lose the texture when it's at game distance otherwise.
Good job though dude.
It's all good dude!
Yeah, I might have to do that. I just liked how it looked right now, but I do realize that the small strands might become a problem if it were going to be in the game. We'll see what I have time to do, this assignment is due Friday for me, and I wouldn't consider them to be the most important issue to fix. Thank you very much for the input!
With the Brush set up, I used the Pen Tool to draw exactly where I wanted the seams to go. I find this easier than drawing by hand. Then I can right click on the Path created, and select Stroke Path, with Brush as selected tool in the popup. Now I have pretty okay looking seams, made really easily. I also added the same properties to the Blending Options, Bevel and Drop shadow.
Repeating this technique where I found them on real boots, gave me this result:
I know these details most likely wouldn't end up visible if the model would actually be in game, but I think it's good practice to add it anyway.
I've also noticed that my UVs around the foot were really crappy. They were so crappy that I couldn't have seams go all the way around the base of it. I'm not too fussed about not having any there, since I added ones going across the top instead, but it's still worth noting it. I've noticed a couple of things I do wrong during this project, and it has really helped realize the mistakes.
Anyways, that's all for me today. Thank you for reading!
My tasks for today were to create a pose for my character, and then create the images needed to enter the contest. So, to create the pose, I had to rig and skin my model, something I've never done before, not properly anyway. I've only played around with it, and understand the concept of it. I did it though, with the help of my teacher. I used the Joint Tool in the Animations tab, and put joints kind of following real anatomy. It's not important that it gets really good, it's just going to be for a pose after all. After clicking out the joints, I go to the "Skin" drop-down and select the options for "Smooth Bind". I was suggested to use Geodesic Voxel as Bind method. It worked out fairly well, and I went on to Painting Skin Weights. I just removed the weights that had been placed outside their correct zone. This applies mostly on the arms and legs, where they were placed on the torso/other leg. I didn't really have time for more than that, neither were I very keen on doing more, so I moved ahead to creating the pose.
The pose was easily made after having skinned the model. It's just to rotate the joints to a position I liked. I started out placing the gun in a proper spot, and then placing the hands and arms in a semi-realistic manner.
Now it's time to create the images that were required. Firstly, I set up the model for beaty shot (I actually used two models). I made sure Flat Lighting was turned on, and rendered a 1080P image.
For the composition one, I created a camera, and rotated it 45 degrees, to point down, just as it is in LoL.
When it comes to the construction one, I took two screencaps, one with a default gray model, and one with the texture on, both selected to show the wireframe.
This is all for Maya, now onto Photoshop.
I took one of the images Riot provided, and put the composition render over it. I duplicated the render, and lowered the opacity, and matched the color to the blue shadow the other character in the picture had. This layer is going to be the shadow, so I scaled and flipped it to match shadows decently. Lastly, I added a stroke to the main render, to make it look more like in-game models do.
The beauty shot is pretty straight forward, it would've been fine without adding anything. However, I wanted a background, so I used another image Riot provided, and blurred it, and used it as a background. I also added a drop shadow to the render.
Lastly, is the construction image. I took the two screencaptures I took, and cut them so that only the viewport was visible. I also imported the textures, and the concept image. I put the wireframe/UV snapshot on one of the textures just for the sake of it. They didn't specify that they wanted or needed it, but I just did it.
Here is the final model:
This is the end of this project. It has been really fun, and I've learned a lot.
Thank you very much for reading!