The BRAWL² Tournament Challenge has been announced!
It starts May 12, and ends Oct 17. Let's see what you got!
https://polycount.com/discussion/237047/the-brawl²-tournament
It starts May 12, and ends Oct 17. Let's see what you got!
https://polycount.com/discussion/237047/the-brawl²-tournament
3DS max UV packing
Hi forum. I was advised to post up a thread here about my current WIP. I did some searching but Im still struggling a bit. Working on a game ready tommy gun tutorial from digital tutors. Ive finshed the high poly and low poly versions. Low poly is about 5200 tris. However Im stuck at unwrapping the gun as the tutorial basically gives you a very basic idea of what to do, and thats it.
Ive unwrapped the entire gun (if I can do pieces more efficiently let me know as this is my first uv attempt), But now Im having trouble trying to figure out how to pack all the uv's into the work area. I want to make it efficient, And easy to work with and most of all look good
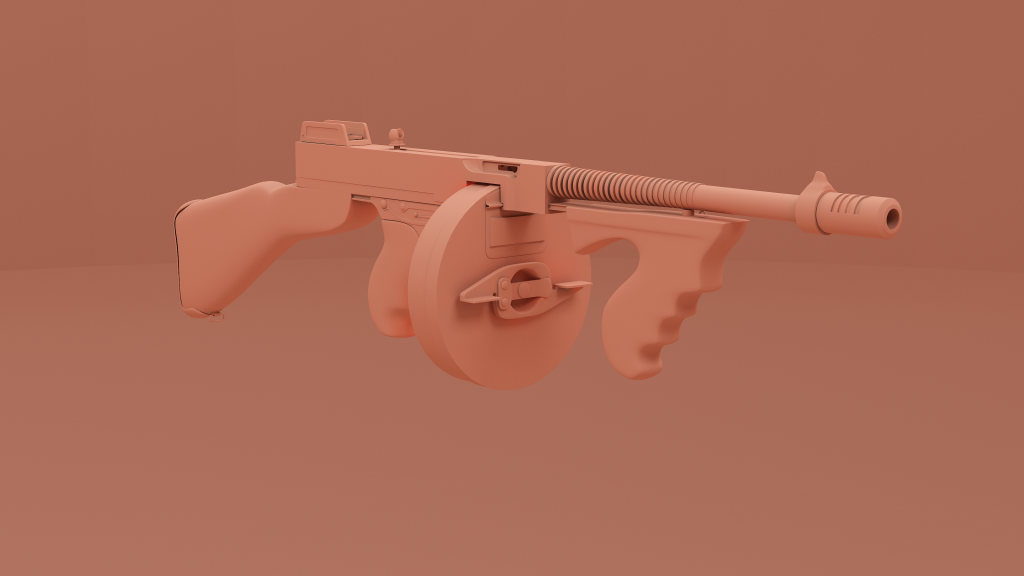
So first, heres a render of the high poly.
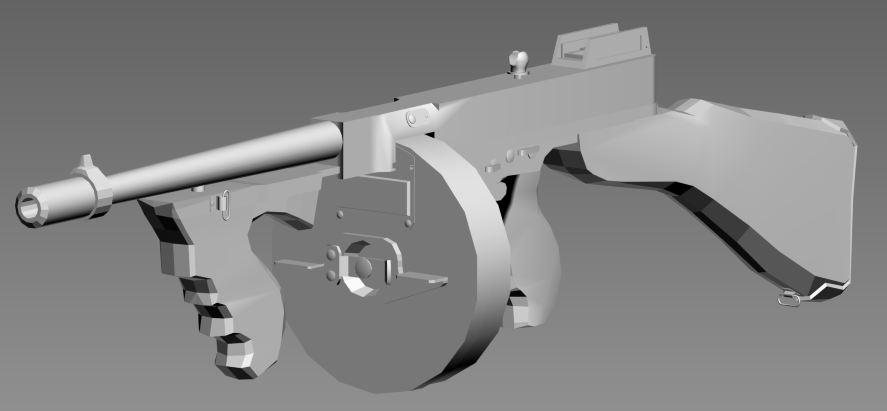
Next is a image of the low poly (just a screengrab)
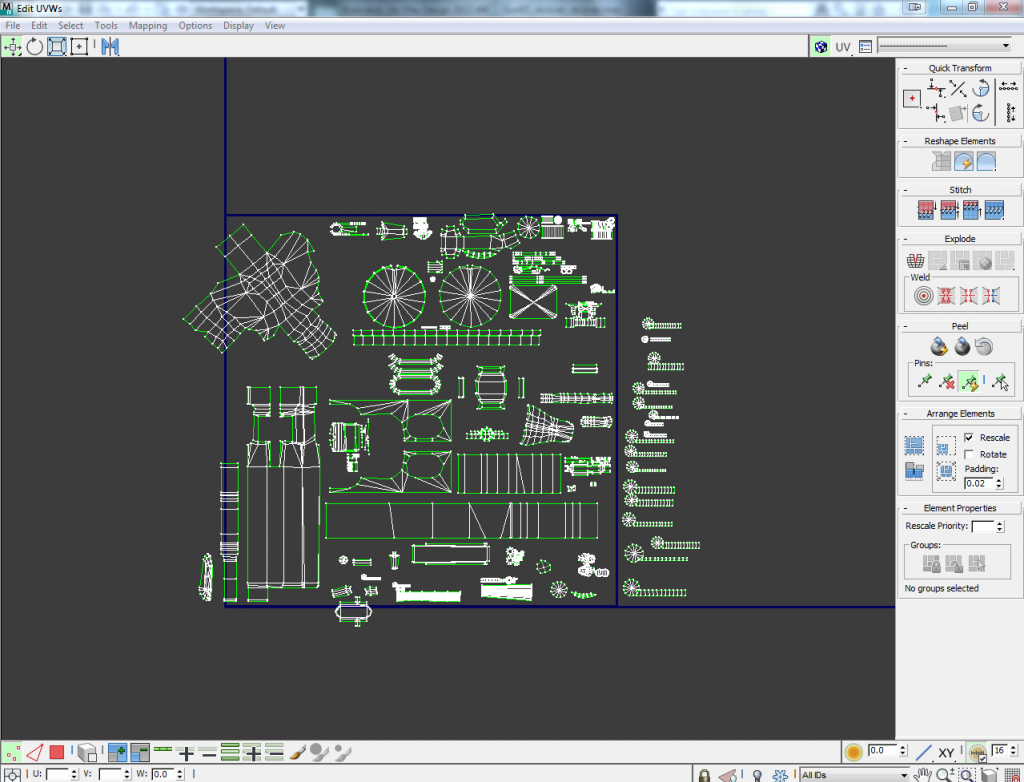
And heres my unwrap so far, I slowly moved most of it pretty close to the area But it still needs a lot of work.
So if I can get some assistance and advice that would be amazing! Thanks for checking out my post.
Ive unwrapped the entire gun (if I can do pieces more efficiently let me know as this is my first uv attempt), But now Im having trouble trying to figure out how to pack all the uv's into the work area. I want to make it efficient, And easy to work with and most of all look good
So first, heres a render of the high poly.

Next is a image of the low poly (just a screengrab)

And heres my unwrap so far, I slowly moved most of it pretty close to the area But it still needs a lot of work.

So if I can get some assistance and advice that would be amazing! Thanks for checking out my post.
Replies
Also one thing you can do, it looks like you have a lot of cylindrical mapped shapes which result in long rectangles, you can stack all of these up into a nice clean shape. Many of the cylindrical end caps can be capped into odd-shaped holes in the layout for better efficiency as well.
One thing to keep in mind is you want to make sure your straight edges are straight in the uv layout, so clamp any edges that are slightly skewed, and try not to leave uv islands rotated at random. The reason for this: It takes 1 pixel to represent a straight line but a minimum of two to represent an angled line, so if you line everything up well your texture will appear sharper generally. Your current layout looks to be mostly lined upwell but there are some spots you can tweak.
Also before you do the final pack, make sure your texal density is even, what this means as that each element in your model has an even resolution. I usually eyeball this by applying a checkered texture and scaling everything until it looks right. After you've done this step you might want to give some areas more or less, for instance iron sights or areas that are real close to the camera should get more resolution, around 125% for items close to the camera and another 125% on top of that for areas you can zoom in on for iron sights view. Areas that won't even be seen, like the back of the buttstock or the front of the barrel can have reduced resolution as well.
Before you do your final uv packing, you should do a test normal map bake to make sure your lowpoly, smoothing groups and uv layout all work well. I usually make a copy of the uv layout and do a quick auto pack for this purpose. You don't want to find out you need to make a bunch of changes after you've made your final uv layout.
Let it auto pack then do the baking section of the tut?
Hope I can get some advice here.
UV's
Light map
Normal map
And here they are applied to the gun. I have the light map in the diffuse slot, And the normal in the bump slot.
Also, as Earthquake said, don't rotate your straight UV shells. A little less texture sharpness is preferable to shells rotated at odd angles and the aliasing/stairstepping artifacts it produces.
Well I didnt rotate them I have a plugin that packed them. But I could probly manually move things around. I also dont have xnormal.
1) It looks like your low poly is interfering with your light map. Select your low poly, right click and go object properties, then uncheck renderable and bake again. That should take care of the large black patches in the light map.
2) The normal map appears to be set to world space (lots of yellow, green and red) when most normal maps are tanget (lots of blue). In Render To Texture (press 0) under Projection mapping, click "options..." and set it to Tanget.
3) Personally I would rather bake a proper ambient occlusion map from VRay or Mental Ray rather than a light map from scanline. The calculation is based on geometry not on the lighting.
4) Are you rendering your normal maps to png with an alpha channel? because it looks like there isn't a background in your normal map, it would typically be a particular shade of blue. You should probably render to a format that doesn't compress and do weird things with the alpha (like turn it into an opacity map). TGA doesn't compress the image and it leaves the alpha channel as a separate channel. Game engines compress files and it's important that you don't feed it an already compressed image for it to try to compress even more, it comes out looking like garbage.
Ok lot of things im not sure about doing here. xD But I will try some things.
1. How do I bake without my low poly?
2.I checked and it is set to tangent.
3.I do have vray so either would be fine, But I have a hard time figuring out the settings still.
4.I was currently just so I could see them without opening photoshop, would it really make a huge difference?
Thanks for the help guys
The last normal map you posted was indeed all sorts of messed up, I don't know why. The previous ones you posted looked close to what I would expect, but still appeared to have many errors (probably due to how the smoothing groups were set up).
Also, even though you found a better way to auto pack your uvs, that is still quite far from a good uv layout, There are many issues with it currently, the biggest being randomly disconnected faces on your uv islands (why does that grip section only have certain quads attached to its uv island?), far too little space between islands (will be a problem when your textures mip down in game) and randomly rotated islands. Not really a problem for a test bake, but I just want to be clear that you still need to put a lot of love into your uvs. You shouldn't look for a quick fix here, but instead should be able to do the job well by hand before relying on plugins.
There may be some built in shaders these days with max too, not sure, I'm not really a max guy.