Hello people, this is our thread for the PETROL/BLOOD contest!
Our team, consists of myself, and Timbo. To start, I will be creating the vehicle whilst Timbo will be creating the character.
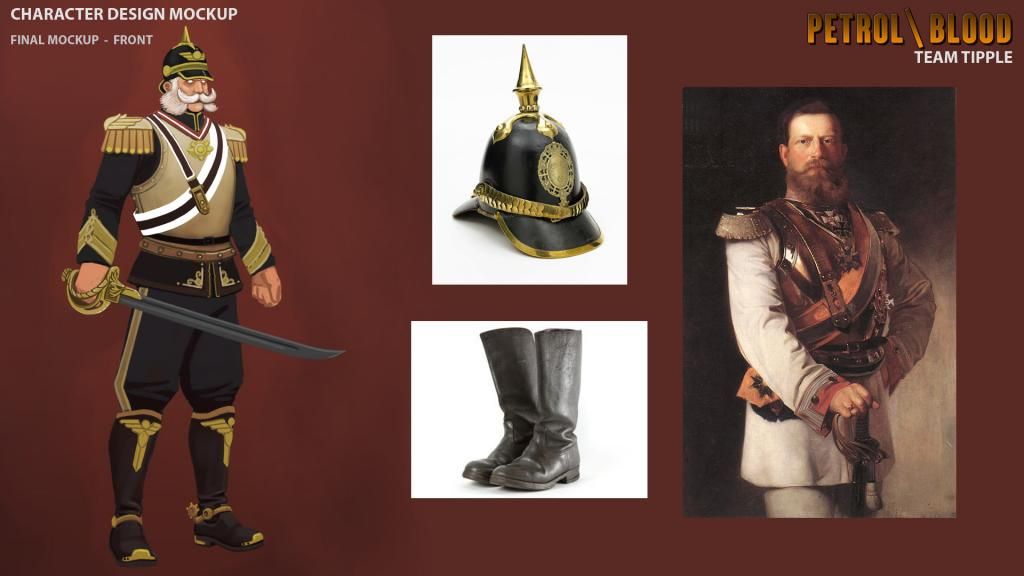
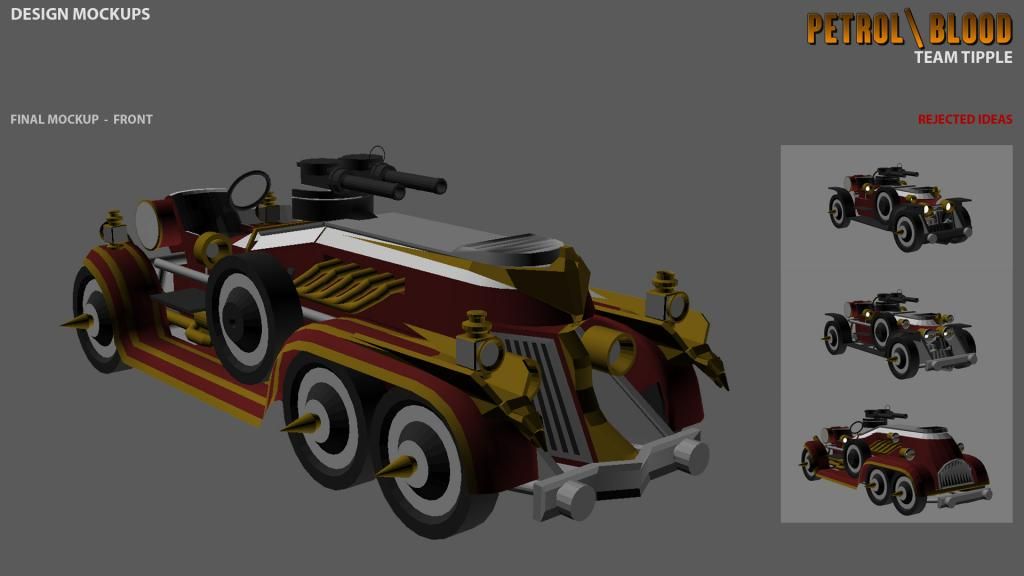
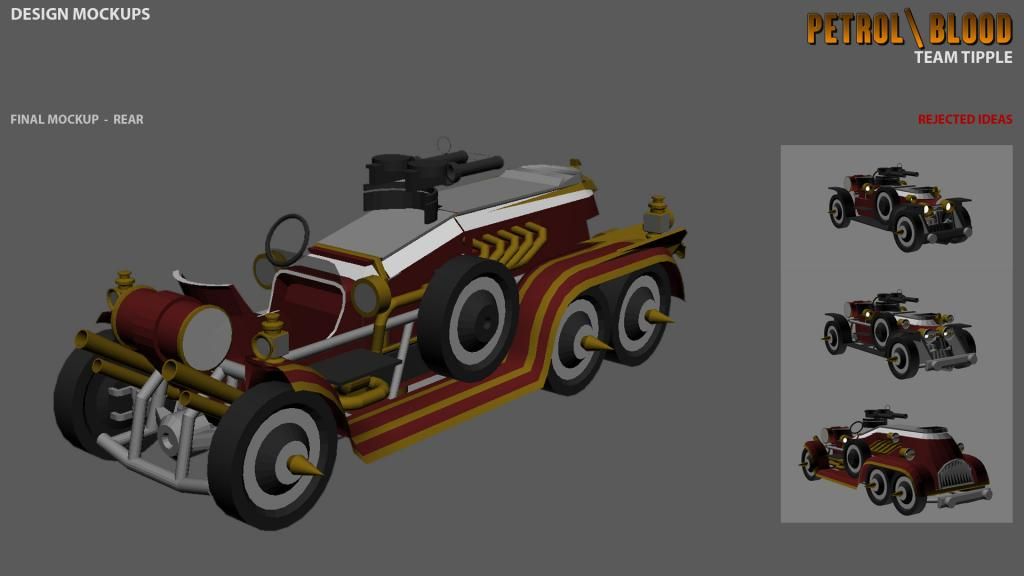
We've spent a evening or two mocking up some ideas for our submission. We've decided to go for a hybrid between Steampunk and Dieselpunk, with a Kaiser themed character and his car.
So far we've settled on rough mockups for both the car and the character (the car itself went through a few mockups before we were satisfied).
At the moment the car is just a hastily made blockout in Max, whilst Tim has used Zbrush and Photoshop to quickly mock up the character.
Ill be working with beardydan on the Petrol Blood challenge, We have both worked together professionally for about year and a half and we seem to sort of get on so we are going to give this a go and see if we end up hating each other or not, Wish us luck
I spent some time this weekend working on the guns and mount for the vehicle. Wanted to get the design of this nailed first in case it affected the shape of the body.
The guns are loosely based on Maxims but they have been beefed up a bit; made the body of the gun a bit larger, as well as changing the shape of the barrel cover. Water cooling is intact via a pipe that leads back in to the car. I've also added a system at the back that will allow the driver to fire the guns from the "cockpit" of the car, and the guns themselves are in a fixed position (like a fighter plane). Extra details such as dirt and damage will be added to the normal map later.
I built a mid poly for these first, so I can just optimize them down quickly for the low. Here's some quick renders of the high poly. (white mesh is a rough blockout of the section of the car they will sit on).
Just a quick update to show how the character is coming along, I Had a few days off work this week so decided to get stuck in and I'm pretty happy with how its coming along so far, there are areas I'm not sure on like eagles on the shoulders have a little to much of a toon feel to them so I'm going to have another go at them when i come round to the second pass, Ill also post some close ups when I've added a little more surface detail to him and worked it all up a little more.
Thought I'd post another update on the vehicle's progress:
First of all I've tweaked the silhouette of the vehicle, as I wasn't too happy with the main design after looking at it with fresh eyes. Nothing too drastic, but I've essentially raised the car, added thicker wheels, and made the entire front section a bit bulkier, just to make the silhouette a bit more interesting.
I'm going to remove the eagle from the front of the car as well as I felt it made it look too tacky.
Anyway, after working out my design tweaks I started working on the high poly for the vehicle itself. I've started with the frame, wheels, suspension, engine and general undercarriage area; areas which really needed to be nailed down so I can build the car around the chassis and ensure everything looks like it works .
A lot of these bits and pieces are based on old bentley stuff, and they will be exposed on the final asset as well. I've made the engine for two reasons; a) You will be able to see parts of it through the grill/hood b) I want at least one of the diorama shots to show the engine, I was thinking maybe "before combat" shot where our dude is preparing the car for battle, or adding some damage to our action shot, or maybe both .
Anyway, here's some quick renders of the vehicle work so far, I am aware some details are missing, such as some of the wiring and steering mechanisms, however I am leaving these until the rest of the high poly is complete.
Thought I'd best post an update. Sorry I haven't updated in a while, but I was off sick for a week (manflu) so progress was hindered a bit, but I am in the process of catching up. I'm hoping to get the high poly done within the next few days as I only have a few bits and pieces left to do, plus a final detail pass (which shouldn't take long).
Here's what the car looks like currently:
Things I have left to do are mainly small details such as the gas pedals, horn, taillights, emblems on the front fenders, more nuts and bolts, steps and the probably the eagles on the front, depending on how they look. May also do some external wiring.
Still trying to think of a name for this thing. So far I've settled on "Kaiserfaust" but that's subject to change.
Looks really nice mate - a big fan of the asymmetrical parts on either side. Also, love the eagle wing design at the sides of the grill how's it looking from behind? Looking forward to more!
Thanks man, was going to post the rear shots as soon as I've done the taillights and gas pedals (as you can see in to the interior from the rear). So should be able to do another update tonight, depending on what time I clock off
Hi all, its been i while since i posted and i have been letting the side down a little I've just been super busy with work so I have got some catching up to do, Dan has done some amazing work on the car, well done mate its really cool. i just have to pull my finger out now and get us a character to put in it, So this is our driver so far I still have a fair bit of work to do but hes starting to come together.
thanks for all the feedback,Ive been doing a little work to try and catch up, I've still got to work up the face and finish the sabers scabbard, and there's still allot of embroidery to do but I feel like I've broken the back of the highpoly work now.
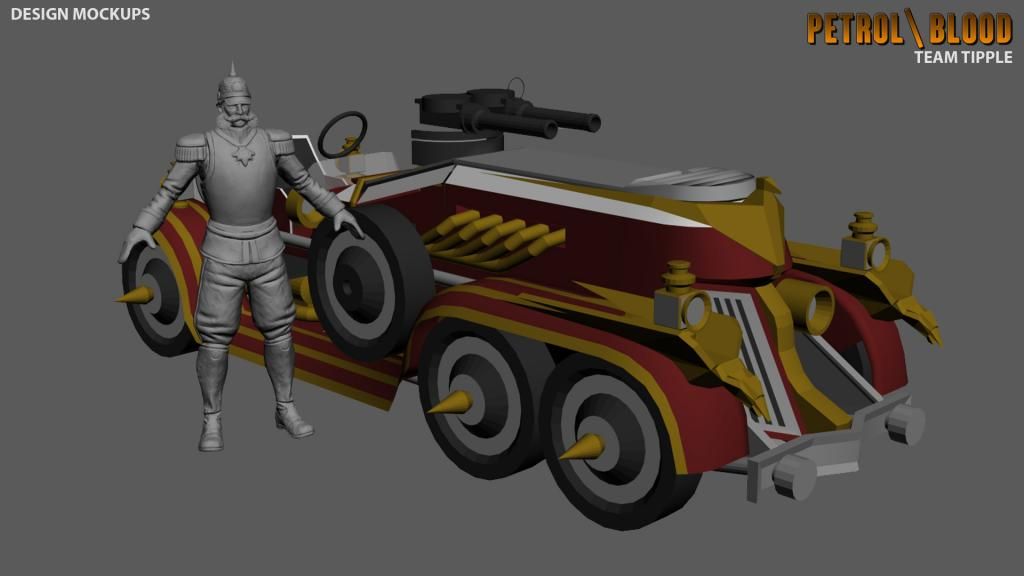
Tim set up a quick test in Zbrush so we could see them together (finally). Note that the car hasn't had an extra sub d applied in Zbrush (on top of the Max turbosmooths) as it would murder our PC's if we tried that with the character in the scene as well. Removing the turbosmooth on 91 parts and smoothing in Zbrush seemed a bit, excessive for a quick test.
Dayme! Yeah, they definitely work well together. Really cohesive. I guess the only thing I'm hoping for is less symmetry on the trousers, but it's a minor quibble. I can already picture the final beauty shot. Here's hoping your texturing's as good as your high-poly skills. Then this'll be a keeper for sure.
This is one of my favorites this contest. I second Monte cristo on the symmetrical folding, I would wait until the character is posed before finalizing the wrinkles.
Thanks for the comments, so about the symmetry, I would usually always sculpt a characters clothing without symmetry but unfortunately i really have very little time to work on this project and as a result i have opted for the very easy and i agree nasty mirror, i will maybe pull it around a little and see what i can do to try and improve it. So all ill say is sorry Dan ill have more time when we next do something like this its just been a bad few weeks .Ive done a little work on the face this evening and added the hair and i think i really need to say that's it for the highpoly work and just get the lowpoly stuff started, if i get any time ill rework some of the fine details in later.
I have been working on my Quixel pass on the main car:
Toolbag 2:
3DO:
Going to do my final pass in Photoshop and NDO, need to add some splatters, a couple of painted emblems, the license plate numbers etc. Still have the glass to do which shouldn't take long.
Did a few more tweaks, and have decided to draw a line under it. I could literally spend days tweaking stuff, but I need to crack on with the diorama, and I'm pretty happy with the results anyway.
I wish you could have some flat parts to rest the eye. Even on the long nose were its typically a resting area, just seems like you have arbitrary color changes from white to black to gold, its just hard to rest my eyes on this piece because of the amount of detail going on in terms of color changes. The high poly looks sick, but once you started adding color, I'm getting lost.
Its also pretty reflective. Like, everything is blinging, so, its hard to make out shapes and form when my eyes are filled with white flickers. Like, their is no wear and tear. Even on the tire rims, its all shiny. It might be because their is no light source and not in a scene, but, just seems like a lot going on.
i have some concerns though.
first of all there are a lot of high gloss highlights in here, especially the guns are pretty hard to read because of that.
second all of the wear and tear is spread out pretty evenly.
i think it would look better if it would fade out from front to back, since when you are driving most of the impact is clearly on the front, while in the back, there should rather be some dirt gathering up.
also handoperated tools like guns, tend to have a different look concerning wear, with way smaller, subtle scratches, rather then big chuncks of chromatic, polished of edges.
i think a bit more dirt gather for the AO might go a long way too.
Thanks for feedback, I will try my best to get these changes incorporated in time, however obviously the priority at the moment is finishing off the scene itself and getting Tim's character in and looking good. In regards to reflections/gloss specifically, a lot of it is to do with the lighting setup in those shots (especially the back light being far too bright) it'll actually look a lot more balanced in the final submission purely because of the lighting changes. I think to add to your feedback I'll also tone down the chrome on the grill and swap out the engine material to a to a toned down, dirty brushed metal as they've been bothering me a lot recently.
A quick update, Tim has sent me his character, he is off for the weekend so it'll be me doing the updates and submission now. I've spent today tweaking the car textures and setting up my scene in Toolbag 2. Just the first scene so far, but the second uses the same assets as a base but will be our action shot.
EDIT: Before I forget, here's a quick and dirty shot of the high poly props:
Replies
Ill be working with beardydan on the Petrol Blood challenge, We have both worked together professionally for about year and a half and we seem to sort of get on so we are going to give this a go and see if we end up hating each other or not, Wish us luck
The guns are loosely based on Maxims but they have been beefed up a bit; made the body of the gun a bit larger, as well as changing the shape of the barrel cover. Water cooling is intact via a pipe that leads back in to the car. I've also added a system at the back that will allow the driver to fire the guns from the "cockpit" of the car, and the guns themselves are in a fixed position (like a fighter plane). Extra details such as dirt and damage will be added to the normal map later.
I built a mid poly for these first, so I can just optimize them down quickly for the low. Here's some quick renders of the high poly. (white mesh is a rough blockout of the section of the car they will sit on).
Just a quick update to show how the character is coming along, I Had a few days off work this week so decided to get stuck in and I'm pretty happy with how its coming along so far, there are areas I'm not sure on like eagles on the shoulders have a little to much of a toon feel to them so I'm going to have another go at them when i come round to the second pass, Ill also post some close ups when I've added a little more surface detail to him and worked it all up a little more.
First of all I've tweaked the silhouette of the vehicle, as I wasn't too happy with the main design after looking at it with fresh eyes. Nothing too drastic, but I've essentially raised the car, added thicker wheels, and made the entire front section a bit bulkier, just to make the silhouette a bit more interesting.
I'm going to remove the eagle from the front of the car as well as I felt it made it look too tacky.
Anyway, after working out my design tweaks I started working on the high poly for the vehicle itself. I've started with the frame, wheels, suspension, engine and general undercarriage area; areas which really needed to be nailed down so I can build the car around the chassis and ensure everything looks like it works .
A lot of these bits and pieces are based on old bentley stuff, and they will be exposed on the final asset as well. I've made the engine for two reasons; a) You will be able to see parts of it through the grill/hood b) I want at least one of the diorama shots to show the engine, I was thinking maybe "before combat" shot where our dude is preparing the car for battle, or adding some damage to our action shot, or maybe both .
Anyway, here's some quick renders of the vehicle work so far, I am aware some details are missing, such as some of the wiring and steering mechanisms, however I am leaving these until the rest of the high poly is complete.
Here's what the car looks like currently:
Things I have left to do are mainly small details such as the gas pedals, horn, taillights, emblems on the front fenders, more nuts and bolts, steps and the probably the eagles on the front, depending on how they look. May also do some external wiring.
Still trying to think of a name for this thing. So far I've settled on "Kaiserfaust" but that's subject to change.
I love the details that you guys are putting into these models.
Looking forward to see more updates.
Good luck with it
thanks for all the feedback,Ive been doing a little work to try and catch up, I've still got to work up the face and finish the sabers scabbard, and there's still allot of embroidery to do but I feel like I've broken the back of the highpoly work now.
Tim set up a quick test in Zbrush so we could see them together (finally). Note that the car hasn't had an extra sub d applied in Zbrush (on top of the Max turbosmooths) as it would murder our PC's if we tried that with the character in the scene as well. Removing the turbosmooth on 91 parts and smoothing in Zbrush seemed a bit, excessive for a quick test.
Thanks for the comments, so about the symmetry, I would usually always sculpt a characters clothing without symmetry but unfortunately i really have very little time to work on this project and as a result i have opted for the very easy and i agree nasty mirror, i will maybe pull it around a little and see what i can do to try and improve it. So all ill say is sorry Dan ill have more time when we next do something like this its just been a bad few weeks .Ive done a little work on the face this evening and added the hair and i think i really need to say that's it for the highpoly work and just get the lowpoly stuff started, if i get any time ill rework some of the fine details in later.
Just taken some quick shots of the low poly with the normal map bake. I've also done a first pass in Ndo for some minor details.
I've added some baked AO, and also fixed a couple of normal boo-boos which I totally missed in my haste to post an update
Today I've been working on the mask for DDO. I've not actually worked on the materials yet but I've got the mask sorted:
Edited post due to image hosting issues:
Thanks Suba!
I have been working on my Quixel pass on the main car:
Toolbag 2:
3DO:
Going to do my final pass in Photoshop and NDO, need to add some splatters, a couple of painted emblems, the license plate numbers etc. Still have the glass to do which shouldn't take long.
stunning work
Texture tweaks:
Did a few more tweaks, and have decided to draw a line under it. I could literally spend days tweaking stuff, but I need to crack on with the diorama, and I'm pretty happy with the results anyway.
Its also pretty reflective. Like, everything is blinging, so, its hard to make out shapes and form when my eyes are filled with white flickers. Like, their is no wear and tear. Even on the tire rims, its all shiny. It might be because their is no light source and not in a scene, but, just seems like a lot going on.
i have some concerns though.
first of all there are a lot of high gloss highlights in here, especially the guns are pretty hard to read because of that.
second all of the wear and tear is spread out pretty evenly.
i think it would look better if it would fade out from front to back, since when you are driving most of the impact is clearly on the front, while in the back, there should rather be some dirt gathering up.
also handoperated tools like guns, tend to have a different look concerning wear, with way smaller, subtle scratches, rather then big chuncks of chromatic, polished of edges.
i think a bit more dirt gather for the AO might go a long way too.
EDIT: Before I forget, here's a quick and dirty shot of the high poly props:
Scene 01 WIP:
also the streetlight should function more as an accent, rather then the main light source, as its a pointlight thats very close to the scene.
the mainlight usually works best with a directional light, that is comming from somewhere in the front, like the sun for example.
right now the scene doesnt look like day or night, since the lamp is too bright for daytime, and the ambient is too bright for nighttime.
i`d recommend you google a photograph or take a movie scene you like for reference and try to recreate the lighting in there.