Female Character study
polycounter lvl 12
I'm currently working on a Female character, normally I practice doing male characters and rarely go past the anatomy stage, I need to break this habit and learn how to do female characters.
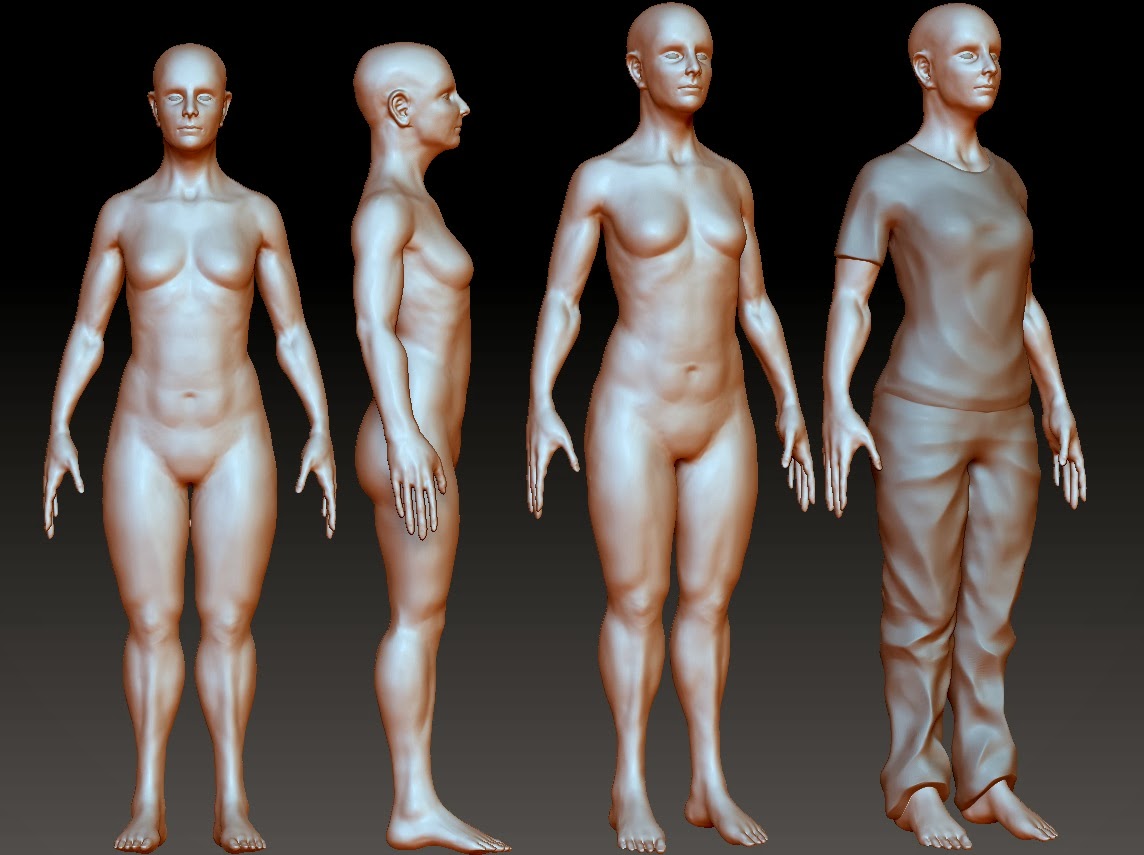
Please critique so I can improve and make changes, It would be greatly appreciated.
Please critique so I can improve and make changes, It would be greatly appreciated.
Replies
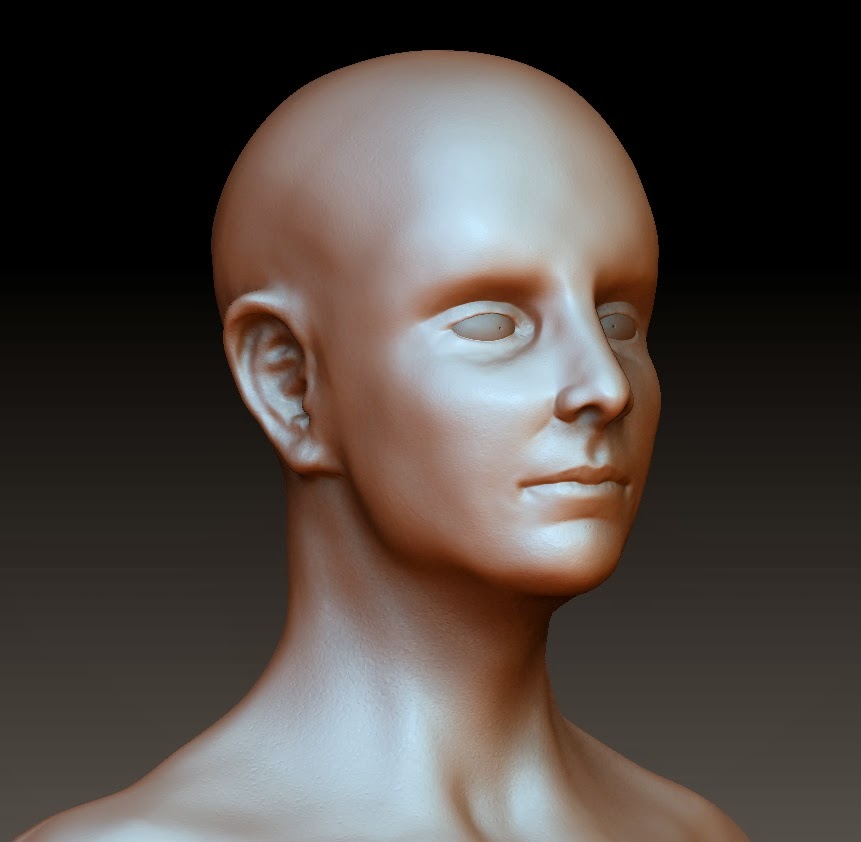
I would rework the head as well. It doesn't look very feminine. I think this is mostly from the head shape you have at the moment. The ears are a little large as well. The throat should be pulled back, but I think this will be fixed by shortening the neck.
Sorry I just rattled those off, but I hope this helps some! It is looking good so far!
And the face is surely the most important part.
Not sure if I pulled the head down and in enough and I feel the shins may still be to defined.
Areas in the neck are still to defined and I need to clean it up quite a bit.
Anything I can change or improve on?
Dont know if this would help; but i'm working on a female piece myself at the moment, and whilst yours has form it lacks subtle features that make it more of a feminine look...... I've tried to do a quick paintover to help you out - take it with a pinch of salt... it might not be what your going for but it might help you along the way.
http://gifmaker.me/PlayGIFAnimation.php?folder=2013120910z5SwfpC3HvfZ8IIUrUTyNK&file=output_QS9p8k.gif
Started some poly-paint for the first time, Still not entirely sure, I'm having trouble getting natural tones.
A female face has very subtle features, make them too strong and you'll end up with some kind of weird effeminated guy. My advice would be, go down some subdivision level and delete the higher ones. When I make female faces 80% of the work is done at low subdivision so it's smooth and subtle. If you haven't already, I strongly suggest your to check out the Vertex magazine (it's free). Hazardous has written a very interesting article about female faces.
The ears are huge. A little trick I use to quickly check if my ears are well placed is to picture the character with glasses. In your case it's impossible for her to wear glasses.
..why didn't I think of this in the beginning :P
More progress, head shape is messy and needs to be cleaned/smooth out
Forget about polypainting, and details right now and focus on form. go down to subdivison 1 and 2 and shape the face, smoothing out areas that are becoming clay/mud like - you obviously have noticed the blobbyness yourself.
continue until you can see this disappear on the higher subdivision levels.
-
Dave
The whole face plane looks like it is slightly angled upwards. The jaw bone and chin could be narrowed a small amount to make it more feminine. I like the way you have the lips right now. The little blue triangle is a top view of the front cheek plane. It looks like it is angled pretty sharply right now and it could be rotated so that it makes a frontal plane. The purple was just for softening. The cheek bones could be softened too, but I'm sure you're getting to the softening like you mentioned so I stopped!
This line should touch the brow line above it. If it doesn't then your head is tilted.
Based on Andrew Loomis's method of drawing heads in 3D space, he does something very similar. Basically the top of the ear should be the same height as the eyebrows when you character is looking forward - notice how the top of your character's ears touches the top of the upper eyelid on her eyes. It's too low, and it tells us that she's looking upward.
Also, to "sell" a head (notice the word head, and not "face") - the shape of the skull, the connection with the neck and everything basically that's around the face, is just as important as the face. Think of all those shapes as the scaffolds of your face - if they don't fit right, the entire face collapses. Well, the entire head does.
More progress
Her head from the side is too wide and looks like it all is slopping to the back, her forehead will also need to be brought forward a bit. Her ears are also a little too large, the earlobe should stop at the base of the nose and the top of the ear stops at the eyebrows (where the bone is) the ear could also be moved forward just a touch.
I hope this helps! She keeps on getting better!
More progress, I did something to ZBrush after I accidentally opened a preset project.
Suddenly the shaders were a lot softer, I kinda like it, It'd be good to know exactly what I did though.
My advice if you'd like it:
1 - Make sure to work in the lowest subdiv possible. This will alleviate some of the muddiness of the sculpt seen in the curving areas (back of skull from profile view, ears, etc.)
2 - Weakest part right now is the ears. Ears are hard, but given how far you've come with the face, you have the skill to really do the ears justice. Grab some references and turn it into the best part of the sculpt. Pay particular attention to the shape of the ears from the front view, and the way the top of the ear attached to the skull.
3 - The 'softness' is the 'wax preview' option in the shader modifiers panel. Turn it down a bit, because it will make some of your rougher forms seem softer than they are, and you want to see those to fix them.
4 - Open the mouth. I mean, sculpt structure wise, the lips are much easier to get when they are not attached together, so if you sculpt out the interiour of the mouth, you will have an easier time getting the lips to look right.
Anyways looking great, come so far from the first post, and good job putting everyones crits to use, that's a great skill itself.
You may be able to get some lower subdivisions back, though, by projecting the details onto a duplicated subtool.
First, of course, save your work.
Then take the subtool that you want lower subdivisions on. We'll call that subtool 1. Duplicate subtool 1. We'll call the new one subtool 2. Remesh subtool 2 to whatever resolution you want your lowest subdivision to be using dynamesh or qremesher or any retop tool. Then divide that mesh until it has approximately the number of points as subtool 1. Then hide every subtool except for subtool 1 and subtool 2. Bring subtool 2 to the lowest subD and with it selected, hit "project all". Bring it up to the next subD and repeat. Do this until you have reached the highest subdivision level of subtool 2. It should look prety much identical to subtool 1. Now you can use subtool 2 as your new sculpt.
Sometimes weird artifacts happen while projecting. A lot of times messing around with the settings under "Project" can help this. Also, one can sometimes get around this by storing a morph target on subtool 2 before doing each projection. Then you can use the morph brush to get rid of the artifacts.
I'm not really a tutorial writer, so I hope this is decipherable. Let me know if you don't understand any part of it. There are also tutorials to be found on the subject scattered throughout the internet. I just don't remember where they are.
There is still a way to go when if comes to smoothing out the mesh around the arms, back and behind the legs(still lumpy)
Big thanks to everyone who's been giving crits, my works improved substantially, you guys are awesome
Over the last 10 days; your improvements been immense
Cheers