Realistic Female Rendering: WIP

interpolator
I've been inspired by Ysalex anatomy thread to make an attempt at a realistic rendering of a attractive female.
I chose to use Candice Swanepoel since there is tons of reference of her and she has pretty ideal facial characteristics for a female.
This is what she looks like for those of you who have never heard of her before.
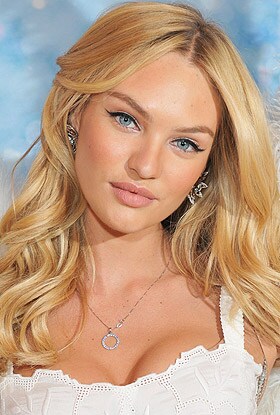
I just want to make it clear that I'm not actually trying to make a likeness of Candice. I'm simply using her as my main reference because she is attractive and I can't sculpt something realistic without reference from somewhere.
I'm decent at sculpting and anatomy (so I think at least...") ) But I know very little about the rest of the workflow necessary to making a realistic image from 3d via HQ render. This is the first time for me using fibers in zbrush and doing anything beyond very basic renders...
) But I know very little about the rest of the workflow necessary to making a realistic image from 3d via HQ render. This is the first time for me using fibers in zbrush and doing anything beyond very basic renders...
Anyway, I figure it would be a lot more beneficial to get critques as I work on this since I'm such a noob.
Here's where I am at now... I still haven't polypainted anything other than solid colors, and this render is pretty much straight out of zbrush viewport.

Let me know if you have any critiques so far, I would greatly appreciate it! BTW, all hair is very WIP, I don't know what the f&$# I'm doing, lol.
Oh yea, and I'm thinking about a pose later similar to this...
http://wallpaperswide.com/candice_swanepoel_the_white_angel-wallpapers.html
I chose to use Candice Swanepoel since there is tons of reference of her and she has pretty ideal facial characteristics for a female.
This is what she looks like for those of you who have never heard of her before.
I just want to make it clear that I'm not actually trying to make a likeness of Candice. I'm simply using her as my main reference because she is attractive and I can't sculpt something realistic without reference from somewhere.
I'm decent at sculpting and anatomy (so I think at least...
Anyway, I figure it would be a lot more beneficial to get critques as I work on this since I'm such a noob.
Here's where I am at now... I still haven't polypainted anything other than solid colors, and this render is pretty much straight out of zbrush viewport.
Let me know if you have any critiques so far, I would greatly appreciate it! BTW, all hair is very WIP, I don't know what the f&$# I'm doing, lol.
Oh yea, and I'm thinking about a pose later similar to this...
http://wallpaperswide.com/candice_swanepoel_the_white_angel-wallpapers.html
Replies
You might notice the head isn't attached actually. I started this sculpt from a sphere, and by the time I realized I needed a body I figured I would just use a base mesh and not waste so much time.
in zbrush I still need to:
-fix eyelids
-smaller details (like lip wrinkles and stuff)
-pose her! (which will break the symmetry... oh well)
-Another pass on the hair/eyebrows (she needs to be posed for this)
-detail pass polypaint (the whole thing really)
-any adjustments people point out?
I noticed couple of things that might help eventually.
I know you said you did not want to go for likeness but that goes for most females - you could make the jaw line from front view a bit rounder. I also noticed that the ear is tilted back a bit too much. The back of her head even if not visible from the render you are going for might also be a little too big. Good luck with it
She is looking great! But I think her lower lip is a bit too large. I would also give her lower lip a bit more angular look than round curve. Other area that looks weird to my eye is that Zygomatic bone area, but I am not sure why
Ear:
I think she might have a little weird anatomy by that ear there like it really is tilted back, but the ear in general is garbage honestly. lol. I might rotate it a little just to see if it looks better but yea probaby can just cover that with hair. Good to know though, cause you are right the ear usually is tilted that way.
Chin: I played around with her jaw line a lot! I mean way too much, lol. I think I might be sold on it but I'll revisit it if it causes some problems or someone can convince me to change it. When she was younger she had a much more "chubby" face and it was more round, but as of late, its much more angular. Personally I like the angular look more, might just be me. But I could still be over doing it. Here are some references for the ears and chin.
Rolang: thanks for the feedback! If you check that reference I have do you still think her lower lip looks big? That was one area I was trying to just copy cause I couldn't make up my mind what would be a more attractive look. Might be the shadows in the cheek area also that gives her a little off look. I'll look into that too, and yea, side of the head is all jacked up and crappy, might just forget about it since her hair will cover that up, lol.
I think I'll take a stab at posing her now. There are muscles in the neck and stuff that look completely different when you turn your head so I'm probably wasting time tweaking this any further in this pose.
again, this is the pose I'm planning on. http://wallpaperswide.com/candice_swanepoel_the_white_angel-wallpapers.html
That said, you should probably just take this one through to completion how it is, and do a second texture/render pass on her going for a non-makeup look.
Actually I was hesitant to paint in the makeup anyway, cause I read somewhere that people will often times make a separate pass for makeup when doing the final renders. Since this is all one texture atm I realize its going to be hard to go back. The good news is, I only spent about an hour painting so its not a huge loss if I end up trashing the makeup version.
I'm sure I will learn a lot once I go thru the whole process here, so I'll take your advice and do a second pass. I would really like to get a portfolio worthy image out of this and I know my first attempt is going to be full of errors. I’ll treat this as a test run.
Evolvyn: Hey thanks for pointing out the boob error. Lol. Didn’t notice it myself, but yea they do look super high even considering she has a crazy pushup bra on. I’ll def. fix that before I pose her.
In your second post (the turn-around) on the right facing view, it looks like her face is pointing/facing down, but her head is looking straight forward.
Check the anatomy of the nostrils where they connect to the area above the upper lip, it's looking kind of thin, and she almost looks like she doesn't have an end 'ball' to her nose - your ref has more mass there.
The jawline is looking a little masculine to me. Your ref chick has a hard jawline, but it blends because her face is wider and forehead is bigger. I know you said you aren't necessarily making a likeness but if you are using no ref or other ref for the 'non-likeness' parts then you are maybe blending shapes that don't necessarily come together to form a nice beautiful face/head shape.
Keep going dude, it's looking good. These are my opinions so if you don't agree, then maybe they can at least help you think of other things to improve
I brought in her jaw a tad and smoothed stuff out along the jaw line more. also thickened up her nose in a few places.
Things have changed a lot from that turn around image, but yea her head is probably tilted on the extreme side. I'm not gonna worry about that though since I plan to pose her now, and I think I have the depth of key areas pretty close now from the side. But that will be more clear when she is posed.
Oh, and I lowered the boobs and worked on the arms and under arm area some more.
Here is an image of her without any bpr render. Its amazing how different she looks without my crappy attempt at lighting her in zbrush. I think it might be part of the reason people have been mentioning her jaw line. That harsh shadow when I render.
Ok, Now I'm gonna pose her for realz, I could do little tweaks on her forever. lol. (the boobs were a pretty big mistake though, and I'm still not satisfied honestly.)
-I need to re-sculpt/tweak a bunch of stuff. The bra itself for example is way too messed up to fix, so I'm going to totally remodel that.
-The hair hasn't really been touched, so that is looking pretty bad now too.
So yea, its totally messed up now, but just thought I would post this to document my progress...
Any fiber mesh experts around that can give advice?
Honestly I'm not sure how to manipulate the fibers to look like that. Might be way too difficult but I'll give it a shot anyways. I'm thinking I might model a lowpoly plane mesh of the hair so I can push strands of fibers to the surface. Only solution I can think of. Worst case I'll simplify the hair style quite a bit.
I heard you can export the hair as splines or somthing and render in maya. Haven't gotten far enough to really figure that part out. I figured I would make it look good in zbrush first then worry about that next. What do you think?
But making a full head of hair and importing the entire thing as curves is too much for the system to handle, and also rarely looks good when done in zbrush (I'm sure you've noticed how hard it is to control large amounts of hair).
The best approach (in my opinion) is to create small groups of hair to use as guide curves, then use maya hair to fill things out using multiple hair systems. Will give you much more control over your hair and will make it easier on you .
yea, I was surprised how difficult it is to move fibers in open space, especially difficult if you want to twist them as well. Even if you go ahead and break them into many polygroups/subtools. Was thinking there must be an easier way...
But yeah, having a few different hair systems can make things more manageable.
I also mainly use fiber mesh. I render in Maya with Vray, so the trick really is getting my fibermesh stuff into Maya HairSystem. Here is my workflow:
1 - Create fibermesh in zbrush, getting the style the way I want it.
2 - Once I know what I want to do, I start over with the fibermesh. This time, I use many, many fewer 'strands', or a lower coverage area. This way, you have what are essentially 'guide' hairs in zbrush. For your beard, what I would suggest doing is actually doing it with the same number of hairs, but making it in several separate groups. It needs to be this way because it is hard to import a large number of hairs into maya.
3 - Go to each fibermesh group, and export --> export as curves --> set file type to .ma.
4 - In maya, input each group, then group them all into one group. CTRL+G.
5 - In Maya, create a throwaway polygon cube, put it outside your scene, select it, then create a hair system for it.
6 - Select your imported curves. nHair --> assign hair to curves. This turns each curve into a hair. Now, if you did the beard with sparse hairs, you will have to bump up the number of hairs per curve in the HAIRSYSTEM. If you created a curve for each individual hair, bump that number down to 1. Mess with all the hairsystem settings to get it looking right.
7 - If you're using mental ray, you're good to go. If you're using vray, assign a vrayhairMTL to the HAIRSYSTEM (it's at the bottom), and then you're done.
________
I know the above mentions beards a lot, but the same pipe goes for long hair.
I used it to make this hair. The red lines I drew are the direction of the control guides that I used fibermesh to create.
Each control guide had approx. 10 'hairs'. I would say that there are 15 to 20 control groups. Then using HairSystem, I randomized things a bit (strand length, placement and slight curves) and bumped the number up to 50 or 60 strands of hair for each control curve or 'hair guide'. This filled it out quite well.
It's pretty easy as long as you keep things manageable. For flowing hair like you are going for, I expect that you will need to make A LOT of groups of hairs, particulalrly in the front where the hair is very layered. I would expect close to 20-30 groups in the front, and then since the back will be seen less probably only 5-10 are needed. This should give you all the control you need.
Anyways good luck and like I said feel free to ask. My hair isn't the prettiest or the best, but its a decent workflow.
I think that you're getting pretty close to her likeness. Looking at your paintover it seems like you know parts that need to be tweaked.
The things that stand out to me the most with the last render is the shape or impression of her eyes when I squint. Even though her eyebrows are slanted in a v shape her eyes don't follow the v. This has been fixed somehow in your paintover and I think it's because you painted out the volume above the eyes so it brings her eyes out more. This comes off as more feminine. I like how you shortened the neck in the paintover but it seems like the face is a tad too wide around the jawline and neck.
Anyways it's looking good. I'm excited to see what it will look like with the new fibermesh makeover.
KristaW: Thanks for the kind words, and I’m surprised you caught that I painted some volume out over the top of the eye. Very subtle but it does seem to help.
I agree with you on the jaw line also. It’s a bit tricky to really assess because her face in the image is turned slightly more (if you look at her nose) than in mine. Also, I don’t know what kind of perspective the camera has on her in the reference and I simply don’t know enough to try and match things up to that degree. So I’m really just eye balling everything and going with what I think looks more correct.
But now that I think about it, if her head is turned more in the reference then it should technically appear to have a wider jawline in the ref. then in my image where she isn’t turned so much. I actually did widened her jaw in the paintover very very slightly, but what I should do is round it out more instead.
Hey Brad, this is looking really good but just a few little things to help you push the likeness.
Look at the paint over Ive added and look at the red lines. This is me just nit picking though, so s'all up to you!
1) Jaws a little wide maybe? look at the flows of lines I drew
something like that looks a little more nicer but obviously not jagged
2) I suggest photo sourcing the texture for the eyes, you will get a lot nicer results, and you can get rid of the inperfections with a touch of polypaint...
Also maybe the eyes are too close together.
3) Add more form to the lips, looking a little flat.
4) Nose looks a little short from the angle of your model.
5) Also the bridge the top lip and tip of the nose looks too slim and defined maybe widen it abit and smooth it out.
6) Skin tone should be more yellow.