The BRAWL² Tournament Challenge has been announced!
It starts May 12, and ends Oct 17. Let's see what you got!
https://polycount.com/discussion/237047/the-brawl²-tournament
It starts May 12, and ends Oct 17. Let's see what you got!
https://polycount.com/discussion/237047/the-brawl²-tournament
Render to texture rendering too dark
I know I sound incompetant right off the bat, hear me out 
I'm using render to texture to bake out shadow maps for multiple parts of a vehicle, every part so far has rendered perfectly, but this part for some reason comes out too dark. The render window looks fine, but the file it saves out is much darker, I'd like to use the render window version, but it's missing the padding.
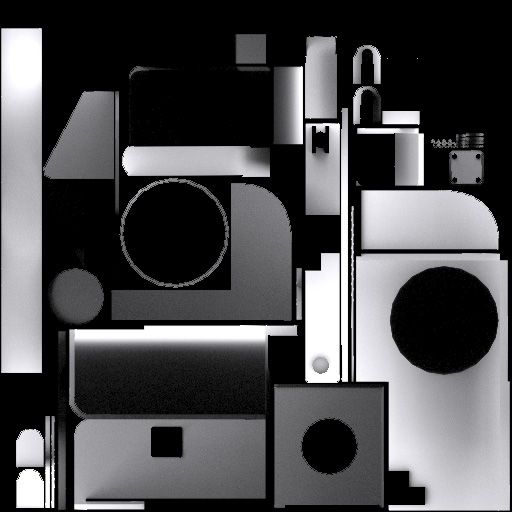
Here's the render viewport (Correct brightness, no padding)

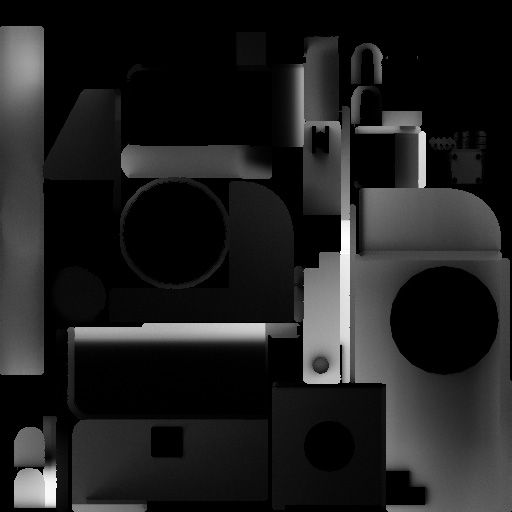
Here's the saved out file (Too dark, has padding)

I'm rendering shadow maps using render to texture with scanline and a skylight in the scene (35 rays per sample, no other lights), I use this method because it's easier than playing with the setting in a mental ray ambient occlusion bake, and I (normally) get consistant results.
Can anyone figure out why this happens, it's killing me!
Thanks in advance.
I'm using render to texture to bake out shadow maps for multiple parts of a vehicle, every part so far has rendered perfectly, but this part for some reason comes out too dark. The render window looks fine, but the file it saves out is much darker, I'd like to use the render window version, but it's missing the padding.
Here's the render viewport (Correct brightness, no padding)

Here's the saved out file (Too dark, has padding)

I'm rendering shadow maps using render to texture with scanline and a skylight in the scene (35 rays per sample, no other lights), I use this method because it's easier than playing with the setting in a mental ray ambient occlusion bake, and I (normally) get consistant results.
Can anyone figure out why this happens, it's killing me!
Thanks in advance.
Replies
But if you don't want the actual shadow map, then you should render a diffuse map with lights and shadows checked on in RTT. Just know that if you don't have any lights in your scene the lighting will be dependant on the default viewport lighting and that will depend on where your viewport camera is in relation to the object you are rendering. You could render it once, rotate or move the viewport and get drastically different results. If you have lights in the scene its not so different.
Another potential source for the discrepancy is the gamma setting in max (Main Menu > Rendering > Gamma and LUT Setup...). In newer versions of max they turned this on to help improve the default rendering of max, its technically more realistic to how actual light behaves but it comes with a bunch of side effects and headaches for people who don't need to worry about gamma. Some image formats don't support the gamma correction and come out darker. It could be as simple as switching to a different output file format. Or if the format support its, the settings might be switched around and not working the right way.
Also some textures like normal maps need to be un-corrected, before they display properly. It's an obscure setting that only shows up when you pick up the file, causing people to repick the file just to get access to its gamma settings, pretty retarded if you ask me but whatever it's their app they can screw with it however they like, I just have to work with it...
It creates a bit of a headache if you don't know about it or how to deal with it. But a lot of ink on the web has been spilled about the new Gamma settings and how to work with and around it.
So start there, those are the most likely culprits.
I know the render window isn't correct, but with the method I'm using, it's exactly what I usually get out of a render (minus the padding), this one damned object excluded.
I technically want an ambient occlusion map, and the skylight is the only light I have in the scene, so it creates the effect I'm looking for, (normally) perfectly.
I'll try the gamma thing, but I'm not sure that's the problem as every object I use this on produces the result I'm used to, in the same scene as the problem object. (Tried disabling\ adjusting the input\output on the gamma, no dice
Or use an external baking program like xNormal.
Or if you have a normal map you can use several photoshop plug-ins (xnormal comes with one) or something like nDo2, dDo or even crazybump to derive AO from the normal map.
Give it a shot, BerserK. It's very similar to what you're talking about and it actually does spit out the correct render from the frame window and from the saved image.
BerserK, one other thing to keep in mind is that in some versions of max RTT will fubar the padding if you have more than one map output in RTT. So bake the maps one at a time if the padding ever goes wonky. Diffuse only, or AO only, but don't add multiple map outputs.
I'll have a go at Mental Ray, thanks again!
Must be a bug... Still going to have a look at Mental Ray though, hopefully it's a little more consistant.