So! here I am taking my first few steps on this side of the pipeline. New world. New tools. New workflow.
I will be posting up some pieces. Please tear them apart! I would appreciate it to receive all sorts of critiques and advice if possible. Out of all the things I have studied so far in school... I think this is calling my name.
Below will be some projects I have done this past month at school. If feedback is given I will try my best to revise and re-post newer versions of the work. If time permits from school and intern schedule! I will do my best!
Thank you for your time, hope all of you are well.
Tica
Week 1 Project - Brick wall and Sidewalk. Learning how to understand and create a texture. Applying them to basically nothing to appear as something more.
[IMG][/img]
Week 2 Project - Sci-fi Health Crate of Awesome. This project was dedicated to learning how to go a bit further in the creation of our textures as well as baking into the model. Creating the emissive map to give the box glow is absolutely fascinating!
[IMG][/img]
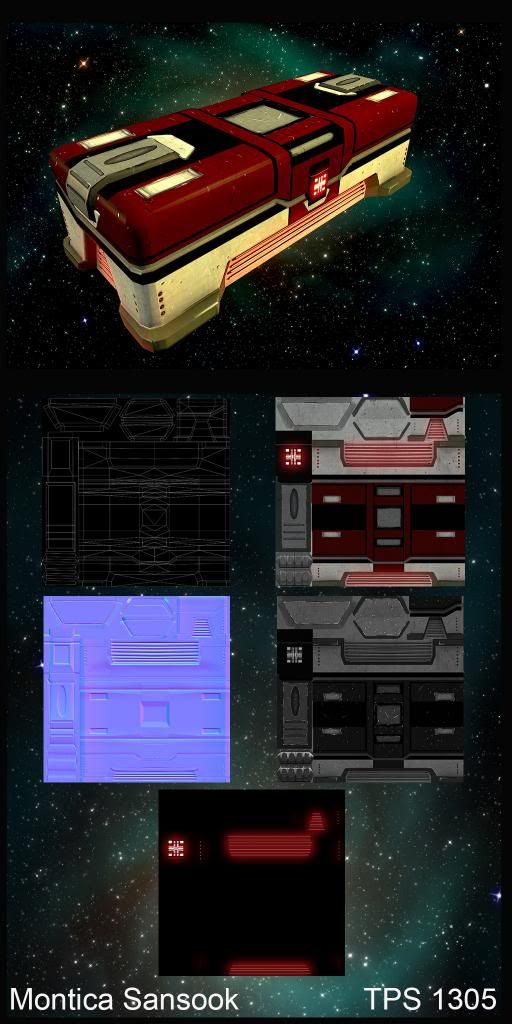
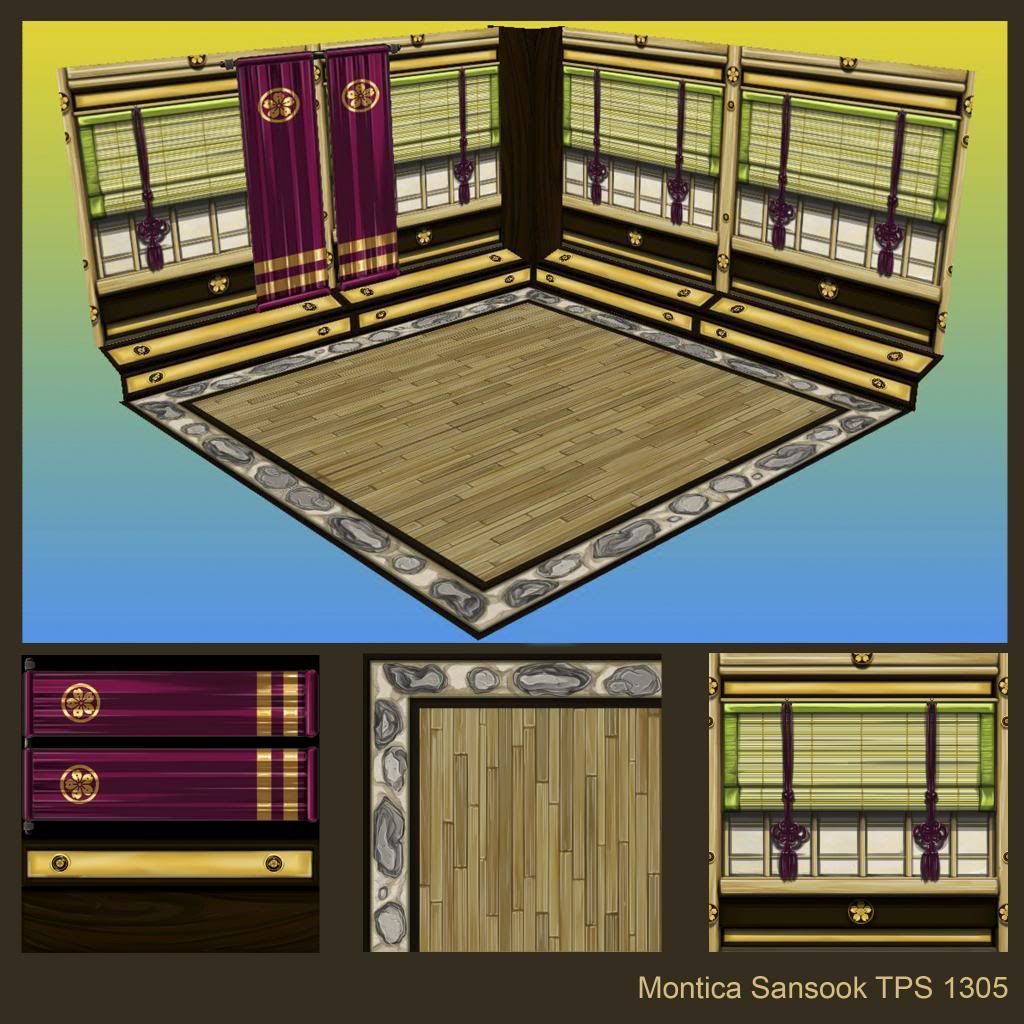
Week 3 Project - Basic Corner Room - We were tasked with the project of creating a corner room that had to have certain materials in it such as, wood, stone, metal and cloth. For this project I went with a traditional Japanese royal room feel.
So, some feedback - Firstly, ditch the color backgrounds on your presentation. They're super distracting and ultimately end up subtracting from your art.
Your textures are a good start! I like the ideas, and I like where you're going. Some things you should keep in mind: Your textures are really dark, especially the dark wood in the Asian room.
I want you to think about context in your next textures, I think these textures are a good start however, they're pretty uninteresting. They don't give tons of context to whatever you're trying to show. They aren't telling any stories. There is sand, but you could possibly have it spilled up, or kicked up onto the wood.
Anyhow, there's tons of things you can do, but these are a good start. Keep practicing, and posting!
I agree with Seaseme. Aside from what he said, I think lighting also plays a big part in making textures look good. Your brick wall has pretty good lighting and that's similar to how it'd be lit in real life or a game, but the other two aren't as strong when it comes to the lighting. I think the crate might be too dark, or maybe it's because of the background. The corner looks really flat. It looks like you painted in the lighting? If you did, then excuse the lighting crit on that one, but the texture looks like it has roughly the same value across the entire wall panel(except the really dark wood), which is what makes it look flat.
This is a good start though. Texturing is probably one of my favorite parts of creating assets. What are you viewing these in, by the way? Marmoset(or an engine)
I thank you for the feedback. The color background came from the backdrop in Maya. Haha I'm trying to figure out how to pull it out.
As far as the set up, it was directed from our professors to be that way. I too thought about the wood, especially the floors being too dark but it was advised to make it so.
Their grading is a bit awkward. They are like go here and make this project! But nope not tooooo much information/direction is given. They asked for very basic nor could we mess with the geo within their given scenes. In short, a little limiting.
Taking this project outside of school and into the personal bits:
Make wood lighter haha ;P
How would you splash sand around the room?
I believe adding another bits of shadow to give it more depth for the sand to be sunk in. The goal was to create those stones as a stepping stone on the same level as the wooden floor.
Thank you once again for your time, comments, and guidance.
I agree with Seaseme. Aside from what he said, I think lighting also plays a big part in making textures look good. Your brick wall has pretty good lighting and that's similar to how it'd be lit in real life or a game, but the other two aren't as strong when it comes to the lighting. I think the crate might be too dark, or maybe it's because of the background. The corner looks really flat. It looks like you painted in the lighting? If you did, then excuse the lighting crit on that one, but the texture looks like it has roughly the same value across the entire wall panel(except the really dark wood), which is what makes it look flat.
This is a good start though. Texturing is probably one of my favorite parts of creating assets. What are you viewing these in, by the way? Marmoset(or an engine)
The firsts two were screenshot in Marmoset. First time opening that program and its ALOT of fun!
The third one is horrid flat. I know... that one is a grab from Maya. WITH NO LIGHTS O___O Our instructors changed it up on us this week and were like, "I know guys we played with marmoset for the first 2wks. With awesome lights. blah blah blah... BUT NO LIGHTs!" So this is the best I could with no lights... sorry for the flatness again. -__-;
I agree with Seaseme. Aside from what he said, I think lighting also plays a big part in making textures look good. Your brick wall has pretty good lighting and that's similar to how it'd be lit in real life or a game, but the other two aren't as strong when it comes to the lighting. I think the crate might be too dark, or maybe it's because of the background. The corner looks really flat. It looks like you painted in the lighting? If you did, then excuse the lighting crit on that one, but the texture looks like it has roughly the same value across the entire wall panel(except the really dark wood), which is what makes it look flat.
This is a good start though. Texturing is probably one of my favorite parts of creating assets. What are you viewing these in, by the way? Marmoset(or an engine)
Ah, I see - so shouldn't the stones be a path to something? Instead of just the border of the room?
I'm not sure why your professors would ask you to make an environment with no lighting, I mean, lighting is a thing that ALL texture artists depend greatly on for tying our textures and scenes together. It's kind of a glue for our art.. So, that's interesting.
I would recommend just a dark grey as your backdrop for your presentations, you want people to look at your art, not the colors distracting our eyes. As for splashing the sand around, just carry that color up onto the wood. Use some sort of stylized brush, and spray it around in spots that make sense. Mostly around the borders of the walk way, and close to the sand pit. Sand has a way of getting everywhere, after all.
"
I'm not sure why your professors would ask you to make an environment with no lighting, I mean, lighting is a thing that ALL texture artists depend greatly on for tying our textures and scenes together. It's kind of a glue for our art.. So, that's interesting."
Generally for handpainted stuff, I find it better to texture without lighting. If a model and texture can hold up on their own without lights, that's a good sign. Often times, the lighting is baked right into the diffuse anyways.
Thanks guys for the tips and banter haha. I'll definitely keep it in mind when I go for revisions after finals of this week.
I also would like to put this out there as well. This is only my 2nd full month getting in depth with Photoshop too! Any direction to possibly favorite brushes or techniques?
So in love with Marmoset Appreciate the simplicity of instant turn over and playing with the lights too.
Ok, here are also some textures examples of a level I created last month learning how to use UDK. We were given a month to learn, create and execute a single level play area project.
All my fellow Polycounters had given you good suggestions and crits....i can see some good works...My only concern or crit would be i find ur normal maps way too smooth The brick wall gives me a bit waxy feel...Since the image is also very small i couldn't read much details..Same with ur scifi crate and ur last udk presentation...just concentrate on normals a bit..coz u know current-gen props depend highly on normal maps..a prop with good diffuse and bad normals will spoil the hard work....just my few cents...keep up the good work...way to go..
Could you possibly point me in the direction of a good maps tutorial? Specifically asking normals and spec? I have a starting idea but haven't been able to place my finger on it exactly. Thank you for your time
Also everyone! I am in the concept phase of our final project for our class. It is... *drumroll* a BARREL! woot! I'm sure you have seen one somewhere or another. I must have this completed by Friday. So, I will be posting up on here frequently. I will be trying to throw together a Mermaid Treasure Barrel! Any love given on how to create more efficient maps or tips on how to pull off old vintage brush metal or crystals would greatly be appreciated. Talk to you guys real soon!
Good job posting Tica! I would second the background comments. They can be slight gradients, or some design. But low contrast and usually darker help. I've commented on the first few projects. So I'll avoid that again till you rework them.
The temple scene the plants read as just being flat green. Use the normal to push more depth and add a specular and spec pow (gloss map) to them. They need to read as wet and having moisture.
Remember to have value separation too. Make sure if you desaturate everything that the walls and ground, etc are all different values of grey. This helps the viewers eye tell what is what.
While he is right that your backgrounds are not very well chosen, it is outright false that colored backgrounds are bad.
This is a statement, it is not specified and I dont know the thoughts behind, but as it stands, it sure is false.
There tons of ways you can make colored backgrounds work very nicely. This is artwork here, not machines putting out a product on some kind of output place.
Most people do not emphatize enough on their presentation and it is the only way to stand out aside from really fantastic work. People experiment way too few and stating something like that is the wrong way to teach.
Do not stop experimenting with backgrounds and presentation. As a note, you should really try learning about color theory, it is really important for any kind of artwork. (Your japanese texture uses warm and cold yellow which is a common mistake and shows that youre not into it, also you can conclude logically which background color would work. Also subtle gradients always work. (I go as far to say that subtle gradients are better than flat color in 99% of any art related work, it just depends how subtle it is...drifting off)
You look like you did a good start so far.
Keep it up. >> Color theory!
Thanks for commenting in. So with the presentation backgrounds its more of finding a balance with color and a stock grey. I very much know the current background colors are a bit over the top and some are extreme. If these were given as an actual portfolio piece, they would very much be cleaned up. Professionally appealing to sell the artwork. Not the flamboyant background. ^_^
So I will do my best in presenting for my final project with everyone's guidance!
I have to disagree with Seaseme. Flat grey backgrounds are boring and uninspired.
While the color background you have choosen is a bad example and in this case it is right that it is too distracting , and the space-one is a little over the top aswell.
This is art work we are doing here, and you present yourself as an artist, not as a
machine doing some kind of product. Subtle gradients always work if you are not sure, but gradients covering a large color range should only be used if you really know what youre doing, and mainly in graphic design.
There is a huge range of things you can do with your background, but this needs
experimentation and artistic vision. I cannot let "colored backgrounds are bad" just stand here like that. People are way to uninspired with their presentation, and this is exactly the wrong direction to teach.
There's nothing wrong with grey backgrounds. Personally I hate gradients but that's just me. The only important things are that your background isn't distracting and you can separate your object from it.
For showing texture flats I wouldn't even put them on a background I would just put them side by side with no space between or padding on the sides.
It looks cool. But its rather dark so you're loosing a lot of detail. Specifically the barnacles and octopus are being lost in the dark wood. I would lighten that up a bit
Hey its looking good not sure who the online teacher is but you should do fine. the barrel is a little dark but i do like the overall design. i wish i would of had the room project when i had TPS
Hey!
Yeah, I took it on campus. Jeff Parrot was my professor. The corner room was introduced within a day! Haha complete last second trial run that stuck. How was your experience?
It looks cool. But its rather dark so you're loosing a lot of detail. Specifically the barnacles and octopus are being lost in the dark wood. I would lighten that up a bit
I'll reopen the project again in a few hours and make those changes and see how it comes out. So everyone agrees to brighten the wood up some more?
Here are some quick updates. The final barrel that was created up above gained a 96 as its final grade! Thank you to everyone who has advised and helped me thus far. Really appreciated.
Also, I have a sort of odd request.
How would one create a normal map for Velvet?
I am trying to create old western theater velvet curtains. I used nCloth however, I need to put the correct maps together so that it'll read well in UDK. Any help will once again Highly be appreciated.
Thank you guys and hope everyone is having a wonderful Saturday night!
I think it depends on what your going for really. But since velvet has a pretty strong fresnel effect, you may want to have something in the normal map just for the fresnel to pick up on.that is,of course,if you using a fresnel shader.
Some noise you might inlude is the verticle lines and some small bumps here and there.
THIS!
This lol is what I'm shooting for as far as a texture. [IMG][/img]
As of the moment right now I just have this as a model.
I'm a bit lost on how to move forward.
Well velvet curtains don't really have much of a diffuse, except for the little pieces of fuzz that are attached to the fabric.All you should need is a simple red texture,some fresnel,soft gloss,and a sparkly-ish specular map.For a normal map,you could use something just for micro details and bumps.
heres a quick example of what i was talking about,hope it helps!
Thanks a ton!
However, I am going to have to figure out how to run it in UDK. I stayed after lecture some to try and figure out how to get a decent Velvet. Gonna run through them. When I get something solid... I will post it up here. Hope everyone has a great day!
Hey Everyone!
We are once again at the end of another month so guess what? Another final of another massive project. This go around as I type, we are completing a fully playable game level in UDK. For those of you whom have helped me immensely with the velvet texture I will provide screen shots after the production lighting were done.
Thank you beautiful people for being a caring and helpful community.
Good luck with your LVL project. Judging by your TPS and ACG stuff you should do great assuming your group mates can keep up.
Hey Iyosin!
Thank you for the vote of confidence you gave. My group mates and I were a great team and we were able to work together in a way to accomplish great goals we had for the month. There were three of us and we pushed our limits all month long to grow. We made an exceptionally huge level haha.
Replies
So, some feedback - Firstly, ditch the color backgrounds on your presentation. They're super distracting and ultimately end up subtracting from your art.
Your textures are a good start! I like the ideas, and I like where you're going. Some things you should keep in mind: Your textures are really dark, especially the dark wood in the Asian room.
I want you to think about context in your next textures, I think these textures are a good start however, they're pretty uninteresting. They don't give tons of context to whatever you're trying to show. They aren't telling any stories. There is sand, but you could possibly have it spilled up, or kicked up onto the wood.
Anyhow, there's tons of things you can do, but these are a good start. Keep practicing, and posting!
Tanner
This is a good start though. Texturing is probably one of my favorite parts of creating assets. What are you viewing these in, by the way? Marmoset(or an engine)
I thank you for the feedback. The color background came from the backdrop in Maya. Haha I'm trying to figure out how to pull it out.
As far as the set up, it was directed from our professors to be that way. I too thought about the wood, especially the floors being too dark but it was advised to make it so.
Their grading is a bit awkward. They are like go here and make this project! But nope not tooooo much information/direction is given. They asked for very basic nor could we mess with the geo within their given scenes. In short, a little limiting.
Taking this project outside of school and into the personal bits:
Make wood lighter haha ;P
How would you splash sand around the room?
I believe adding another bits of shadow to give it more depth for the sand to be sunk in. The goal was to create those stones as a stepping stone on the same level as the wooden floor.
Thank you once again for your time, comments, and guidance.
Tica
The firsts two were screenshot in Marmoset. First time opening that program and its ALOT of fun!
The third one is horrid flat. I know... that one is a grab from Maya. WITH NO LIGHTS O___O Our instructors changed it up on us this week and were like, "I know guys we played with marmoset for the first 2wks. With awesome lights. blah blah blah... BUT NO LIGHTs!" So this is the best I could with no lights... sorry for the flatness again. -__-;
Ah, I see - so shouldn't the stones be a path to something? Instead of just the border of the room?
I'm not sure why your professors would ask you to make an environment with no lighting, I mean, lighting is a thing that ALL texture artists depend greatly on for tying our textures and scenes together. It's kind of a glue for our art.. So, that's interesting.
I would recommend just a dark grey as your backdrop for your presentations, you want people to look at your art, not the colors distracting our eyes. As for splashing the sand around, just carry that color up onto the wood. Use some sort of stylized brush, and spray it around in spots that make sense. Mostly around the borders of the walk way, and close to the sand pit. Sand has a way of getting everywhere, after all.
And any time, always happy to hop on PC and help!
Tanner
I'm not sure why your professors would ask you to make an environment with no lighting, I mean, lighting is a thing that ALL texture artists depend greatly on for tying our textures and scenes together. It's kind of a glue for our art.. So, that's interesting."
Generally for handpainted stuff, I find it better to texture without lighting. If a model and texture can hold up on their own without lights, that's a good sign. Often times, the lighting is baked right into the diffuse anyways.
You're stuff is looking pretty good, keep it up!
I also would like to put this out there as well. This is only my 2nd full month getting in depth with Photoshop too! Any direction to possibly favorite brushes or techniques?
So in love with Marmoset Appreciate the simplicity of instant turn over and playing with the lights too.
Holy crap at the power of this development kit.
[IMG][/img]
[IMG][/img]
[IMG][/img]
[IMG][/img]
[IMG][/img]
[IMG][/img]
Could you possibly point me in the direction of a good maps tutorial? Specifically asking normals and spec? I have a starting idea but haven't been able to place my finger on it exactly. Thank you for your time
pressed a key, thought it all was lost, and wrote it again >.>
The temple scene the plants read as just being flat green. Use the normal to push more depth and add a specular and spec pow (gloss map) to them. They need to read as wet and having moisture.
Remember to have value separation too. Make sure if you desaturate everything that the walls and ground, etc are all different values of grey. This helps the viewers eye tell what is what.
Good job on posting though! Keep going!
While he is right that your backgrounds are not very well chosen, it is outright false that colored backgrounds are bad.
This is a statement, it is not specified and I dont know the thoughts behind, but as it stands, it sure is false.
There tons of ways you can make colored backgrounds work very nicely. This is artwork here, not machines putting out a product on some kind of output place.
Most people do not emphatize enough on their presentation and it is the only way to stand out aside from really fantastic work. People experiment way too few and stating something like that is the wrong way to teach.
Do not stop experimenting with backgrounds and presentation. As a note, you should really try learning about color theory, it is really important for any kind of artwork. (Your japanese texture uses warm and cold yellow which is a common mistake and shows that youre not into it, also you can conclude logically which background color would work. Also subtle gradients always work. (I go as far to say that subtle gradients are better than flat color in 99% of any art related work, it just depends how subtle it is...drifting off)
You look like you did a good start so far.
Keep it up. >> Color theory!
Thanks for commenting in. So with the presentation backgrounds its more of finding a balance with color and a stock grey. I very much know the current background colors are a bit over the top and some are extreme. If these were given as an actual portfolio piece, they would very much be cleaned up. Professionally appealing to sell the artwork. Not the flamboyant background. ^_^
So I will do my best in presenting for my final project with everyone's guidance!
For showing texture flats I wouldn't even put them on a background I would just put them side by side with no space between or padding on the sides.
Real quick rough thumbnail of Wk 4 Project.
[IMG][/img]
Where are you taking these courses? Definitely keep us updated.
Thank you for your compliment about the thread. Please feel free to commentate!
I am really grateful with everyone's participation!
[IMG][/img]
Hey!
Yeah, I took it on campus. Jeff Parrot was my professor. The corner room was introduced within a day! Haha complete last second trial run that stuck. How was your experience?
I'll reopen the project again in a few hours and make those changes and see how it comes out. So everyone agrees to brighten the wood up some more?
Here are some quick updates. The final barrel that was created up above gained a 96 as its final grade! Thank you to everyone who has advised and helped me thus far. Really appreciated.
Also, I have a sort of odd request.
How would one create a normal map for Velvet?
I am trying to create old western theater velvet curtains. I used nCloth however, I need to put the correct maps together so that it'll read well in UDK. Any help will once again Highly be appreciated.
Thank you guys and hope everyone is having a wonderful Saturday night!
-Tica
Some noise you might inlude is the verticle lines and some small bumps here and there.
THIS!
This lol is what I'm shooting for as far as a texture. [IMG][/img]
As of the moment right now I just have this as a model.
I'm a bit lost on how to move forward.
We are once again at the end of another month so guess what? Another final of another massive project. This go around as I type, we are completing a fully playable game level in UDK. For those of you whom have helped me immensely with the velvet texture I will provide screen shots after the production lighting were done.
Thank you beautiful people for being a caring and helpful community.
Thank you for the vote of confidence you gave. My group mates and I were a great team and we were able to work together in a way to accomplish great goals we had for the month. There were three of us and we pushed our limits all month long to grow. We made an exceptionally huge level haha.