Could use some crutiques on my forest WIP...
triangle
Firstly thanks for taking the time to view this thread! :poly136:
Everything in the scene minus the rocks and the leaning tree in the middle (yet to replace those) is mine. Currently in school training to become an environment artist for games...
Would like some critiques on the vegetation and the lighting, as well as the overall quality. Thanks!")
Edit: Wow I spelled critiques wrong... too early in the morning.
Link to scene:
[ame=" https://www.youtube.com/watch?v=25CfsPo0joU&feature=player_detailpage"]Fairy Forest WIP in CryEngine - YouTube[/ame]
Some other work to critique if you feel the need:
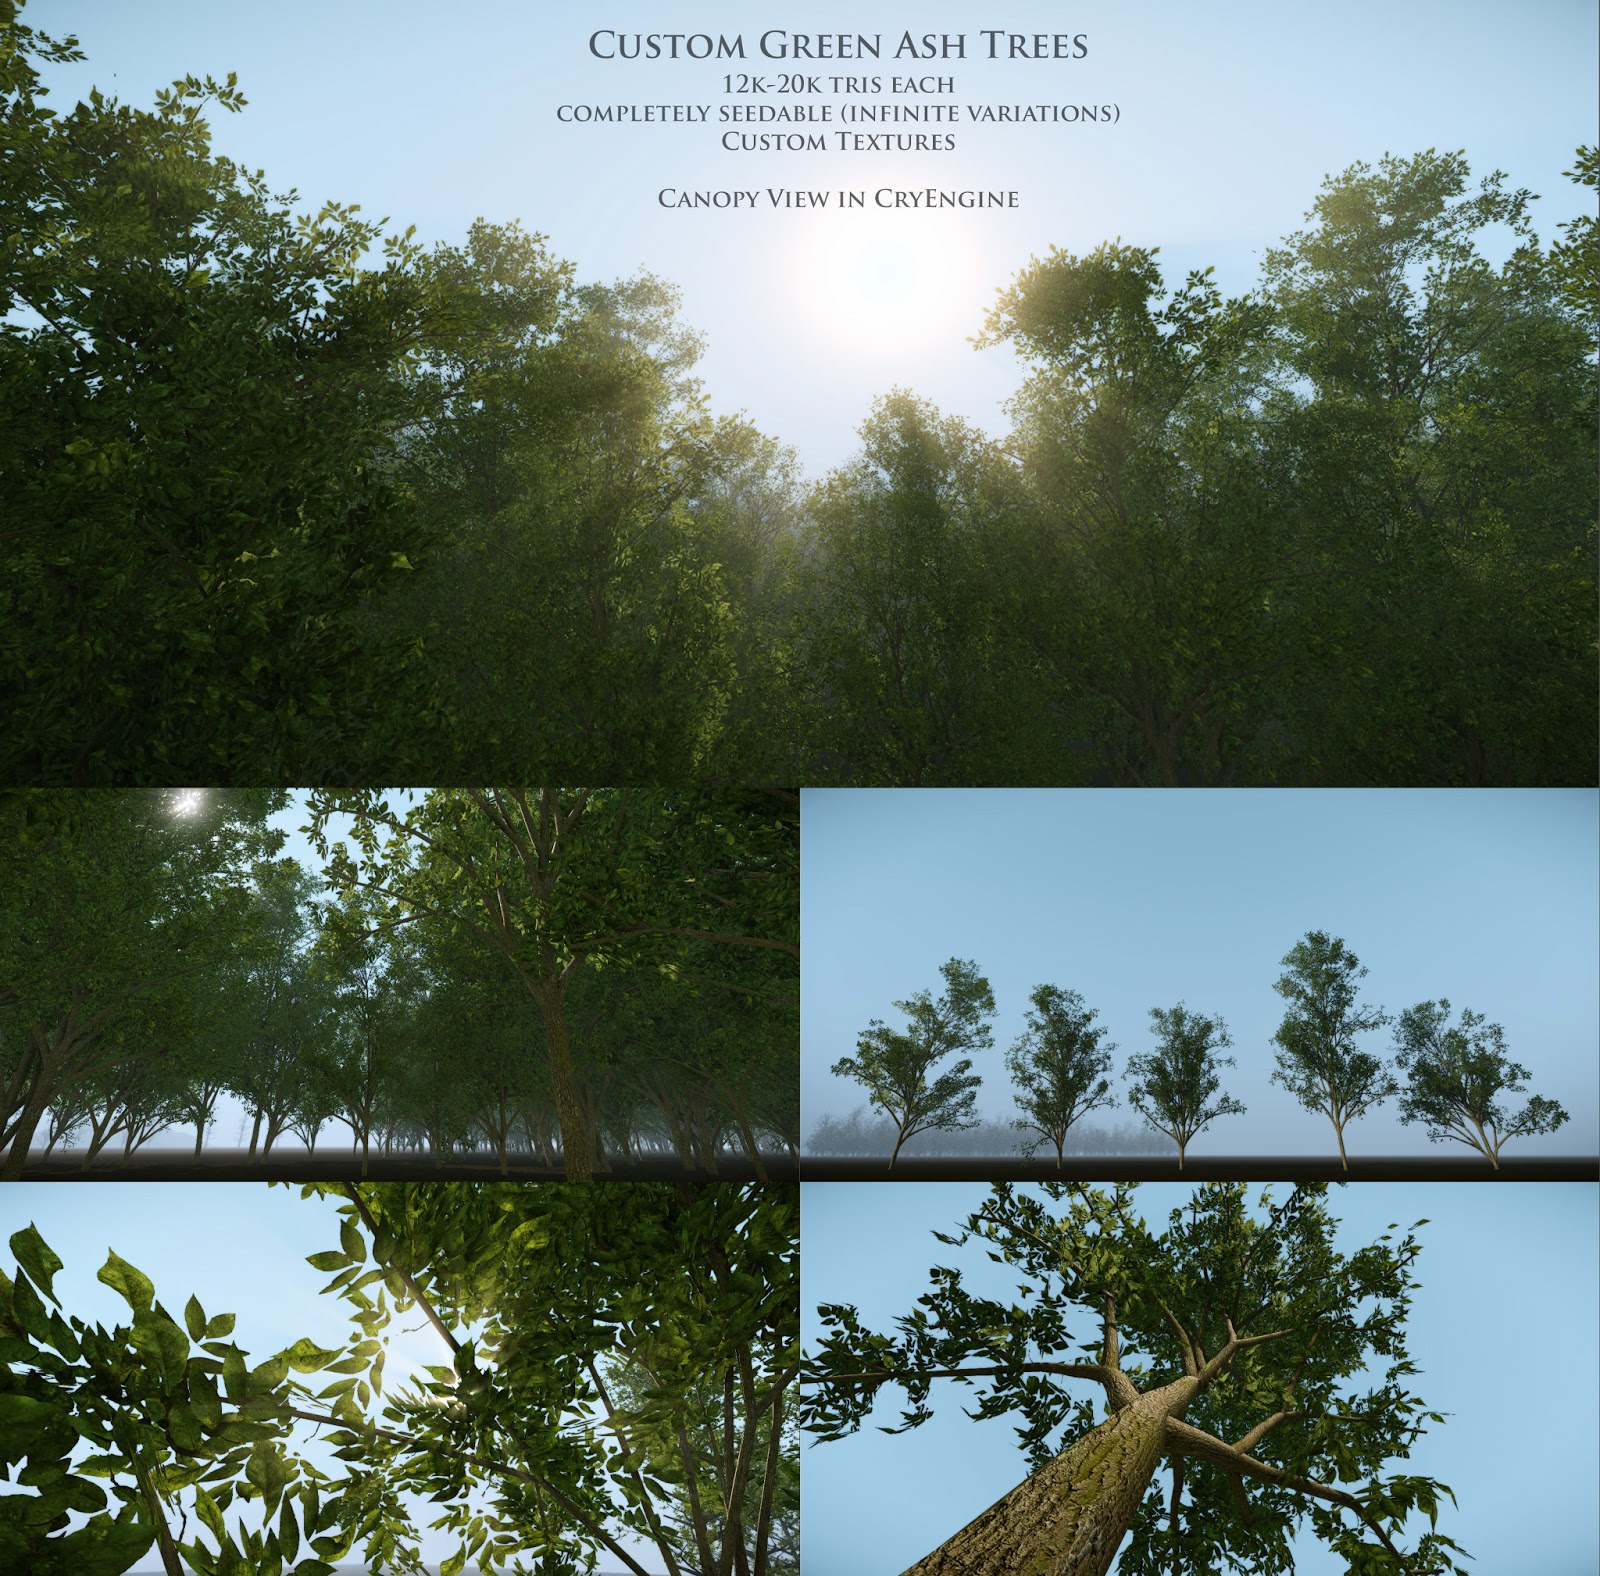
Green Ash Trees
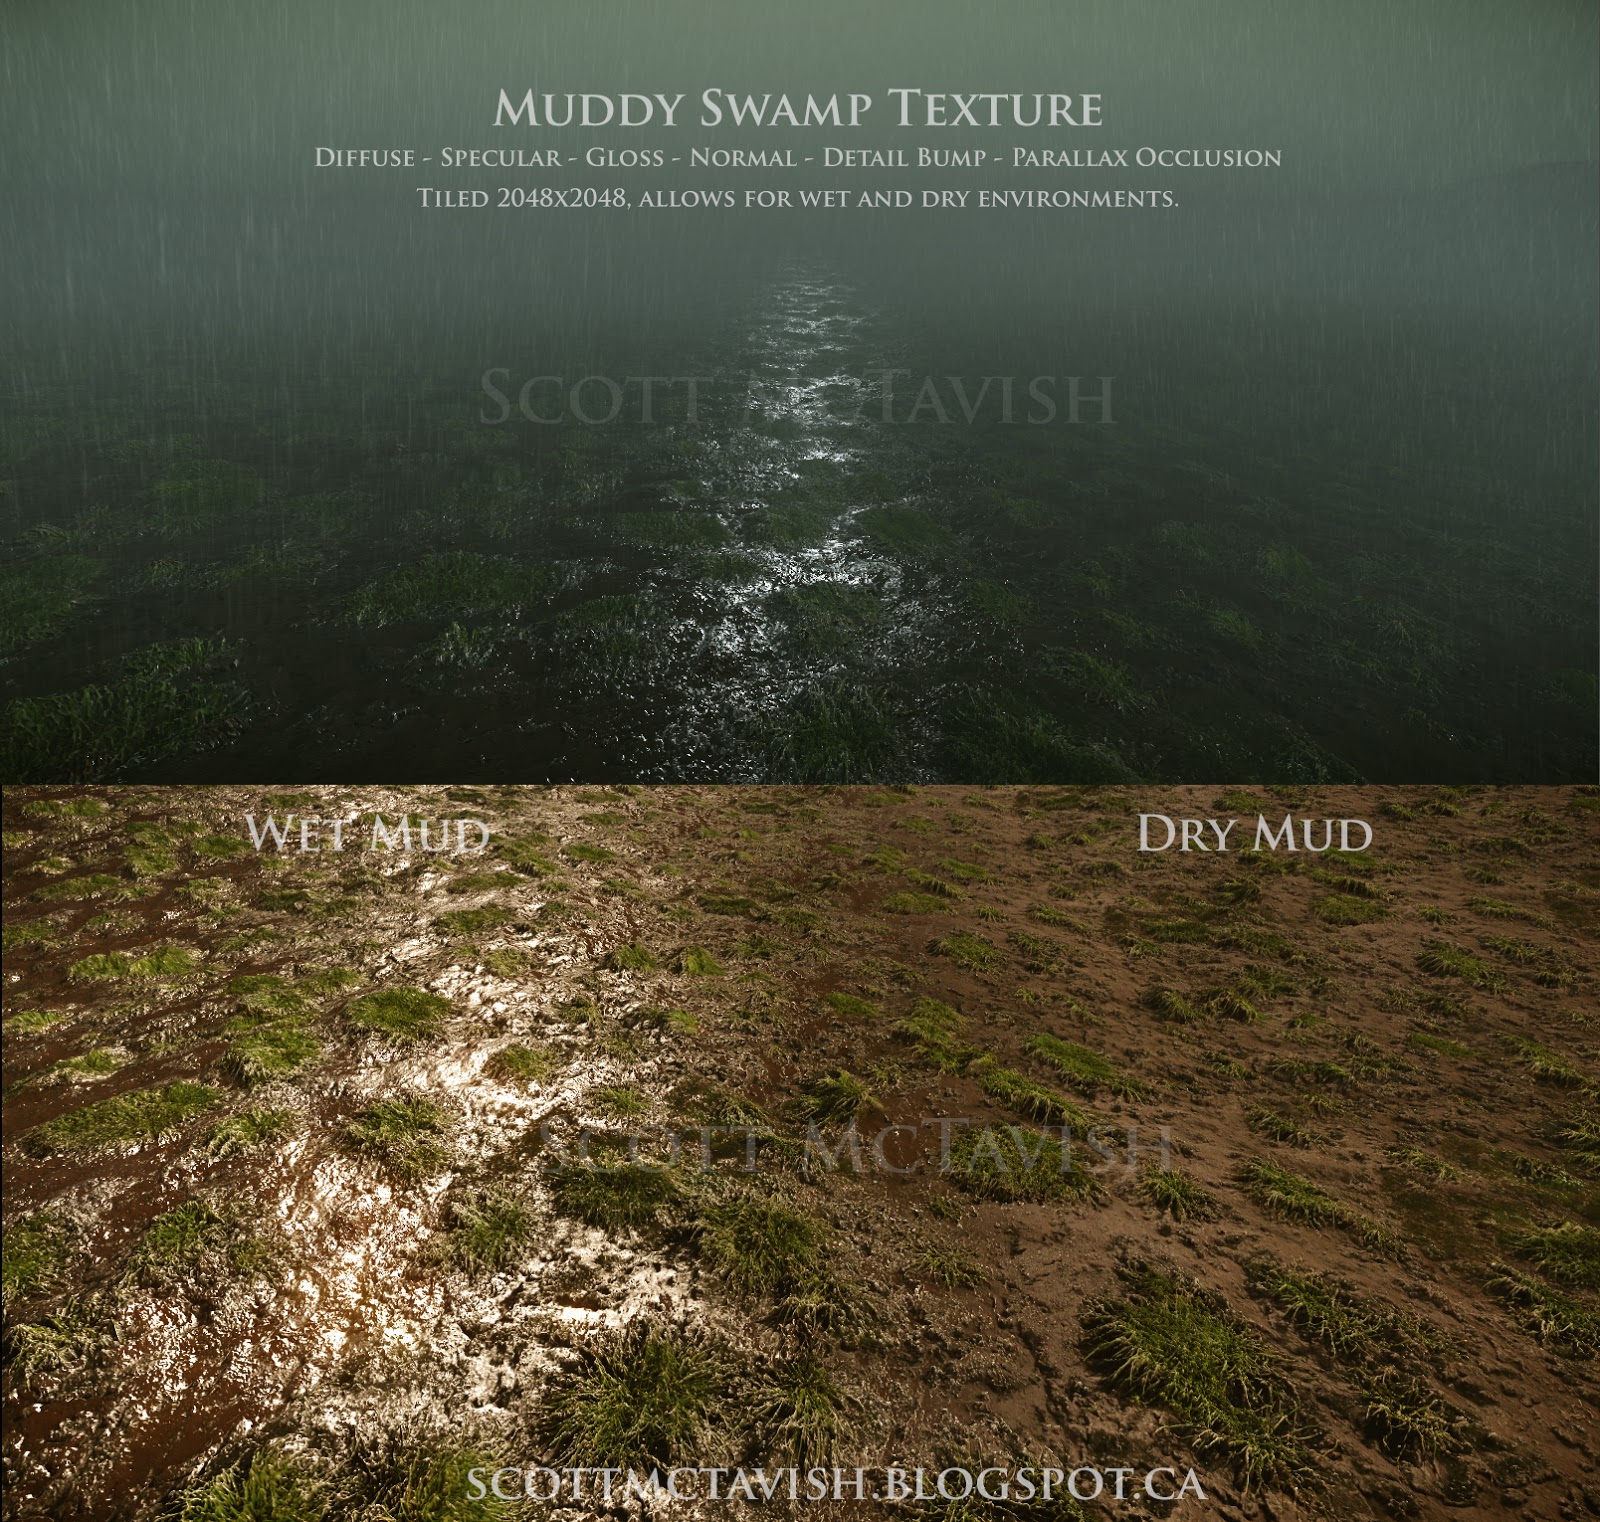
Muddy Swamp Ground Texture
Everything in the scene minus the rocks and the leaning tree in the middle (yet to replace those) is mine. Currently in school training to become an environment artist for games...
Would like some critiques on the vegetation and the lighting, as well as the overall quality. Thanks!
Edit: Wow I spelled critiques wrong... too early in the morning.
Link to scene:
[ame="
https://www.youtube.com/watch?v=25CfsPo0joU&feature=player_detailpage"]Fairy Forest WIP in CryEngine - YouTube[/ame]Some other work to critique if you feel the need:
Green Ash Trees
Muddy Swamp Ground Texture
Replies
If you get time would like to know your work flow.
Chillydog: Yep, I'm currently sculpting some mossy rocks for the scene.
Plumbjet: My workflow probably isn't all that special, but the mud texture took me about 4 hours to wrap up. Not sure if that's good or bad?
Would love to have a look at those texture flats ^^
Since everyone is asking maybe if I have a few minutes to spare I can break down how I made the texture... I'll post my workflow and the texture flats when I head into school tomorrow. (hopefully I remember).
Any critiques on the trees/scene?
For the forest, since you're calling it a "fairy forest", I'd include more of the foreground plant(and maybe more variations) and more of the butterflies. I'd also try to get some more variation in the hues and saturation. When I think of fantasy forests, dramatic lighting comes to mind, with strong light shafts and lots of dynamic shadows from the trees moving. Right now, it feels like a realistic forest with 1 crazy butterfly and an alien plant.
As far as the trees, I suppose it depends on their intended use and viewing distance/angle. From a medium distance in a dense group, they look fine; reasonable trunk & branch layout, believable tree & leaf density. In the distant view (such as the 3rd image) they seem too delicate with too many branches widely separated from the main clump. Of course, this might be the look you want for a fairy forest, but I assume from the description you're going for something like this:
Close-ups of an individual tree, along with an accompanying wireframe & texture sheet will help us respond more intelligently.
12-20k per tree seems a bit high, again depending on the intended use. Forest scenes in general cry out for LOD models, ultimately becoming mere billboards in the distance.
DWalker: Again, awesome input, I appreciate it. I wanted to add the video to showcase the fairy particle effects as well as some of the shadowing from the moving trees. As for the trees, I started working on some LOD models and sprites but was told it's a waste of time for a demo reel, as they'll never be used. I'll attach some wires and individual texture flats of the trees to help with the input. Thanks!
Workflow for creation (approx. 4 hrs):
1. Start with basic diffuse, something with enough detail in colours to bring out the normals/specular nicely. Make sure the map is at least 2k, you can always downres it...
2. Adjust diffuse colour accordingly (if needed), and ensure tileable (use the offset filter under other in PS.)
3. When diffuse tweaking is finished, save it off, start on the spec and gloss. Use your current diffuse map as a base.
4. I find a great way to get the most detail is to use the hue/saturation adjustment; crank it way up, and play with the hues so that the shapes you want come out with a strong value in each colour. This will give you the most detail when running a black/white pass on the image.
5. Now, run a black and white adjustment on the image. Because of the hue/saturation crank you did on the image, adjustimg the black/white values for each colour will be much easier and will give you much more detail in the shapes you want to showcase in your spec/gloss.
6. Considering this is your spec map, adjust the specular accordingly, same with every other map.
7. *optional* I suggest previewing this in Cryengine/Marmoset/UDK/Mudbox, wherever you plan on using it, to ensure best results and minimum wasted time.
8. Once the spec map is done, save it off. Open your saved diffuse, repeat process for the gloss map. It is HIGHLY recommended that you preview this map as you go, as gloss works differently in almost everything... what looks good in maya or mudbox may look entirely different in a game engine.
9. After repeating the same procedures for your gloss, save it off, and again open another diffuse.
10. Use the same process for the parallax occlusion displacement. Ensure most of all that almost nothing is pure white, only close to it at the very highest, and only close to black at the very lowest - no 0's or 255's. Once you get the displacement looking the way you want, save it off.
11. Open displacement in CrazyBump. Adjust both normal map and displacement map to get it looking decent enough, constantly export the maps to your chosen rendering program/game engine to check them - crazybump results are not accurate in its viewer.
12. Last step, add a detail bump map, anything you want. I used the standard "mud" detail bump that cryengine provides, tiled relatively high to get high-frequency detail on the specular hits in the mud. Adjust fresnel accordingly to the lighting to get more accurate results with light reflection.
13. Viola!
Below are the finished texture tiles. Any more questions I'll be happy to answer if I can... still in school so I'll try to check it inbetween working on my reel if I remember!