I really need some tips (Max and Zbrush) asap
I've created a character in 3DS Max, with a decent polycount. I then brought the model with its accessories in to zbrush to do some detailing, to create normal map, diffuse, and displacement. However this is my first time working with character props as well, so I merged it all in Max to the character, brought it into zbrush, then autogrouped it, and split it to parts, as I felt it would be easier to work with it in parts as subtools. Now the detailing is done and I thought I'd make it one object again. When I used merge, I saw that it deleted the lower subdivisions, wich made me sit with an extremely high poly character. And I got a limit with 30 000 polys. Any tips to what I can do? Is it because the different parts has different levels of subdividing?
I have to be finished by sunday.
I could post some images if it would help.
Thanks.
Should I invest in Topogun or 3DCoat to make a new lowpoly out of the character with its accessories or is there a better way?
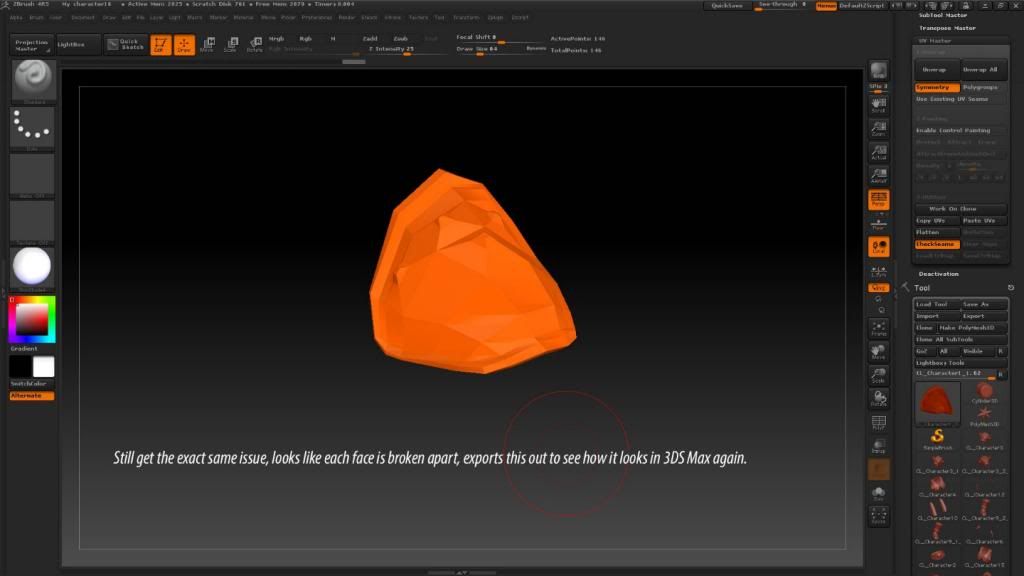
Edit: I have now, tried to export it out of zbrush, in to max, and the seams seems kindof alright, but not the same as zbrush, when I rearrange the UV Island, and import it back to Zbrush, it seems like all the faces are broken. Tried to reweld and back again, same issue.

I have to be finished by sunday.
I could post some images if it would help.
Thanks.
Should I invest in Topogun or 3DCoat to make a new lowpoly out of the character with its accessories or is there a better way?
Edit: I have now, tried to export it out of zbrush, in to max, and the seams seems kindof alright, but not the same as zbrush, when I rearrange the UV Island, and import it back to Zbrush, it seems like all the faces are broken. Tried to reweld and back again, same issue.
Replies
Thanks a lot for such fast response, main reason I wanted to do this is because it has to be one model, with only one UV map texturing all the parts.
Can seem like subdividing all the parts to 8 makes my computer struggle. I'm feeling a bit stressed right now :P I really feel that I regret splitting the model in the beginning now. Really feels like a waste to retopo it aswell, because I did a very basic lowpoly version in the first place with somewhat good poly distribution.
Can X normals be my saviour if I export the tool in OBJ at current quality state, then export it with subdivisions lowered? Is there a way to export the whole model including its subtools so xnormal can read it as one whole object and project its details in displacement and normals?
Do you notice any seams on the decimated version? If not, export it, and export your lowest subdivision levels too. You can merge those back together in Max, and bake your normal map there or in xnormal. It doesn't have to be a single object in xnormal, you can load in as many models as you would like
And when I texture it, it all has to be in one 2048x2048 unwrap
My thought was to make normal maps and displacement to make a full quality render of a decent polycount model. Hence the limit 30 000 polys
It helps to think of the zbrush sculpt as being a different entity than your game mesh, even if you plan on using the lowest subdivision levels. If you have your sculpt looking the way you want, that's what matters at this stage. No need to worry about UVs or having things grouped. Just create a folder somewhere, and start exporting your sculpt (as many subtools as it takes, decimation is optional depending on the file size you're dealing with; if you do use it then you might want to decimate on a cloned file so that you still have the original topology for later).
Once you have the sculpt exported, its time to focus on your game mesh. Often this means retopology, but if you already have topology in the lowest subdivision levels that you're happy with then those will work too. Click the Tool: Subtool: All Low button to drop every subtool to the lowest subdivision level, then start exporting those out somewhere as well (if you're set up to use GoZ, I believe there is a button that exports every visible subtool). Load them up in Max and do a simple merge for any pieces you want to be merged. You now have your lowpoly mesh, export that as an obj or fbx.
*If you don't have UVs on the lowpoly mesh at this stage, now is the time to create them. You can pop this low, merged mesh back into zbrush and let UV Master take care of some of the work, or unwrap it however you want).
Finally you can use Max or Xnormal to bake the detail from the sculpted meshes over to the lowpoly mesh.
Btw, my GoZ doesnt include displacements any longer when I export the model that I have baked with. Used to do that and have it automaticly in Max. That doesnt happen anymore after upgrading to 4r5
Although I seem to have gotn one error, making texture from polypaint I get some "bleeding"
As you can see there, maybe it won't happen if I do the highres in xnormals instead.
Tried enabling antialiasing, and that's what you see here. It's even worse without. Still it's better than no texture at all and no normals at all, but it still kindof bugs me :P
It didnt do any difference
Seems like for diffuse atleast it's something I can easely fix in photoshop
Just as I feared.. The normal map turned out hideous. This one is baked in Zbrush tho. Downloading Xnormal to do a test there now.
Testrender in 3DS max, I know there's that Gamma bug there aswell, but it does not compensate for the each poly bug there.
yeah, that's exactly what it is... Is there an easy way to fix this?
I reimported it and checked it to see it was alright, I then created a new normal map to just do a quick test, can still see some weird seems thats not there. Smooth uv was on
Even tried to delete the lowest subdivision and export it out on level 2, and see the unwrap, the same edge artifacts in diffuse and normals are still there.
oh yeah lol, found it, yeah mrg is on, qud, mrg, grp and txr is on
The seams are ok in zbrush now, I've doublechecked, but the normals still act a bit weird, not as bad as earlier, but still a tiny edge between the faces.
Diffuse still gets the red edges between faces too
However, merge is not on in the import tool... hmm
I tried reimporting it again after what you said, make it mesh and back to poly. And I noticed it said that it found mismatching vertecis that it corrected, is that the reason for this error? However, I also noticed that the bleeding on the texture got slightly better this time.
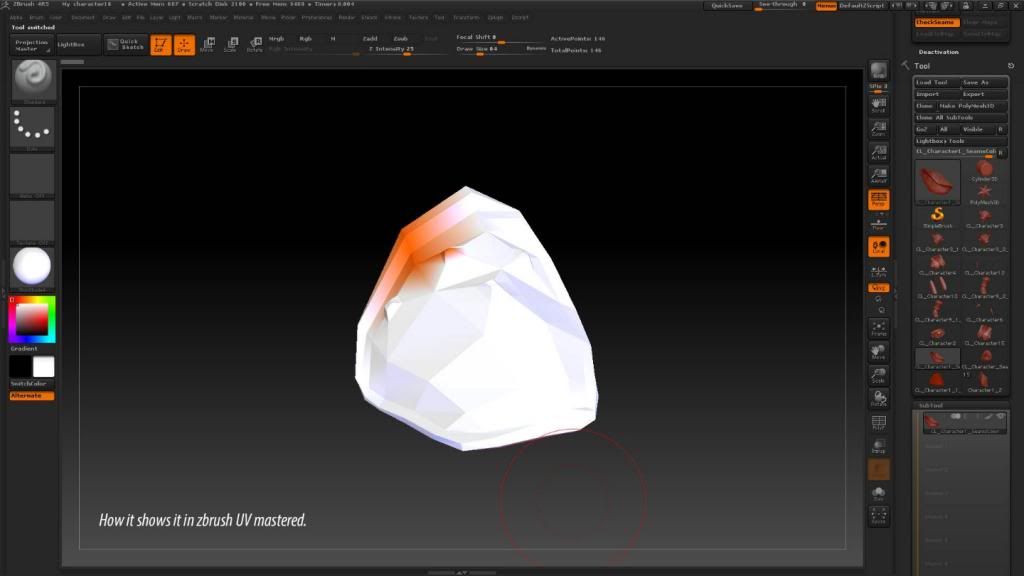
And I just found out that even tho my seams look right in Max, however when I say work on clone in zbrush, and do checkseams, it looks like all the faces are broken apart...
I've tried this with both max 2013, and 2014 now, and the same thing happens.
Doesnt look like I can change the name of the thread.
Seams clear to me that it's zbrush that breaks the faces, as I tested normal baking with the Obj I import to zbrush, it works for normal baking, so now the issue only applies to Zbrush, as it messes up my polypainting.