First Female character WIP
Hey Polycount users,
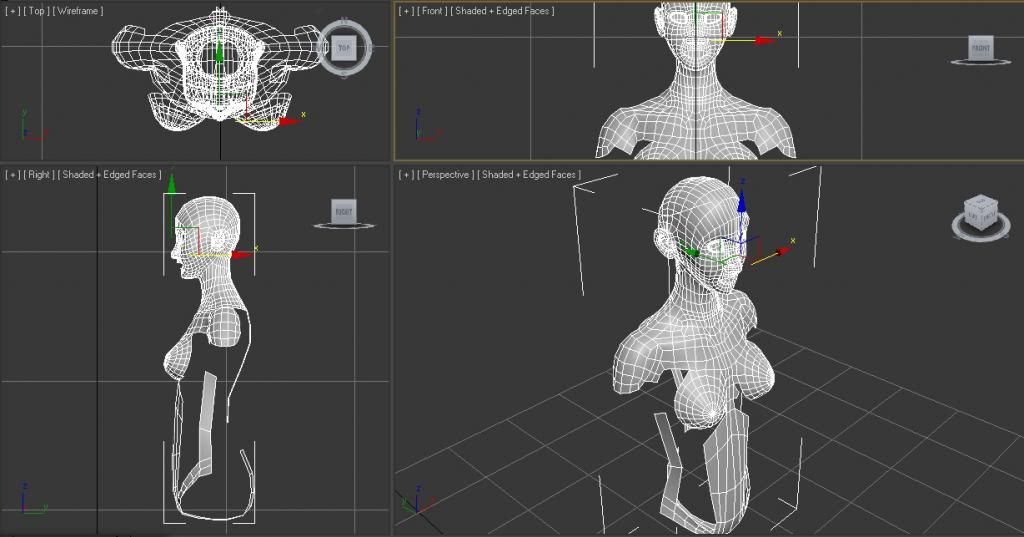
At the beginning of 2013 I posted a general topic asking for advice on character modeling processes as I wanted this year to make a big push with progress. The feedback was more then I ever could ask for and I am grateful for the knowledge that was given. I come now posting this topic in more advice I what I've been attempting and working on. The last month or so has been hectic, but I've finally got away and now have more open time to practice. This is the current torso + head of my WIP. Any advice or critiques you have so that I may correct what is wrong currently with the mesh, and avoid troubles going forward would be amazing, and you would have my eternal gratitude.
At the beginning of 2013 I posted a general topic asking for advice on character modeling processes as I wanted this year to make a big push with progress. The feedback was more then I ever could ask for and I am grateful for the knowledge that was given. I come now posting this topic in more advice I what I've been attempting and working on. The last month or so has been hectic, but I've finally got away and now have more open time to practice. This is the current torso + head of my WIP. Any advice or critiques you have so that I may correct what is wrong currently with the mesh, and avoid troubles going forward would be amazing, and you would have my eternal gratitude.
Replies
I usually do box-modeling xD
@Pyrzern: Yea I use to do everything with the box modeling approach, but over time I've grown attached to edging out forms then filling the empty space in. I really like your characters you have on you DA page.
This is pretty much the same workflow I use with edge extrusion, essentially marking the more extreme points and filling in the blanks. The one area that stands out to me as "odd" at least from what we can see here is the loop on this character's traps. I'm not sure that this will have the result when smoothing and deforming that you would expect - you may be better off just letting those edges flow around the neck and down the the arm (rathe rthan making them a sectioned off group - just continuing the edges around the neck and then crossed with an edge loop going from the neck down the arm, basically outlining how the traps would flow.) Another point that may cause you some issues is how you are terminating the clavicles - having a pole there may cause some weird pinching
Proportions are mostly good except maybe:
1)the length of the ear is ~the length from the bottom of the brow to the bottom of the nose in most humans.
2)I'm not sure on where you are going with this but breasts sit differently if held by a bra or not so more reference and understanding of the shape as squishy instead of suspended solid might benefit you. :P
In the end it depends on what details you are going to show, no point in doing back study if you are going to cover it in fur etc. (because I can't see what the character's back looks like)
@The_Blenderer - Thanks man. I didn't even notice the ear problem till you mentioned it and I looked at it, but it's definitely a needed fix. The breast i'm doing suspended, as this being a first character model I'm not doing any clothes. As for the back, you can't see it cause I didn't make it till today.
Most recent version (I did originally have the ribcage in, but it looked terrible, so only it's outline is shown.)
In this shot, I'm sure you're going to fix it up but the topology on the back is a little messy - I I'd try to have clean edges running around the torso for better deformation, right now that long group of polygons in the center of the back is going to cause problems.
For the head/face - it looks like you're straying into anime territory...? Though that's fine, I think it would be a better exercise to go for something realistic first as an anatomy study and then take the lessons learn there by applying it to a more stylized model. There's a bunch of anatomical issues going on there - which may not even be worth pointing out due to the stylization (sharp mouth, the nose is too wide, big eyes, big ears, etc.) The topology and actually modelling skills are coming along but, yeah, I'd really focus on a reference first and try to get that right...or at least obtain a reference shot that you're going for so that we have something to critique against.
Cheers!
Feedback, comments, and critiques please!
Any and all critiques are welcome!
Second note: Also if anyone could point me in the direction of a good head modeling video, please share, the tutorial I've been working this model from doesn't have the greatest head modeling section.
I notice a odd pole right below the knee caps. I'm not very familiar with body topology to make a solid comment, but I don't think that pole should exist. Forearms obviously still a work in progress, it needs some more edge loops to make things evenly distributed.
In my honest opinion, I think you're killing yourself with all this extra topology. You're definitely headed in the right direction, but I believe you can build your topology better and more simplistic.
Here are some reference images that will help you out a bit. I still have to look back at these from time to time, sometimes, because they're so fundamentally good. These images are from a fellow from Zbrush Central: Rimasson. They're really old now, but he shows great understanding of topology flow and anatomy.
http://www.zbrushcentral.com/showthread.php?22541-Female-Body-Wip-(Nudity)
Also, I studied this tutorial a ton when I was starting out modeling figures: the Joan of Arc Tutorial from Michel Rogers. Also very old, but shows a great in depth step-by-step demonstration of building even topology flow of a female figure. I hope this helps you. Cheers!
http://www.3dtotal.com/ffa/tutorials/max/joanofarc/joanmenu.php
@jmiles - Thanks for the imagery, links, and comments! I definitely did shoot myself in the foot with using a tutorial that had heavy of poly density. I plan to start another model as soon as this one is finished for more practice, and it will go after less polys for sure.
Also the topology right above the knee looks a little probalamatic...I would consider moving some of the poles to places where the form would naturally stick out or in (not a smooth area like the thigh) The same thing goes for a lot of poles that I am seeing. I would try to tuck them away in less scene areas or places where you want a dimple or a lump.
Not much else to say except to keep going
Thanks for the critiques and comments!
http://www.3dtotal.com/team/Tutorials_2/hand_modelling/hand_modelling_01.php
The female character posted by jmiles above is a perfect example. See how the quads are evenly spaced apart. If you have too many edge loops then it can create "pinching" in the geometry which can look 20 times worse when you subdivide.
Keep everything simple and if you see edge loops that are too close then move the verts or the entire edge line so it is even. It doesn't have to be perfect especially since this is your first. Just keep it in mind for the future
To be honest what you are achieving here is much better then my first attempt was lol!
Thanks Stitchshift for the advice and help!
I redid a good chunk of the body today, following the great comments and advice given.
Edit: I critiqued an earlier image you posted. The thigh's need to be fixed. I don't think you should have your topology come down and the wrap around as well.
Edit: Ahhh, okay i see what you were trying to do. Following a previous image someone posted from before.
You can simply create your blocked out version, and then create the topology you want over that. If you need to change things around, you don't have to start from square one because you still have the basic form of the blocked out model to go by.
anyway, butt loop depends on what you're gonna do later on. If it's a game rez character, you could probably do without. If it's something more, then leave it in, but you should make the loop go all the way around the upper thigh.
Keep it coming.
Here is the latest WIP (feet are completely blocked in, except I have a nasty 5 polygon on the foots bottom I'm trying to figure out how to get rid of it.)
Location of the annoying 5 polygon:
@xXavier777787: never tried the graphite modeling in max, I'll have to take a look at it now since it seems like it could aid me quite a bit. Also I hate to ask but when you say loop around the upper thigh, where at?
@kanga: Any recommendations for the sculpting app? I have Zbrush sitting on the desktop, but have yet to open it, and I here the menu/UI is a bit of a bitch to learn.
Once again thank you to everyone who made a post!
I'll post an updated photo tomorrow when I have more of the head and hands complete.
Wish I wasn't this silent but another semester has started, and I also am in the process of moving. So I worked on this head, looking to get some critiques on what to improve on, roughing in the lips have also been a pain.
One suggestion, if you're just using this as a base mesh to sculpt on then you should keep the topology much more simple than you already have it. I personally think it's just inefficient to have a complex modeled base mesh for human characters especially when you have tools like zremesher in zbrush that can give you a decent starting point to start sculpting on before you retopologize.
Doesn't seem like you plan to ZBrush this piece after, though. So, here, rough starting point for polygonal mouth modeling. If you're lucky, it will look quite alright. If not, it might look a little duck-face :P
http://www.secondpicture.com/tutorials/3d/3d_modeling_a_mouth_in_3ds_max.html
Thanks Leinad for the comment and insight! I'm in the process of learning Zbrush (watching videos to understand where everything is and such).
@PyrZern:
Yea I've been trying as much as possible to stay active, but it's quite a busy time for me right now. I was thinking of maybe messing around with this model a bit in Zbrush just to see how it all works out, but it'd be nothing major. Thanks for the pictures and references of mouth modeling, definitely seems like a good methodology.
Head is mostly done, except the left over open areas, some critiques on problematic areas would be great!
Try this one if you feel up to it
Wow the difference in structure is really evident when viewing your examples compared to mine. Definitely going to make changes over the next few days and see what works best. Many thanks!
If you are willing, remake it a few times
10.19.13: Did another face practice. Can definitely see a difference.
Comments, critiques and advice would be much appreciated from everyone!
http://www.pinterest.com/pin/472033604665384404/
There were a few more, but now I have too many stuff on my pinterest, I can't find what I am looking for anymore.
@haribol33: I've recently taken notice to this issue, thank you though for pointing it out!
@pyrzern: Thanks man for the tutorial! It was a big help for my remodel of the ear I worked on yesterday.
@jeremiah_bigley: Thanks man for the comment!
12.6.13: Ear redone, but it's quite a few more polys then the hole on the side of the head.