Cloud strife-3d model

polycounter lvl 10
Been working on this for sometime.Trying out Blender for the first time and I am quite happy with the tools so far.
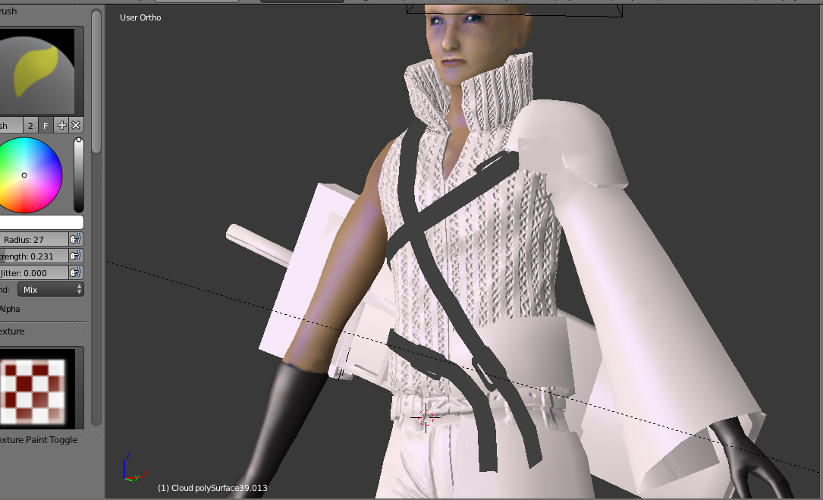
Details are bump maps painted in Blender at 1024 x 1024 px.Need to smoothen out hand cape details.
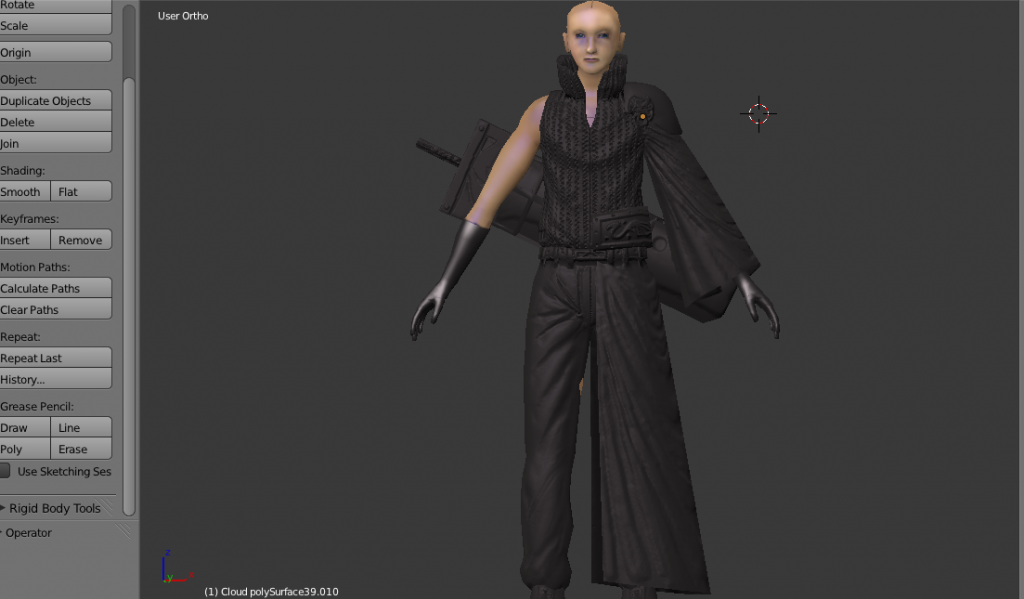
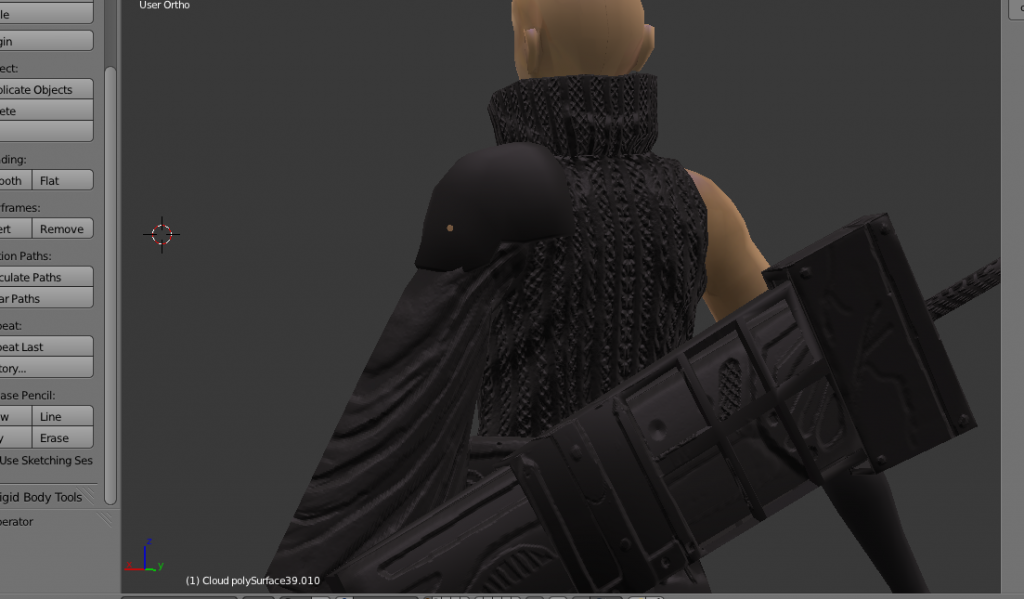
The model is gonna be animated in Blender(testing animation tools and workflow as well).Currently working on materials.
Details are bump maps painted in Blender at 1024 x 1024 px.Need to smoothen out hand cape details.
The model is gonna be animated in Blender(testing animation tools and workflow as well).Currently working on materials.
Replies
Material definition right now is obtrusively unified. I can't tell what's hardened metal or cloth.
Update-
Screengrab of Cloud strife using Blender.I have to repaint some bump maps details.I think I captured his likeness.Still working on the hair,need to add more clumps and refine the textures.Its looking really off.Painted the bump maps in Blender and converted them to normal maps in Blender.
Last part. What weapon are you trying to make. Cause i doesn't look (yet) like the buster, fusion or tsurugi right now. If you want the fusion as a whole look here for some good referense and background on it.
Also for the scabbard/holster i made a fast screenshot of what it looks like up close. Might help a bit with modeling it http://img10.imageshack.us/img10/538/ff7acscreencap.jpg
Any huge FF fan especially 7 so i do hope it works out the way you want and hope it. Sorry if i come on a bit strong. Didn't know what you where looking for so just dropped all i was thinking. It's a great start imho i'd just change the things i mentioned.
@HardBaller
Thanks for providing the links and pointing out some issues with the model.The model is intended for an animation project in order to familiarise myself with Blender.I am really not going for exactly the original design.Getting the likeness of his facial features is my main goal.I will adjust his arm cape to cover his hands.Fix the shoulder thingy and belts.
I still need to recreate other models,,including a summon from the original game,environment as well.I need to finish this model and move on to the other ones.Of course,to an acceptable level where the model looks good.
Really digging the realtime shadows and lighting in Blender game engine.Tried using Maya viewport 2.0.Didn't look this good and viewport lag was terrible.Blender on the other hand runs smoothly.I am a little worried about how realtime softbodies works in Blender especially if used for the hair and capes.Physx(apex cloth) in Maya was top notch.Loved the workflow.
Repainted the normal map for the hair,finished rigging and posed the character.
I am also surprised Blender has heat map skining since 2010.Didn't need to raise his arms.Just painted a few skin weights here and there and the mesh has good deformations.Maya just added heat map skinning last year.
As for rigging,Blender has an autorig feature for moving a string of bones on the fly.It can be turned on or off.Very good for posing spines,or hair movement during animation.Also u can disable the inherit rotation of a child bone to keep it in place when moving ik handles around.Very good for feet and hands.
Working on environments now.Everything is realtime using Blenders game engine.Also painted normal maps in blender.
Gonna model more assets to fill the room.
Tried to see if I could get better graphics using Maya viewport 2.0.Exported to Maya-
Struggled with the lighting and shadows.For some reason,the model looks different.I think I read somewhere Blender bakes normal map differently from how Maya reads normal maps.Maybe thats why it looks off.I am having a tough time getting the shadows on the character right.If I turn screen space occulsion,the viewport lags and I get a memory warning.Blender's viewport on the otherhand works flawlessly.
What's your plan for the environment? Are you thinking about sticking to how you've made your tiling walls?
No laid out plans yet.I am currently modeling some chains,pipes,rails,beams might throw in some engines thingy.I will come up with more assets as I fill the room.
The first three images are the latest updates.All rendered in realtime using Blender's game engine.All normal maps were painted in Blender.All environment assets were all modeled and textured in Blender.I am yet to rig Lightning farron's model.
I think I am gonna model some assets for the floor.I think only the walls should have those designs.
I wonder why most studios are using an app that cost so much money and still have to create plugins and tools around it while there is an app that is open source and has far more better tools imo.I have been using it so far and its been really great.Is there some sort of shame in being associated with open source?Because Blender is really good and I am kinda surprised it is cause when I switched I expected it to fall short of the commercial ones but its on the same level maybe better as its integrated meaning u don't have to export and import all the time.U get to do everything in one app which is more convienent and faster(import..export issues/errors completely eliminated).Whereas AutoDesk will continue to scatter features about and release 2 or 1 useful tools per version.
I think you should narrow yourself down a bit. Please don't be offended by this, but it feels like you're kind of just started out and there is a lot of improvement to be made. I think you would benefit from picking one category to start out with (character, environment or props) and focus on working on just one thing at a time to get it as good as possible. Maybe just start out with doing a head sculpt of Cloud and really spend a lot of time on it. Study references from real life and think of how you would apply them to the style you're going for.
I am always drawing on my sketch pad using references from photos hoping to get better.I modeled everything by hand(no sculpting).The normal map details were actually bump maps painted by hand and then baked to normal maps.
Toned down the lighting and tweaked the materials.
Tweaked his face using Blender's sculpting tools.Not as good as I would want but definitely better than how he looked before.Fun fact is u can sculpt and move vertices around after rigging in Blender and everything deforms fine after.
Yep,they don't like each other.
Finally rigged lightning with just automatic weights method(heat map skinning),still need to paint additional skin weights on them to get better deforms.I will be using Blender's cloth to simulate the clothes.Have to model and rig some scary enemy robots and then create the summons.
Switched back to Maya.Encountered really difficult technical animation/rigging problems using Blender and some of its addons.Also animating the characters has been really tasking especially getting facial emotions/lip synching right.I have put this project on hold for now.
3D is usually problematic especially when it comes to animating characters,their emotions,expressions,hair and clothes(yep..even simulations doesn't help matters).For these things to be believable or look good,a lot goes into the rigging,technical stuff.Most times these projects usually have a hair,cloth,lip synching,motion capture,rigging team.Not to mention the high specs of cpu required for simulations.
So if I am going to animate characters.Its going to be in 2d with 3d environments.That way I get things done faster.Like someone suggested,pick an area like environments,props,character and perfect ur skills in that area.
So when it comes to 3d it will environments or animations showing environments from now on.No characters,tedious rigging or complex animations.
Will start a new environment project as soon as possible.Thanks.
[ame="