[UDK] Warhammer Chaos Diorama Scene
Hello There!
I've been tasked with recreating a warhammer universe environment, with strong consideration for wear and tear, and i settled on this "Arcane Ruins" diorama from the games-workshop website:

Theres plenty of bullet riddled wear and tear here, and broken pillars etc, also appears highly modular which works nicely for my engine of choice.
The assignment focuses on the use of Zbrush, so i went ahead and did some research into the sort of art style i want to improve / develop
My sculpting style and tool pallete is derived from the techniques of artists such as Konrad Beerbaum, Ben Lewis, Steven Skidmore, and Adam Pitts of Vigil Games/Darksiders 2:
Polycount Darksiders
Zbrush Central Darksiders
This tool shelf shared by Ben Lewis on the zbrush central thread show some tools that im already familiar with for stylised hardsurface/stone deformation:

There are some custom brushes for cracks (which closely follow dam standard and slash 3 brush strokes using unique alphas and modifier settings) and for slashes on the surface using drag Rect brush mode. There is also a crumple brush used to suggest wear and tear on the surfaces.
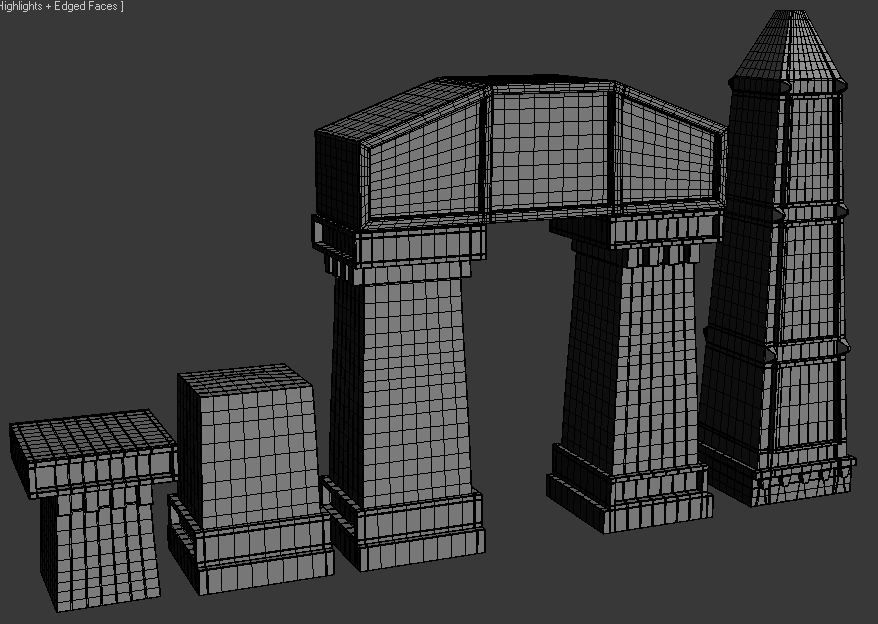
Heres some progress ive made blocking out / edge controlling my meshes ready for zbrush:
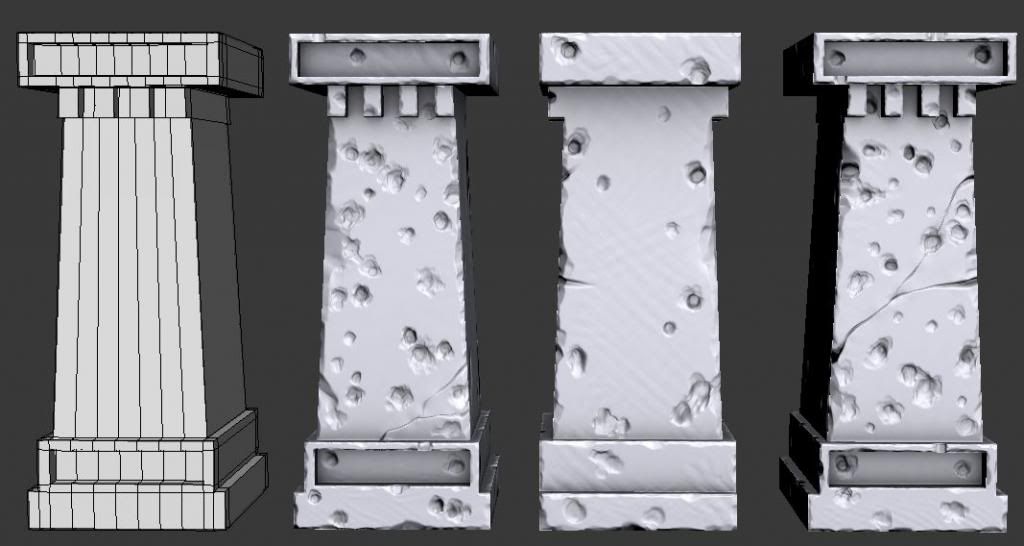
And heres my first sculpt / bake:
Ill keep this thread updated throughout the week, today i aim to complete the broken pillar, the spire and the top bar. March 1st requirements include all (10) Assets sculpted and baked (10 high / low resolution meshes) so time to crack on!
Critique and suggestions for making this scene awesome are always loved and appreciated =]
I've been tasked with recreating a warhammer universe environment, with strong consideration for wear and tear, and i settled on this "Arcane Ruins" diorama from the games-workshop website:
Theres plenty of bullet riddled wear and tear here, and broken pillars etc, also appears highly modular which works nicely for my engine of choice.
The assignment focuses on the use of Zbrush, so i went ahead and did some research into the sort of art style i want to improve / develop
My sculpting style and tool pallete is derived from the techniques of artists such as Konrad Beerbaum, Ben Lewis, Steven Skidmore, and Adam Pitts of Vigil Games/Darksiders 2:
Polycount Darksiders
Zbrush Central Darksiders
This tool shelf shared by Ben Lewis on the zbrush central thread show some tools that im already familiar with for stylised hardsurface/stone deformation:
There are some custom brushes for cracks (which closely follow dam standard and slash 3 brush strokes using unique alphas and modifier settings) and for slashes on the surface using drag Rect brush mode. There is also a crumple brush used to suggest wear and tear on the surfaces.
Heres some progress ive made blocking out / edge controlling my meshes ready for zbrush:
And heres my first sculpt / bake:
Ill keep this thread updated throughout the week, today i aim to complete the broken pillar, the spire and the top bar. March 1st requirements include all (10) Assets sculpted and baked (10 high / low resolution meshes) so time to crack on!
Critique and suggestions for making this scene awesome are always loved and appreciated =]
Replies
Does your assignment include marking for your low poly mesh itself or is it purely the bake? If it involves the mesh you might want to see if you can get rid of some polys from the low, it looks like there are some wasted. I can see two sections of the stone where I would expect to see a divide between two different stones (at the front of the base and near the top of the side profile). I know its not on the reference model but it might be worth discussing it with your tutor, it all depends if your supposed to follow the reference exactly or not but you might even get extra marks for correcting an error in the concept!
Good luck with the assignment, I'm especially looking forward to seeing you tackle the skulls, those seem to be a key piece to this.
I get marked on the 1st of march for the sculpting progress, the normal mapping bake result, and the low poly mesh, i see what you mean with the wasted geometry there are alot of edges thanks to the square teeth like parts at the top which i can weld together towards the base =]
and i think i know what your saying about the difference in stone types, the base and top parts look like the might be slabs, i think i can get the difference visible in the diffuse with different toned stone maybe?
Heres some more progress i did today:
I look forward to making the skulls too, i have a good friend on a group project im working on that has made some great skulls, i textured them using the same technique i use here and the edge highlights and AO work really well, just need to get some tips from him and any one else willing into creating stylised skulls
ive got another reference for the skulls that i might use aswell:
It removes the horns in place of just hard edged skulls, which if im aiming for 40k might make more sense, less horns, more bolters!
Thanks for the crits and vote of confidence =D
okay, a standard bolter round is 0.75 cal, which is huge. they also differ from bullets we see today, in that they have a diamantine (obviously fictional) tip (powerful enough to penetrate power armour), and an explosive internal system designed so that when the bullet hits something, whatever that thing is can't get up.
they also have a rocket propulsion system... apparently the way they work is that like a standard bullet, they have a very small amount of primary fuel or powder designed to force the bolt out of the barrel, immediately after leaving the chamber the secondary fuel ignites and sends the bolt forward with no loss of momentum.
bear this in mind when working out your damage. there wouldn't be small dings and holes, there would be very little left of a pillar that's been hit by more than a couple of bolter rounds.
heavy bolters use 1.0 cal bolts btw.
Ill get on with some epicly damaged assets in this case, explode on impact xD this pillar would probably be floored!
thanks again, interesting details =]
Every hole is drybrushed aswell
The scene is in engine now, nice modularity and some lighting issues, a unique lightmap will be made for the whole scene once ive decided composition and export all the meshes etc, probably make an atlas aswell, the scene needs alot more colour variation, so im going to set it at night and have some colours from the lights etc, fire would be a good idea i assume.
Also i need to make skulls, for piles and to decorate the pillars and spire, its a bland scene as it stands, but the meshes have done their job of fleshing the area out.
Also i need to make a tileable for the floors, as im currently using many many many small slabs lol, i can create one in max using the HP sculpts i imported for baking, straight to a plane.
Anyway heres some engine shots:
Any crits and ideas to spruce it up are grand ^_^
Another pass on the texture would improve these models a lot.
Broken Pillar Top and Bottom:
Pillar:
Flagstones / Tileable Floor Prep:
Spire:
Steps:
TopBar1:
TopBar2:
Trims:
All The normals (except the flagstones and trims) are baked at 2048 (1024 otherwise)
The "trims" are used to create the heightened areas by created an edge of larger stone pieces!
[ame="
Someone mentioned shading groups might be my problem, and im using UVW lightmap co-ords from my base unwrap, because there were no overlapping UVs, but still, very sketchy
Ill be combining meshes once i decide on a composition, i was thinking that setting it outdoors requires creating the illusion of an open space, with very few assets that might be a problem, also i fancy lighting it at night with flmaing torches and lightshafts, something like the temple feeling from AVP:
edit:
Also i dont know why the hell i didnt use edge padding lol, its automatic with xNormal and i just forgot to do it this time round, the steps are damn uglay!
You made some error in your baking.
You need to make your custom normal (with the edit normal in modifier list)
http://i158.photobucket.com/albums/t105/rf_/trims_NORMS.jpg Here, you are in hard edge
http://i158.photobucket.com/albums/t105/rf_/flagstones_LP.jpg Here, you are in soften edge
It's important to have a good custom normal for the shading and for a credible baking.
I thing you need to flip your Y channel too.
also, im unsure what you mean by custom normals using edit normal modifier, ive never encountered that before, im guessing it will require some knowledge of settings, what does it do and why would i use it? is it for the low poly? thanks for the tips =]
Luckily i use a master photoshop file that holds all my normals and spec and diffuse layers for each mesh, so itll be a quick edit then some smoothing group errors need to be fixed, ill update over the month, other projects need some tlc atm!
Sorry for the incredibly bad quality of this video, it "says" its in 720p, with the option in the player too, ill see what i can do!
also, screenshots:
As usual the images dont upload full size so here is a rar, i also thought you might want the UDK content files and the map too seeing as the video is a bit naff! =]
https://dl.dropboxusercontent.com/u/64996810/Zbrush_fw002190.zip
[ame="
also a higher res video:
[ame="
thanks for the help previously =]
Edit, Didnt see page 2 XD. Its coming along nicely, but I think your fog is a little to strong.